Adding Options to a Combo Box Utilizing JavaScript
A JavaScript function can be employed to modify the options presented in a drop-down box on the webpage.
The subsequent example introduces a new blank selection at the top of the starthour, startminute, endhour and endminute fields at Level 2 for new records:
function clearTimes()
 {
var frm = document.forms[0];
// at Level 1 use document.form1 instead of document.forms[0]

if (frm.startdate.value=="") //this will only run if there is no startdate already saved
{
   try
   {
       frm.starthour.add(new Option("", "", true, true), frm.starthour.options[0]) //add blank option to beginning of starthour
       frm.startminute.add(new Option("", "", true, true), frm.startminute.options[0])
       frm.endhour.add(new Option("", "", true, true), frm.endhour.options[0])
       frm.endminute.add(new Option("", "", true, true), frm.endminute.options[0])
   }
   catch(e)
   { //in IE, try the below version instead of add()
       frm.starthour.add(new Option("", "", true, true), 0) //add blank option to beginning of starthour
       frm.startminute.add(new Option("", "", true, true), 0)
       frm.endhour.add(new Option("", "", true, true), 0)
       frm.endminute.add(new Option("", "", true, true), 0)
   }
}
}
clearTimes();
The available options are:
document.forms[0].starthour.add(new Option(Display text, Store value, defaultSelected, selected), document.forms[0].starthour.options[0])
Note: the same syntax can be applied at Level 1, substituting document.forms[0] with document.form1
Incorporating a Button that Executes a JavaScript
To include a button on the page that executes a custom Browser Script, employ the following method:
1) Create a Display Only - Text or System Object or Read Only – System Variables Custom Field. In the Text/Link: section, incorporate the following:
<input type="button" class=Button value="Button Label" onClick='runThisScript()'/>
where:
- Button Label is the label you wish to display on the button
and
- runThisScript() is the function you have defined separately within a Browser Script (step 2).
2) Create a Browser Script Custom Field that encompasses the JavaScript function you intend to execute upon clicking the button:
function runThisScript()
{
// enter the intended script functionality here
}
Adding a Specified Number of Days to a Date Based on Dropdown Value
Problem
A date must be presented that reflects a number of business days following a date indicated in an existing field. The quantity of days to be added will vary according to the value of a dropdown field located elsewhere on the page.
Solution
Establish a Special – Calculated Value custom field with expressions equivalent to the following:
Where the date to which days are to be added is a custom field with a Custom Field ID of 12345 and the dropdown list is titled Client Category
[Client Category]=='Regular'?busdateadd(frm.cf_12345.value,10):[Client Category]=='Under Investigation'?busdateadd(frm.cf_12345.value,5):[Client Category]=='Special'?busdateadd(frm.cf_12345.value,30):'0000-00-00'
Where the date to which days are to be added is the standard field "Start Date" and the dropdown list is Time Line
[Time Line]=='Regular'?busdateadd(frm.startdate.value,10):[Time Line]=='Under Investigation'?busdateadd(frm.startdate.value,5):[Time Line]=='Special'?busdateadd(frm.startdate.value,30):'0000-00-00'
The aforementioned calculations adhere to the following rules:
- If the dropdown field is designated as "Regular," the value of this field will reflect 10 business days subsequent to the specified date field
- If the dropdown field is designated as "Under Investigation," the value of this field will reflect 5 business days subsequent to the specified date field
- If the dropdown field is designated as "Special," the value of this field will reflect 30 business days subsequent to the specified date field
- If the dropdown field does not align with any of the aforementioned values, the value of this field will be '0000-00-00'
Incorporating JavaScript JS Files into Web Page View Pages
To integrate JavaScript JS files within a Web Page View custom field, the following method must be employed.
<script language="JavaScript">
function include_dom(script_filename) {
    var html_doc = document.getElementsByTagName('head').item(0);
    var js = document.createElement('script');
    js.setAttribute('language', 'javascript');
    js.setAttribute('type', 'text/javascript');
    js.setAttribute('src', script_filename);
    html_doc.appendChild(js);
    return false;
}
function includejsfiles() {
  include_dom("/validate.js");
  include_dom("/anotherfile.js");
}
</script>
Additionally, you must invoke the includejsfiles function in the body onload of the Web Page View:
<body onload="includejsfiles();">
Explanation
JavaScript JS files can be added to Browser Script custom fields or on template pages, sign-up pages, etc., using the following syntax:
<SCRIPT type="text/javascript" language=JavaScript src="/validate.js"></SCRIPT>
Utilizing this method on Web Page View custom fields may result in page crashes in certain browsers, particularly Internet Explorer. Consequently, the includejsfiles method outlined above must be utilized for Web Page Views.
Important
- The includejsfiles method must be invoked onload. Attempting to call it prior to the complete page load may cause some browsers to freeze.
Restricting Selections to One Check Box
To prevent a user from selecting more than one check box for the associated Custom Field, incorporate the following code into the HTML Tag section of the Custom Field:
onclick="onlyonechecked(this)"
NOTE: It is generally preferable to utilize a Combo Box custom field with the Show as Radio Buttons option selected
This can be applied for:
- Select Many - Check Box
The user will be restricted from selecting more than one check box with this code in place.
For a Select One - Combo Box field, the "Show as Radio Buttons" option may be selected to display the field selections as "radio buttons."
Note
- If employing onlyonechecked on a Select Many - Check Box field and you also wish to Show/Hide Header, you should utilize _showhideheader instead of _showhideheadercheckbox
Calculated Value - busdateadd Function
The JavaScript "busdateadd" function adds a specified number of business days to a given date.
- Syntax: busdateadd(datefield, business days to be added)
- datefield may represent a Standard Field or a Custom Field
- It excludes Saturday and Sunday, as well as Canadian public holidays (not banking holidays).
- This is not associated with any SmartSimple calendar.
Impact: This facilitates a calculation in a custom field based on business days rather than actual days.
Example: Suppose the field frm.startdate.value = 07/11/2008, Friday
busdateadd(frm.startdate.value,1)
returns 10/11/2008, Monday
frm.startdate is a standard field. To perform calculations using a Custom Field, use frm.cf_fieldid.value.
Calculating Age from Date of Birth
There exists a system function known as calage which can be utilized to calculate the current age when provided with the Date of Birth:
To display the current age, you should create a Calculated Value Custom Field with the following expression:
calage([date of birth])
where date of birth denotes the name of the field containing the date. It must be present and visible on the current page for this function to operate.
To display the number of years and months between the current date and the date included in the function as a floating point, create a Calculated Value Custom Field with the following expression:
calage([date of birth],1)
To display the number of years and months between the current date and the date included in the function as the string "X years and Y months," create a Calculated Value Custom Field with the following expression:
calage([date of birth],2)
Calculating GST Function
You can automatically ascertain whether GST should be calculated on an item and compute the GST by utilizing the following technique:
This example presumes you are integrating this functionality at a UTA level and involves three existing custom fields:
- total - a text box designated to store the amount and
- GST - a select one combo box indicating whether the item should include GST.
1. Establish an additional custom field - Calculate GST as a Special - Browser Script type field.
2. Incorporate the following expression into that field.
function calculategst(amount,gst) {if (gst=='Yes') return parseFloat(amount*0.06).toFixed(2); else return parseFloat(0).toFixed(2);}
This function - calculategst can be invoked from any field, although the Calculate GST field itself will not be displayed.
3. Create a calculated field to retain the calculated value.
4. Append the following expression to that field.
calculategst([Total],[GST])
This expression invokes the calculategst function and transmits the total and GST values. If GST is applicable, the value is calculated and returned (to two decimal places); otherwise, 0.00 is returned.
Change Owner Script
Utilize this browser script to designate the owner to the individual editing the level one based on the status.
 function changeOwner(){
 var frm=document.form1;
 if (frm.stageid.value=='1829')
   {
      frm.ownerid.value=@me.userid@;
   }
 }
 changeOwner();
In this instance, the 'stageid' denotes the status, specifically the 'web' status. It subsequently alters the ownerid to reflect the current individual making the edits. The owner id may be hard-coded to represent a constant contact by employing 'frm.ownerid.value=userid', where userid='actual userid' for the user.
Transforming Text to Uppercase or Lowercase
You can modify the case of the text entered in a custom field by implementing this code in the HTML Tag box within the custom field settings.
To convert entered text to Uppercase
onChange="this.value=this.value.toUpperCase();"
To convert entered text to Lowercase
onChange="this.value=this.value.toLowerCase();"
The code is executed immediately once the user inputs a value and clicks outside the field (even without the necessity to hit SAVE).
Alternatively, you may utilize onBlur instead of onChange.
onblur="this.value=this.value.toUpperCase()"
- onBlur activates when the focus shifts away from the current field.
- onChange activates when the content of the field has been modified.
Modifying the Default End Date
By default, within the Universal Tracking Application, the end date for a level 1 item is established as the start date. In numerous scenarios, you may wish to exert control over the level 1 end date.
The following method can be employed for UTA level 1:
1. Introduce a new custom field to the UTA custom field list.
2. Set the field type to Special - Browser Script.
This field type is not displayed on the page; however, the associated script will be integrated into the webpage and can be invoked and executed.
3. Insert the following JavaScript into the JavaScript window.
 function changeEndDate() {
   var frm=document.form1;
   if (frm.opportunityid.value==0)
     frm.enddate.value=''
    }
    changeEndDate();
- This function examines the opportunityid value, which is set to 0 for a Level 1 Entity prior to being saved.
- If the Level 1 Entity is new (value == 0), then the end date value is rendered blank.
- The function is invoked in the final line of the script.
- This approach may also be utilized to set the end date to, for instance, the start date + 60 days or to adjust other field values.
For UTA level 2, employ this code to clear the Start date:
function changeStartDate() {
   var frm=document.frmevent;
   if (frm.eventid.value==0)
     frm.startdate.value=''
    }
    changeStartDate();
For UTA level 3, utilize this code to clear the End date:
function changeEndDate() {
   var frm=document.frmevent;
   if (frm.eventid.value==0)
     frm.enddate.value=''
    }
    changeEndDate();
Altering the Status from a Web Page View
You can modify the status of the associated item on a Web Page View utilizing the following script:
At Level 1:
document.getElementById("obj.fd_stageid").value = "8885"; At Level 2:
document.getElementById("obj.fd_statusid").value = "8885";Here, 8885 is the ID associated with the status you wish to select.
Adding Options to a Combo Box Using JavaScript
A JavaScript function can be employed to modify the options available in a dropdown box on the page.
The following example adds a new blank selection at the top of the starthour, startminute, endhour and endminute fields at Level 2 for new records:
function clearTimes()
 {
var frm = document.forms[0];
// at Level 1 use document.form1 instead of document.forms[0]

if (frm.startdate.value=="") //this will only run if there is not startdate already saved
{
   try
   {
       frm.starthour.add(new Option("", "", true, true), frm.starthour.options[0]) //add blank option to beginning of starthour
       frm.startminute.add(new Option("", "", true, true), frm.startminute.options[0])
       frm.endhour.add(new Option("", "", true, true), frm.endhour.options[0])
       frm.endminute.add(new Option("", "", true, true), frm.endminute.options[0])
   }
   catch(e)
   { //in IE, attempt the alternative version instead of add()
       frm.starthour.add(new Option("", "", true, true), 0) //add blank option to beginning of starthour
       frm.startminute.add(new Option("", "", true, true), 0)
       frm.endhour.add(new Option("", "", true, true), 0)
       frm.endminute.add(new Option("", "", true, true), 0)
   }
}
}
clearTimes();
The options available are:
document.forms[0].starthour.add(new Option(Display text, Store value, defaultSelected, selected), document.forms[0].starthour.options[0])
Note: the same syntax can be applied at Level 1, replacing document.forms[0] with document.form1.
Regulating the Submit Button within a UTA Level 1 Template
It is occasionally necessary to control the role of the user that can submit a level 1 template by role while simultaneously permitting other users to save the template without the ability to submit it.
This effect can be achieved through the following method.
1. If present, remove @SYSTEMBUTTONS@ from the template page.
2. Insert the JavaScript displayed below into the template page - below the reference to the application fields (@appfields@).
This code will require modification to align with the specific roles you intend to manage.
@APPFIELDS@
<center>
<!-- show and hide button-->
//If Save Draft is required then add this line
<input type=submit id=savedraftbutton value='Save Draft' onClick="this.form.butaction.value=1;" class=Button>

<script language='javascript'>
//Control the display of the Submit and Save buttons
//Assume three role IDs - Role1=5659, Role2=5036 and Role3=3291 - all three roles can save but only 5659 can submit
//System or UTA level roles can be employed to control the display of the buttons in this case UTA roles are utilized

var m_sysaroleids="@SYSROLEIDS@"; //Initialize user system roles variable to user's system roles
var m_utaroleids="@UTAROLEIDS@"; //Initialize user UTA roles variable to user's UTA roles
var m_showsave=true; //Initialize Show Save variable to True
var m_showsubmit=false; //Initialize Show Submit variable to False
var subpage="ex_apppage_save.jsp";  //Initialize the form action page

//If user belongs to any of the three UTA roles then set Show Save variable to true
if(m_utaroleids.indexOf(',5659,')>-1||m_utaroleids.indexOf(',5036,')>-1||m_utaroleids.indexOf(',3291,')>-1)
    m_showsave=true;

//if user is in the UTA role ID 5659 set Show Submit variable to true
if(m_utaroleids.indexOf(',5659,')>-1)
    m_showsubmit=true;

//Display the Save button if Show Save variable is set to true
if(m_showsave)
   document.write("<input type=submit id=savebutton value='Save' onClick='this.form.butaction.value=0;' class=Button> ");

//Display the Submit button if Show Submit variable is set to true
if(m_showsubmit)
 document.write("<input type=submit id=submitbutton value='Submit EOI'  onClick='this.form.butaction.value=2;this.form.action=subpage' class=Button> ");
document.close();
</script>

<!-- End ---->
Generating PDF Documents with JavaScript
Numerous SmartSimple components can be effortlessly converted to PDF utilizing baseline functionality such as the Web Page View Field.
It is also feasible to generate PDF documents from any HTML encoded text. For instance:
- Reports
- Web Page View Field if you wish to manipulate the HTML using JavaScript prior to generating the PDF. (Utilizing the standard feature to convert Web Page View into a PDF will render using the initial HTML and not the HTML after being manipulated by JavaScript)
This is accomplished by submitting a form containing an input named "txt" to the SmartSimple pdfWriter page.
Note: the use of these techniques necessitates knowledge of HTML and JavaScript
To convert a report to PDF, you may add the following code to the Header of the Report Template:
<div style="pd4ml-display:none">
<form name="CreatePDF" action="/pdfWriter" method="POST">
    <input type="hidden" id="PDFcontent" name="txt"/>
    <input type=submit class="Button" value="Create PDF" onclick="this.form.txt.value=document.getElementsByTagName('HTML')[0].outerHTML;">
</form>
</div>
Notes:
- If the report is rebuilt, the code will be removed from the Header and will need to be re-added.
- style="pd4ml-display:none" is included to prevent the content within that "div" from being included in the PDF. Refer to PDF Writer Custom Tags for additional information.
- If the report spans multiple pages, only the visible page will be converted to PDF. You can click Show All to create a PDF of the entire report.
To convert a report to PDF, you may utilize the following code as the body of the Report Template:
<html>
<body>

<div style="pd4ml-display:none">
@navbar@
<form name="CreatePDF" action="/pdfWriter" method="POST">
    <input type="hidden" id="PDFcontent" name="txt" value="" style="width:0px; display:none"/>
    <input type=submit class="Button" value="Create PDF" onclick="this.form.txt.value=document.getElementsByTagName('HTML')[0].outerHTML;">
</form>
</div>

<table>
@rows@
</table>

</body>
</html>
This technique can be employed to generate a single PDF document that encompasses multiple records, akin to a Mail Merge. For instance, if you wish to create a one-page Executive Summary of all the Level 1 records that you possess at a specific status such as Under Review.
- On the Level 1 Record, create a Read Only System Variable custom field with HTML containing the information you wish to display, formatted as desired. Note: the contents of this field would resemble the contents of a Web Page View field, but only the contents within the body tag.
- The role permissions for this field can be set to Deny Role Access as you do not wish it to be visible when viewing the actual Level 1 record (although you may want to make it visible temporarily while configuring the field for testing purposes).
- Create a report that is filtered for the desired Level 1 records. The only field that should be visible in the report is the Read Only System Variable field created above.
- Utilize the technique described above to convert the report into a PDF. If you desire each Level 1 record to be on a separate page of the PDF, you can incorporate the following HTML into the Rows of the report: <pd4ml:page.break/>
Custom Defined Holidays
Rather than relying on the pre-defined holidays within SmartSimple , users have the option to specify custom dates that should be recognized as holidays.
- This feature is applicable when utilizing the busdateadd() or isHoliday() functions.
- The ssvar_holidays variable can be employed to supersede the system-defined holiday dates for the record currently being edited.
- The ssvar_holidays variable must be incorporated within a Browser Script custom field at the same level as the busdateadd() or isHoliday() function.
Example
ssvar_holidays=",2011-01-01,2011-02-16,2011-04-10,2011-05-18,2011-07-01,2011-08-03,
2011-09-07,2011-10-12,2011-12-25,2011-12-26,2011-12-28,2012-01-01,2012-04-02,2012-05-24,
2012-07-01,2012-08-02,2012-09-06,2012-10-11,2012-12-27,2012-12-28,";
IsHoliday()
To deduct business days from a specified date, the following code may be utilized in a Special Browser script field, which will update a Calculated Value Custom Field with the new date.
Within the Special Browser script field, you will define the function that subtracts a specified number of days from a given date.
function bus_date_subtract()
{
  var frm=document.form1;  // or document.frmevent at Level 2 or 3
  var formatstr="dd/mm/yyyy";
  var start=ConvertDateStr(frm.startdate.value,formatstr);
  var sub=-5;
  for(i=-1;i>sub;i--)
  {
    var cdate=dateadd(start,'D',i);
    var cdatetemp=new Date();
    var cdatearr=cdate.split("-");
    cdatetemp.setFullYear(parseInt(cdatearr[0]),parseInt(cdatearr[1])-1,parseInt(cdatearr[2]));
    if(isHoliday(cdate)||cdatetemp.getDate()==0||cdatetemp.getDate()==6)sub--;
  }
document.frmevent.cf_1742956.value=cdate;
}
bus_date_subtract();
In the Expression section of the Calculated Value Custom Field , the function would be invoked as follows:
bus_date_subtract();
Note: The function definition may be modified to accept parameters (fields containing dates) that are passed at the time of invoking the function from any Calculated Value Custom Field.
Restricting Selection to a Single Check Box
To prevent a user from selecting more than one Check Box for the corresponding Custom Field, incorporate the following code into the HTML Tag section of the Custom Field:
onclick="onlyonechecked(this)"
NOTE: It is generally advisable to utilize a Combo Box custom field with Show as Radio Buttons selected
This approach is applicable for:
- Select Many - Check Box
With this code implemented, the user will be restricted to selecting only a single check box.
For a Select One - Combo Box field, the "Show as Radio Buttons" option may be selected to present the field selections as "radio buttons."
Note
- When using onlyonechecked on a Select Many - Check Box field and also wishing to Show/Hide Header , it is advisable to use _showhideheader instead of _showhideheadercheckbox
Making a Field Under a Show/Hide Header Mandatory
Problem
In scenarios where a checkbox labeled "Other" necessitates the display of a mandatory "Other Description" field upon selection, and the "Other Description" field is marked as mandatory (Allow Empty unchecked), the page will fail to save if that field is left blank, even if it is located under a show/hide header that is only visible when "Other" is selected.
Solution
Where
(a) the checkbox field contains n values, with "Other" being the nth value, and an HTML tag of onclick="_showhideheadercheckbox(12345,this,'Other');onlyonechecked(this)"
(b) the field designated as mandatory is located under a Title Bar with the custom field ID of 12345
The field intended to be mandatory should have
(c) Allow Empty unchecked and
(d) include the following in the JavaScript Validation:
!=''||!document.getElementById('cf_12345_n-1').checked
Thus, if "Other" is the 5th value in the checkbox list, n-1 = 4
Manipulating Dates
The following JavaScript functions are integrated into SmartSimple to facilitate working with and performing calculations involving dates:
ConvertDateStr
Converts a date presented in the user's preferred display format to the standard database format of yyyy-mm-dd.
Syntax:
ConvertDateStr(date,'@dateformat@')
Where:
- date refers to the date you wish to convert to the yyyy-mm-dd format.
Example:
var newDate=ConvertDateStr(frm.startdate.value,'@dateformat@');
ConvertDate
Converts a date from the standard database format of yyyy-mm-dd to the preferred display format of the current user.
Syntax:
ConvertDate(date,'@dateformat@')
Where:
- date refers to the date you wish to convert to the user's preferred display format.
Example:
var newDate=ConvertDate(sdate,'@dateformat@');
Example:
var newDate=dateadd(sdate,'m',duration);
Example
The following example adds a specified number of months (stored in cf_123456) to the startdate and saves it as the enddate.
var sdate=ConvertDateStr(frm.startdate.value,'@dateformat@');
var duration=parseInt(parseFloat(frm.cf_123456.value));
if(isNaN(duration)){
   alert("Invalid Duration provided");
   return;
   }
var edate=dateadd(sdate,'m',duration);
frm.enddate.value=ssConvertDate(edate,"@dateformat@");
Notes
- When utilizing JavaScript to populate a date, it must be entered in the preferred date format of the current user, as the system will automatically convert it to yyyy-mm-dd upon saving the page.
- To alter the display format of dates shown on the page, refer to sscalculation
Obtaining Server Date and Time
JavaScript Method
The variable method will retrieve the date and time from the server at the moment the page loads. If it is desired to obtain the server date and time at the point when the form is submitted, this can be accomplished using JavaScript.
- Note: When enforcing submission deadlines for security reasons, it is advisable to use Submit Logic, although it can be complemented with one of the methods outlined on this page.
The following JavaScript command will retrieve the server date and time:
var datetime=getservertime(false,"");
The following commands can be utilized to obtain various components of the server date and time:
datetime.getfieldbyname(1,"servertime")
- returns the server time in YYYY-MM-DD HH:MM:SS
datetime.getfieldbyname(1,"year")
- returns the year of the server time
datetime.getfieldbyname(1,"month")
- returns the month of the server time
datetime.getfieldbyname(1,"day")
- returns the day of the server time
datetime.getfieldbyname(1,"hour")
- returns the hour of the server time
datetime.getfieldbyname(1,"minute")
- returns the minute of the server time
datetime.getfieldbyname(1,"second")
- returns the second of the server time
For instance, to compare the current server time against the submission deadline described above, one could utilize the following JavaScript function:
function sbfunc(){

   var rs=getservertime(false,"");
   if(rs.getfieldbyname(1,"servertime")>="@system.Submission Deadline@"){
      alert("The submission deadline of @system.Submission Deadline@ has passed. Submission is not permitted");
      return false;
   }

   return true;
}
- Note: The getservertime JavaScript function will function in the UTA Level 1, 2, and 3. In other contexts such as Web Page Views or custom fields on Contacts or Companies, it will be necessary to include the /Ajax/uta/in_uta.js JavaScript file.
- It is feasible to obtain the date and time from the client machine using JavaScript's built-in Date() function; however, utilizing the server date and time is generally preferred due to its consistency and control.
Passing Values Using Parameters
There are several techniques available for passing a value, referred to as a Parameter, from one page to another. This allows for the pre-population of form fields or the display of information on an HTML page.
Sending Page
Values can be transmitted from the initial (sending) page by constructing a link to the destination page that incorporates parameters that connect the variables to be passed. These parameters are subsequently parsed by the receiving page back into values.
Syntax:
/urltopage?var1=@variable1@&var2=@variable2@
Where:
- urltopage represents the relative URL to the destination page.
- variable1, variable2 etc. are the variable names (e.g., @firstname@).
- var1, var2 are the corresponding names for the variables.
Examples:
Portal
- Create a Portal shortcut and associate the link with that shortcut.
/urltopage?var1=@variable1@&var2=@variable2@
Button
- Create a Read Only - System Variables Custom Field with:
<input type="button" class=Button value="Button Label"
 onClick='parent.location.href="/urltopage?var1=@variable1@&var2=@variable2@"'/>
Hyperlink
- Create a Read Only - System Variables Custom Field with:
<a href="/urltopage?var1=@variable1@&var2=@variable2@">Click Here</a>
Note: User and Company variables may be utilized to pass details of the currently logged-in user and their associated company.
Receiving Page
On the receiving page, the parameters can pre-populate a form or an HTML element that exists on that page. To accomplish this, the following JavaScript functions may be employed.
Insert the following first function in the head section of the HTML document.
function getParams() {
var idx = document.URL.indexOf('?');
var params = new Array();
if (idx != -1) {
var pairs = document.URL.substring(idx+1, document.URL.length).split('&');
for (var i=0; i<pairs.length; i++) {
nameVal = pairs[i].split('=');
params[nameVal[0]] = nameVal[1];
   }
}
return params;
}
params = getParams();
Insert one of the following second functions within the body, just prior to the closing body tag (</body>).
Form Field Population
<script>

var para1=document.getElementById('field1');
var para2=document.getElementById('field2');

para1.value = unescape(params["var1"]);
para2.value = unescape(params["var2"]);


</script>
HTML Element Population (e.g., <div>, <span>)
<script>

var para1=document.getElementById('element1');
var para2=document.getElementById('element2');

para1.value = unescape(params["var1"]);
para2.value = unescape(params["var2"]);

</script>
Replace "field1" or "element1" etc. with the actual form or element ID name and "var1" with the parameter name.
For example:
var para1=document.getElementById('firstname');
<input type="text" value="" id="firstname">
or
var para1=document.getElementById('firstname');
<div id="firstname"></div>
SmartSimple will substitute the variable references (@lastname@, etc.) with values obtained from the current user session.
Using a Check Box to Execute JavaScript
A Check Box Custom Field can be employed to execute JavaScript, allowing the check box to function similarly to a button on the page that triggers the script. This is accomplished through a combination of the HTML Tag and a browser script to create the action event. One of the lines in the script can also deselect the check box.
In the HTML Tag field of the Check Box Custom Field, you would include an OnClick event:
onclick="runthis()"
Then, in the browser script Custom Field, you would define the JavaScript function:
function runthis()
{
--enter whatever the script should do here--
document.frmevent.cf_123456[1].checked=false;
}
where "123456" is the field ID of the Check Box.
- The document.frmevent.cf_123456[1].checked=false line deselects the check box if you wish to have the check box behave like a button.
Note:
- At Level 1 use document.form1 instead of document.frmevent
- On a tab, use document.frmedit instead of document.frmevent
Removing Options from a Check Box Using JavaScript
A JavaScript function can be utilized to modify the options available in a pull-down box on the page.
Removing One or More Options
Example 1,
The following example removes two different Types available for new Level 2 records (useful if you need to define complex criteria for what types of Level 2 records can be created):
function RemoveTypes(){
var i=0;
var frm = document.frmevent;
// at Level 1 use document.form1 instead of document.frmevent

if (frm.eventid.value==0)
// Note: this loop starts at the bottom to avoid skipping any due to re-indexing as they are removed.
for (i=frm.eventtype.options.length-1;i>=0;i--)
{
   if (frm.eventtype.options[i].text=='FirstType' || frm.eventtype.options[i].text=='SecondType')
      frm.eventtype.options[i]=null;
}
}
}
RemoveTypes();
Example 2,
The following example removes a Branch from Level 1 in the Branch drop-down list.
function RemoveBranches()
{
var i=0;
var frm=document.form1;
// Note: this loop starts at the bottom to avoid skipping any due to re-indexing as they are removed.
for(i=3;i>=0;i--)
{
   if (frm.branchid.options[i].value=='448060')
//448060 is a Branch id
        frm.branchid.remove(i);
}
}
RemoveBranches();
Example 3,
The following example also removes Branches from Level 1 in the Branch drop-down list.
function RemoveBranches()
{
	var i=0;
	var frm=document.form1;
	if(frm){
		// Note: this loop starts at the bottom to avoid skipping any due to re-indexing as they are removed.
		for(i=(frm.branchid.options.length-1);i>=0;i--){
			if (frm.branchid.options[i].value!=1111 && frm.branchid.options[i].value!=2222 && frm.branchid.options[i].value!=3333 &&frm.branchid.options[i].value!=4444){
				frm.branchid.remove(i);
			}
		}
	}
}
RemoveBranches();
If you wish to manage this by role (for instance, if you want a role to have the ability to view existing Level 2 records of a specified Type, but not create them...)
Please include the following in the variable section at the beginning of the script:
var myrolelist="@me.rolelist@";
Additionally, replace or include the following in the conditional logic section:
if (myrolelist.indexOf(",1234,")>=0)
It is important to test for greater than or equal to 0. If the role is the first listed in the user's role list, it will return a 0 rather than a 1 due to the preceding comma.
To Remove All Options Except the Selected
- The following script will prevent users from altering the Level 2 Type once the record has been saved:
// For existing Types, remove all options from the Type field (except the selected) to prevent changes
if (frm.eventid.value!=0)
{
	for (i=frm.eventtype.options.length-1;i>=0;i--)
	{
		if (frm.eventtype.options[i].value!=frm.eventtype.value)
			frm.eventtype.options[i]=null;
	}
}
Removing Special Characters
The following method can be employed to prevent users from entering special characters in Custom Fields. Special characters may lead to complications, particularly when the data is exported to other applications.
For instance, if you intend to export the data to Microsoft Excel, any text fields containing ampersands (&) or quotation marks (" or ') frequently result in formatting issues for Excel.
Procedure:
Incorporate the following code into the HTML Tag box of the custom field you wish to restrict:
onchange="this.value=this.value.replace(/[Search Expression]/flag,' New String ');"
where
- Search Expression specifies a string value to locate.
- New String specifies the replacement string.
- flag is a command line switch utilized to control the outcome of the replace operation.
If you desire the replacement to occur actively while the user is typing into the field, utilize onKeyup instead of onChange.
Options
For Search Expression, you may use
- \W = Matches any character that is not a character from the basic Latin alphabet, an integer, or the underscore.
- \w = Matches any alphanumeric character from the basic Latin alphabet, including the underscore. Equivalent to [A-Za-z0-9_]
- \D = Matches any character that is not an integer.
- \d = Matches all integers. Equivalent to [0-9]
- \0 = NULL character
- \s = Matches a single whitespace character
- [xyz]= A character set. Matches any one of the enclosed characters. You can specify a range of characters by using a hyphen.
For example, [abcd] is equivalent to [a-d]. They match the 'b' in "brisket" and the 'c' in "ache".
- Any individual character can be specified within the square brackets except double quote " which has a special meaning.
- If you wish to include the backslash \ or closing square bracket ] you must precede them with a backslash (the initial backslash instructs the system to read the next character without interpreting it. Refer to Example 2 below).
For Flag, the following options are available:
- g = global match
- i = ignore case
Using onChange will replace the characters as soon as the user clicks away from the current field, or hits Save.
Utilizing onKeyup will replace the characters immediately as they are typed.
Examples
1. To eliminate all characters that are not part of the basic Latin alphabet and 0-9 (such as . , & ; : ~ ! @ # $ % ^ & * ( ) + " ' including the space key) and immediately replace them with an underscore (_):
onkeyup="this.value=this.value.replace(/[\W]/g,'_');"
2. The following code will search for # [ $ ] and \ and replace them with an underscore (_) once the user has clicked away from the field:
onchange="this.value=this.value.replace(/[#[$\]\\@]/g,'_');"
Note: if you also wish to replace double quotes, you must omit the double quotes surrounding the JavaScript statement:
onchange=javascript:this.value=this.value.replace(/['@#&"]/g,'_');
If you wish to replace double quotes with a single quote, use the following:
onkeyup=javascript:this.value=this.value.replace(/["]/g,'\'');
3. To restrict a user to only enter integers, input the following code in the HTML tag box:
onkeyup="this.value=this.value.replace(/[\D]/g,'');"
Select Check Boxes by Default
If you wish to have one or more Check Boxes selected by default, it is necessary to create a Browser Script to select the boxes.
Example: The following will check the 2nd and 4th options for Custom Field number 568279.
//This is to add the newonload function to the onload function so it runs when the page is loaded
var oldonload = window.onload;
if (typeof window.onload != 'function')window.onload = newonload;
else {
	window.onload = function() {
		oldonload();
		newonload();
	}
}

//This is the relevant function:
function newonload(){
	var frm=document.form1;
	if(frm){
		if (frm.opportunityid.value==0){
			frm.cf_568279[2].checked = true;
			frm.cf_568279[4].checked = true;
		}
	}
}
Note:
- At Level 2 or 3, utilize document.frmevent instead of document.form1 and eventid instead of opportunityid
Utilize a Button to Generate a Level 1
System Administrators can create a button that will enable users to create Level 1 records on demand.
Steps:
- Create a custom field of type Display - Text and Variables
- In the Content section, enter the following:
<script language=javascript>
function createNewLevel1(){
	location.href="/Apps/app_editopportunity.jsp?appid=12345&nextlevel=1&opportunityid=0&defaultstatusid=52525&opportunitytypeid=121212";
}
</script>
<input type="button" class=Button value="Button Label" onClick="createNewLevel1()">
Note: If you are utilizing variables within your link, it is essential to place the script within the onclick; otherwise, it will not parse the variables accurately in a list view.
<input type="button" class=Button value="Button Label" onClick="location.href='/Apps/app_editopportunity.jsp?appid=12345&nextlevel=1&opportunityid=0&defaultstatusid=52525&opportunitytypeid=121212&defaultownerid=@userid@'">
where:
- appid = the application ID of the application in which the Level 1 should be created
- defaultstatusid = the status ID to which the new record should be set. If this parameter is omitted, the default status will be applied.
- opportunitytypeid = the Template ID with which the new record should be associated. If this parameter is omitted, the default template will be utilized.
- Button Label should represent the text that will appear on the button (e.g., "Create New Grant")
- The other parameters should remain exactly as specified:
- opportunityid=0 will create a new, blank Level 1 record
- Other parameters that can be utilized include defaultownerid which will assign the owner of the new record to the contact with a matching userid.
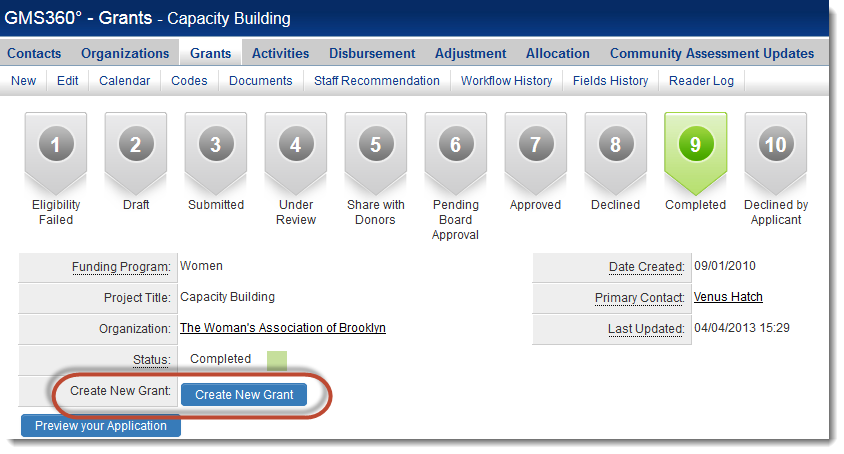
This Display - Text and Variables field can subsequently be referenced in a list view:
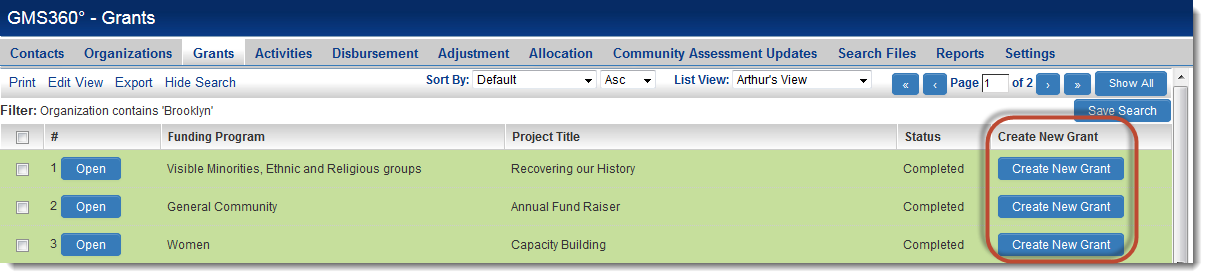
...on reports...
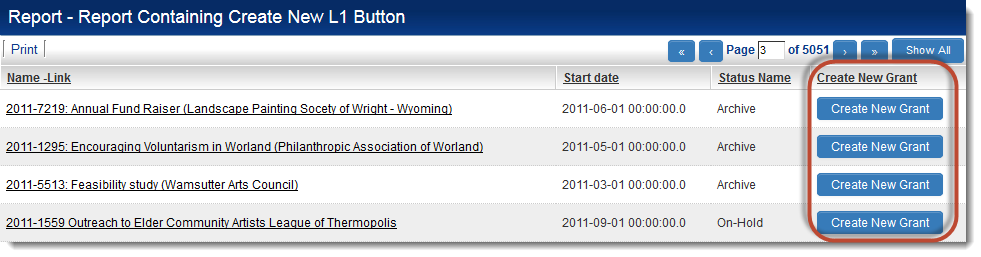
...or on another Level 1 record:
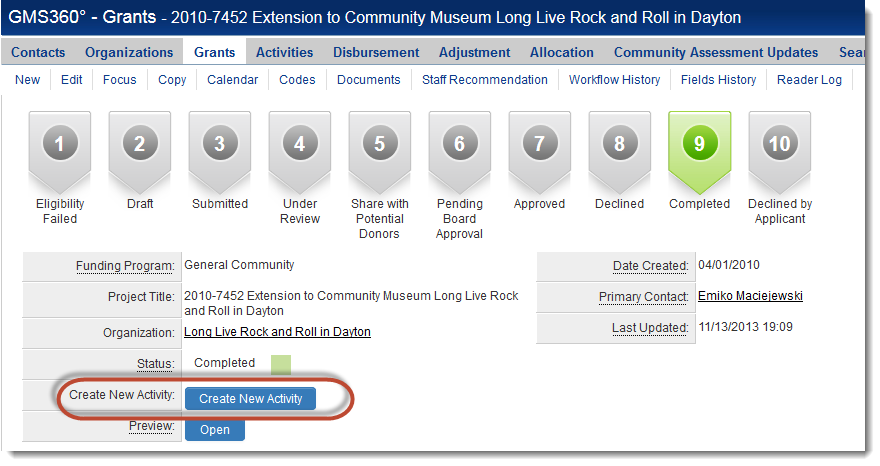
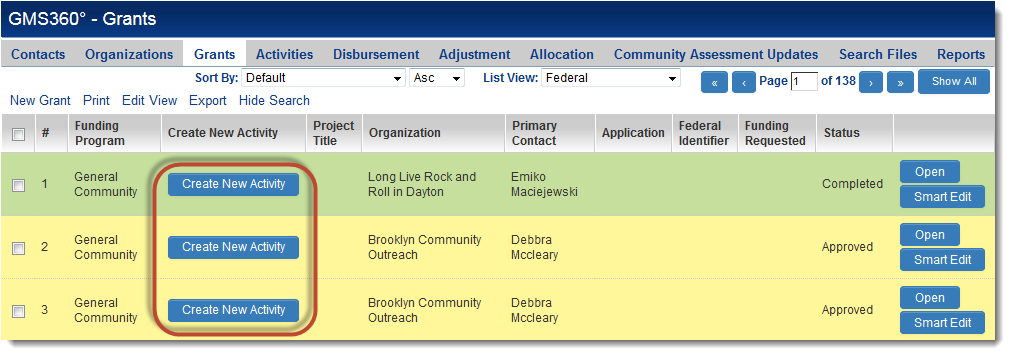
Utilize a Button to Create a Level 2 Record
System Administrators have the capability to create a button that enables users to create Level 2 records dynamically.
Steps:
- On the Level 1, create a custom field of type Display - Text and Variables
- In the Contentsection, input the following:
<script language=javascript>
function createNewLevel2(){
location.href="/Apps/app_editevent.jsp?appid=@apptype@&islevel2=1&objecttype=23&nextlevel=1&companyid=@companyid@&objectid=@opportunityid@&eventid=0";
}
</script>
<input type="button" class=Button value="Button Label" onClick="createNewLevel2()">
where:
- appid = the application ID of the application in which the Level 2 should be created
- Button Label should represent the text displayed on the button (e.g., "Create New Activity")
- the other parameters should remain precisely as illustrated:
- companyid=@companyid@ will link the organization associated with the Level 1 record on which the button was activated to the new Level 2 record
- objectid=@opportunityid@ will associate the new Level 2 record with the Level 1 record on which the button was pressed
- eventid=0 will generate a new, blank Level 2 record
Additional parameters that may be included:
- defaultstatusid = the status ID to which the new record should be assigned. If this parameter is omitted, the default status will be utilized.
- eventtypeid = the Type ID with which the new record should be associated. If this parameter is omitted, the default type will be applied.
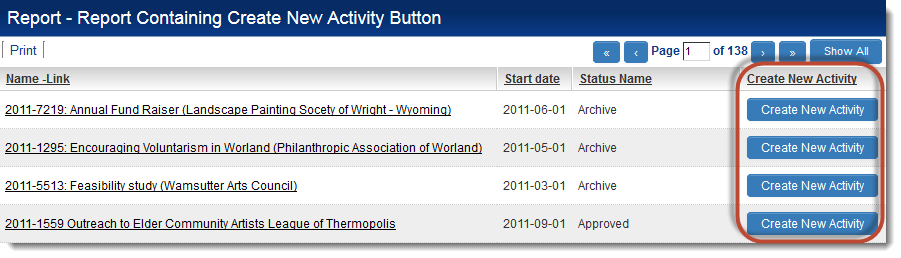
This Display - Text and Variables field can subsequently be referenced in a list view:
...on reports...
...or on the Level 1 record itself: