Overview
Users collaborate within SmartSimple Cloud using a wide range of languages. For example, applicants, reviewers, and program managers can interact in over 180 different languages.
For your Global Administrators responsible for system configuration, translations are provided in English, Español (Spanish), and Français (French - Canada).
Please note that the Español (Spanish) translations utilize Castilian Spanish, and the platform does not support right-to-left language formats.
This article provides an overview of the user interface options related to user language selection.
To configure available languages or add translations, Global Administrator access is required.
Essentials
Once a Global Administrator has configured the desired languages, users will be able to select their preferred language. Language selection can be made on the login page or via the header after login. Global Administrators can add languages by navigating accordingly and selecting the desired language options before saving:
System Administration (gear icon) >> Global Settings >> Users (tab) >> Portals >> [Edit] Common >> [Add/Edit] User Menu
Selecting Language on the Login Page
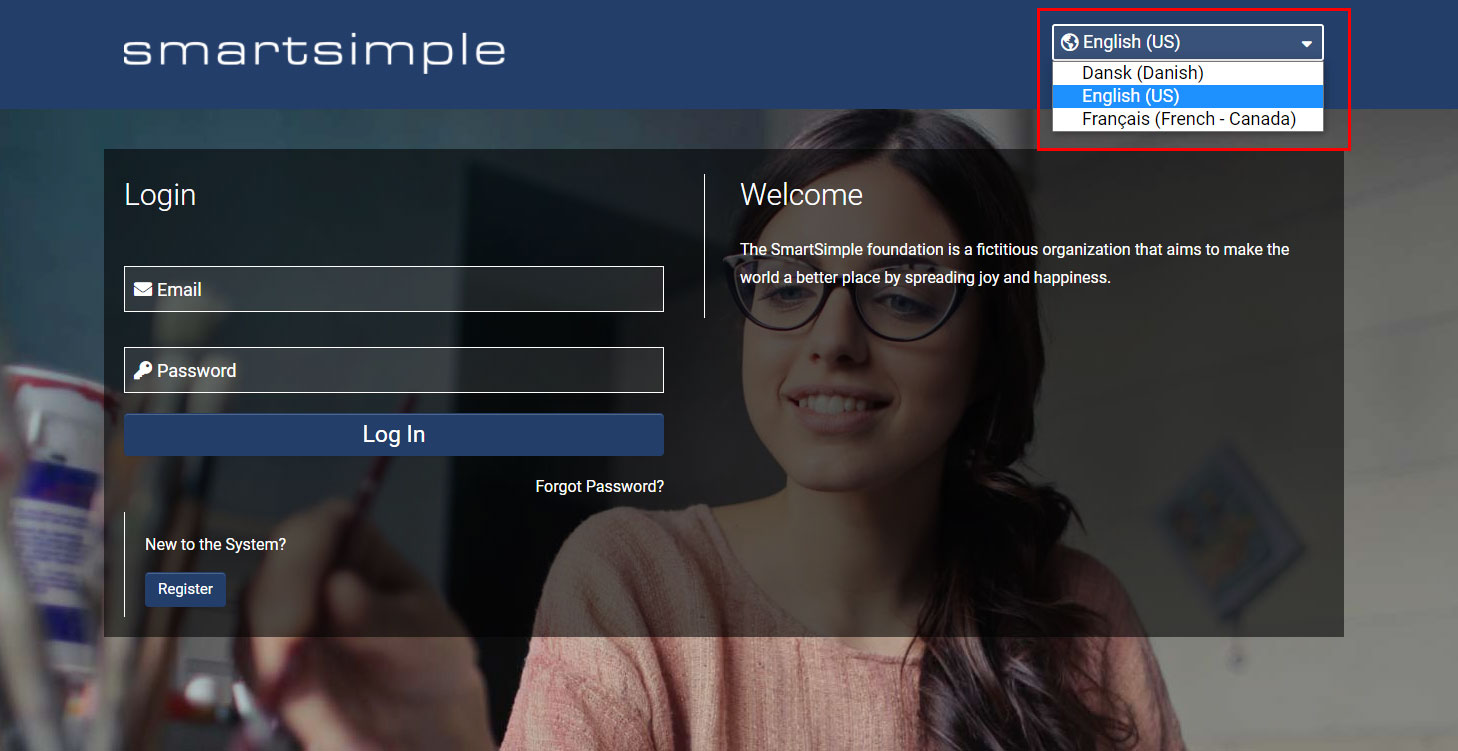
The login page is the initial interface users encounter before accessing the system. The language selector is located at the top right corner of the page within the header.
The language selector as displayed on the login page.
When a user selects their preferred language on the login page, they will be redirected to the corresponding login page. The new login page will load, and the language ID in the URL may change (e.g., &lang=23). This language ID indicates to the system which language to present; in this example, 23 corresponds to Danish.
Upon logging in through the selected login page, the system interface will be displayed in that language. For instance, if a user accesses the system via the Danish login page, the entire interface will appear in Danish after login.
Note: If a user does not select a language on the default login page (by leaving the language dropdown set to Select Language or by navigating to a URL ending with "&lang="), the system will display the language configured in the user's personal settings upon login. If no language is specified in the user's personal settings, English will be the default language.
Switching Languages While Logged In
After logging into the system, users may change their language preference at any time by selecting their Profile icon and choosing their preferred Language from the available options.
SmSnav_profileLanguage
The language selector as displayed after the user has logged in.
The browser will reload to apply the selected language; therefore, please ensure all work is saved prior to switching languages.
Alternatively, you may navigate as follows to modify your language setting and then click save:
My Profile (User Menu icon) >> Personal Settings >> Regional (tab)
User Language Setting
Each user can select their preferred language through the System Profile menu. Over 20 languages are available. However, changing the language does not automatically translate the entire system; system functionality depends on the configuration.
- If all interface elements have been translated, the entire system will be displayed in the selected language.
- If only some interface elements have been translated, only those components will appear in the selected language, while the remainder will be shown in English.
- If no translations exist for the selected language, all content will be displayed in English.
Note: The Language ID (numeric value) currently in use can be viewed in the browser's address bar and can be modified to change the language.
Performing Configuration Work in Alternative Languages
System Administrators may perform configuration tasks in one of three languages: English, French, and Danish.
This language selection only affects configuration pages and does not impact the user-facing system. Translations must be provided for all user-facing elements.
- If a System Administrator selects any of these three languages, the entire platform will be displayed in that language.
- If any other language is selected, the system will continue to be displayed in English.
Configuring the Platform for User Access in Other Languages
- A single-language system has all field captions, tooltips, instructions, object names, statuses, etc., configured in the desired language.
- A multilingual system has multiple field captions, tooltips, instructions, object names, statuses, etc., configured for each required language.
- If a user switches to a language for which no configuration exists, all content will be displayed in English.
The typical process for deploying a multilingual system involves initially configuring all processes in one language. Subsequently, all configured elements are translated into additional languages. This approach allows for process refinement in a single language and reduces repeated translation requests.
The translation process includes:
- Exporting the list of fields requiring translation from the system, including button labels, statuses, type names, portal instructions, emails, etc.
- The client is responsible for providing the translated content.
- Importing the translated fields back into the system.
- Manual updates are necessary for certain items that do not support import functionality.
- Testing the end-to-end process in the new language.
- Completing any necessary remediation.
Typically, clients are responsible for supplying all translated content. Many systems are available in multiple languages for end users; however, only a limited number are configured for internal staff or system administrators in multiple languages.
Your System Administrator is equipped to configure the translated content. The effort required depends on the number of processes and portals requiring updates.
Configuration Settings Requiring Translation
Several components within the system support translation options, including:
- Custom Field Language Settings – Each custom field can be assigned multiple language settings, allowing captions, selection options, and tooltips to be displayed in various languages. Administrators may use Translation Import/Export to manage custom field translations. When using translation services, it is essential to preserve any HTML tags or SSlogic syntax. Certain custom field types, such as Custom Field Type: Special - Advanced Data Table, may require manual updates rather than importing translation files.
- Standard Field Language Settings – Each standard field can also be assigned multiple language settings, allowing captions, selection options, and tooltips to be displayed in various languages. System Administrators can configure these fields accordingly.
- Login Page – System Administrators can create a separate login page for each supported language.
- Signup Page – Each signup page can be assigned multiple language settings, ensuring translations of instructions as well as custom and standard field captions are displayed in various languages.
- Organizations – This includes standard and custom fields, status captions, submit buttons, SmartCheck Validation, and list view captions.
- People – This encompasses standard and custom fields, status captions, submit buttons, SmartCheck Validation, and list view captions.
- Roles and Categories – System Administrators can update captions for user roles and categories.
- UTA Settings – This includes status captions, type captions, submit buttons, SmartCheck Validation, invitation templates, and list view captions for each UTA and each level.
- Transactions – This includes status captions, type captions, submit buttons, SmartCheck Validation, and list view captions.
- Portals, including Shortcuts.
- Workflow Email Templates – Each workflow email can be configured with SSlogic to identify the user's language using:
@me.langid@- Email Templates.
- Reports – Users can enable the Enable Translation option, and when a language-specific version is required, the language parameter can be added to the report URL.
- System Variables – System Administrators may need to create new system variables to reference common variables, such as the client name in different languages.
- Language Library – For hard-coded labels on core SmartSimple pages, translations can be entered into the Language Library.
Translating Content
In addition to user interface translation, the platform supports content translation. For example, if a user inputs content in Chinese, it can be automatically translated into any other language, with the translated content stored in a separate field.
- This feature is intended to provide rapid translation for content that would otherwise be inaccessible to users who do not understand the source language. It is not designed to replace the high-quality translation services used by your organization.
- For additional information, please refer to the article: Enable Translation Service.
Using UK English
If a user selects UK English as their language, it is important to ensure that translations for standard fields, such as "organization" (to "organisation") and "Postal Code / Zip" (to "Postal Code"), are provided.
Variables
The following variable outputs the translated type name:
@type_lang@
Language Library
The Language Library is designed to facilitate the translation of any string value (text) into different languages. It serves specific purposes within the system.
- You may need to customize the captions of certain built-in labels to better align with your organization's terminology. For example, you can rename the default term "company" to "Organization" using the Global Terminology settings; however, this change does not apply to users operating in other languages, for which the Language Library must be utilized.
- You might wish to abbreviate existing captions. For instance, the standard menu item "Organization Hierarchy" could be simplified to "Hierarchy."
- Certain components of the Reporting System may require translation through the Language Library.
The Language Library settings can be found under the System tab within the Global Settings.
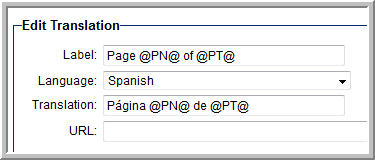
Edit Translation
Each entry in the Language Library consists of the following fields:
- Label – Specifies the text string intended for translation.
- Language – Indicates the language associated with the translation. This setting is compared to the user's language preference to determine if the translation should be applied.
- Translation – Defines the translated text to be used for the specified string in the selected language.
- URL – This field can restrict the translation to a particular page. This is useful when the same string requires different meanings depending on context. If the URL field is left blank, the translation applies universally across all pages.
Example
In this example, the term "Organization" is adjusted to "Organisation" using British English spelling.
Comparable translations should be created for every occurrence of "Organization," including singular and plural forms, as well as phrases like "Organizational Hierarchy." The translation list would appear as shown below if these additional entries were added.
These translations will be reflected system-wide wherever the relevant strings are referenced.
Text Strings Containing a Variable
The November 2018 upgrade introduced changes to the processing of strings containing both text and variables, primarily affecting settings pages. As a result, you may need to revise how translations are entered into the Language Library to ensure that both text and variable values are translated correctly.
System Administrators can identify all strings containing variables by following these steps:
1. Click the user menu in the upper-right corner of the header and select System from the dropdown.
2. In the modal window, enable Translation Audit Mode, click Save, then close the modal.
3. Refresh the page by pressing CTRL + F5 on a PC. Text eligible for translation via the Language Library will be enclosed in square brackets and asterisks, for example, [*text*]. Some text may also be enclosed in @ symbols, for example:
@text@
Strings containing text enclosed in @ symbols require modification to be compatible with translations as of the November 2018 upgrade.
Refer to the example below for guidance. The original text displayed is:
Enable and manage standard fields for my level 1
When Translation Audit Mode is active, this appears as:
[*Enable and manage standard fields for @value:my level 1@*]
To translate this string, enter two separate entries into the Language Library. The first string is:
Enable and manage standard fields for @value@
The second string replaces the @value@ placeholder, for example:
my level 1
Please note:
- Remove the colon following the key; in this example, the key is "value."
- Ensure the key is enclosed within @ symbols without spaces, such as @value@ or @company@.
SSTranslate
SSTranslate is a built-in SmartSimple function used to translate blocks of text within a Web Page View field.
You can designate text blocks for processing by the Language Library using the ssTranslate syntax. For further details, please refer to the section on Translating Web Page Views.
Grammatical Gender
Within the platform, some text references configurable terminology (e.g., L1/L2/L3 names, types, statuses). Certain languages have grammatical gender. The system generally assumes masculine gender for terms; however, this assumption may not always be accurate depending on the context.
When text includes configurable terminology, overriding grammatical gender globally may not be feasible because the configurable text varies. In such cases, you must override gender through the actual translation rather than relying on placeholders.
Example for French:
The phrase “New @value@” is translated as “Nouveau @value@,” where @value@ represents the placeholder for the configured term.
- This is correct if the configured term is “Payment,” since its translation “Paiement” is masculine.
- It is incorrect if the term is plural (“Payments”), as it would translate to “Nouveaux Paiements.” In this case, an entry must be added to the Language Library for “New Paiements” as “Nouveaux' Paiements.”
- It is incorrect if the configured term is “Request,” since its translation “Requête” is feminine and would translate to “Nouvelle Requête.” Similarly, for plural forms such as “Nouvelles Demandes,” entries must be made in the Language Library for “New Requête” as “Nouvelle Requête” and “New Demandes” as “Nouvelles Demandes.”
Notes
- The Page X of Y navigation label can be translated using the following syntax:
Page @PN@ of @PT@
Example translation into Spanish:
Enable Translation Service
SmartSimple provides a basic language translation feature for data entered in text fields.
- This feature applies exclusively to Plain Text fields and is not compatible with Rich Text fields.
- The translations provided are considered "working" translations and may not be suitable for contexts requiring high-quality or professional translations.
- This functionality is enabled through integration with Google Translate services.
Global Activation of the Translate Feature
System Administration (gear icon) >> Global Settings >> [Enable FieldTranslation Service - Allow Custom fields to be configured with translation service]
The roles authorized to utilize the translation feature must be configured in the Features tab under System Feature Permissions, specifically the [Enable Field Translation] permission:
System Administration (gear icon) >> Global Settings >> Security (tab) >> System Feature Permissions
Enabling the Translate Feature for Specific Fields
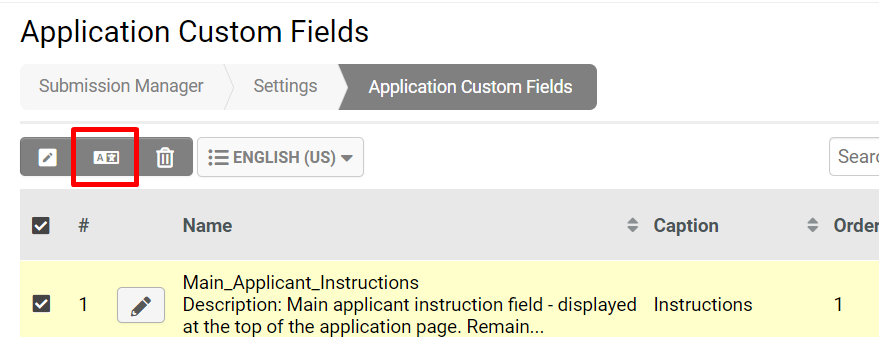
To enable translation services, please select the [Custom Field Translation Settings] button located in the top-left Action Bar within the Field Edit screen.
Translation Import/Export
Users collaborate within SmartSimple Cloud across multiple languages. For example, applicants, reviewers, and program managers may interact in over 30 different languages.
This section provides an overview of configuring custom fields for multiple languages.
System Administrators have the ability to export custom field translation settings and import translation files. The Translation Import and Translation Export tabs are accessible within any Custom Fields Settings page.
Best Practices
- The recommended approach for deploying a multi-language system involves initially configuring all processes in a single language, followed by translating all custom fields into the additional language(s). External user pages are more commonly enabled in multiple languages than entire systems.
- Unless you are a native speaker, it is advisable to use a professional translation service to generate translated field captions.
- The exported translation file may contain tags such as HTML formatting or sslogic; therefore, it is important to preserve the original format when translating the content.
- For Custom Field Type: Select One – Combo Box, ensure that the translation file maintains the store-value=display-value syntax.
- Certain custom field types, such as Custom Field Type: Special - Advanced Data Table, may be better suited for manual updates rather than importing translation files.
-
Configuration – Essentials
1. Navigate to the UTA; in this example, proceed to the Submission Manager.
2. Access the Configuration Settings.
3. Navigate to Level 1 Custom Fields.
4. The objective is to generate a Translation File for all custom fields within this UTA.
5. Select the checkbox at the top to select all custom fields.
Create translation file export button
6. Click the "Create Translation File" button located at the top.
7. Select the desired file format; for this illustration, Excel 2010 will be used.
8. Return to the Custom Field page and click the "Text Import" button located at the top.
Select Text Import
9. Paste the data from the previous step into the designated field. Ensure the Column Delimiter is selected; in this case, choose Tab. Select the imported language, configure the relevant options, and click the "Analyze" button.
Select the language for import
10. Map the columns to correspond with those in the Excel sheet, then click the "Parse Data" button.
11. This window verifies that the fields are mapped correctly; any detected errors will prevent parsing into the instance. After verification, click the "Upload" button, which will display whether the fields were successfully imported or failed.
Custom Field Language Settings
The Language Setting for Custom Fields enables the display of custom field content in multiple languages, aligning with the authenticated user's language preference.
Note: If a custom field does not have an entry for the selected language of the current user, the English language custom field settings will be applied by default.
To access the Custom Field Language Settings page, edit any custom field and select the Language Settings button located adjacent to the Caption option.
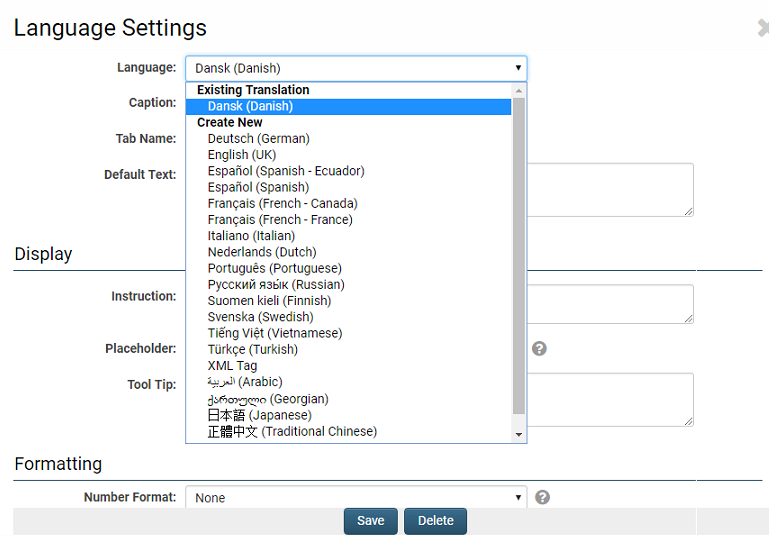
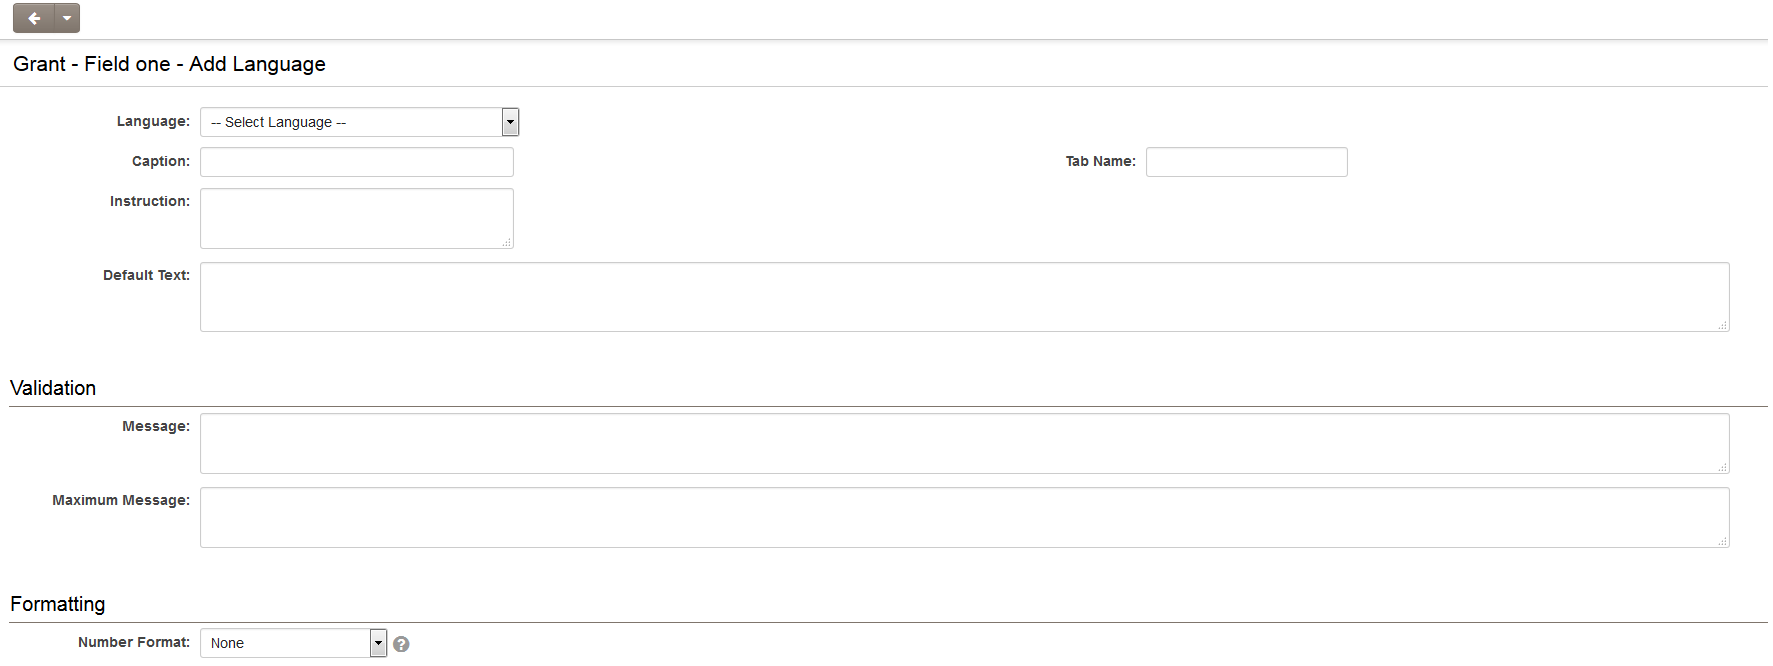
The Language Settings interface includes a Language drop-down menu, which distinguishes between existing translations and languages without translations. Select a language from the drop-down to add a new translation or modify an existing one.
The translatable settings within the Language Settings depend on the type of Custom Field being translated.
These settings may include:
- Caption: The introductory question or description preceding the field.
- Tab Name: For fields intended to be displayed on an alternative "Navigation" tab. (Refer to Tabs (Disambiguation))
- Default Text: (Applicable to Single Line or Multiple Lines text box field types) The default text displayed within the text box.
- Values: (Applicable to Combo Box and Check Boxes field types) The values used within the combo box or check boxes, separated by semicolons without spaces.
Note: It is generally essential to employ the StoreValue=DisplayValue syntax for these values. Please refer below for details.
- Validation Message: The message displayed to the user if the field data fails validation.
- Maximum Message: (Applicable to Single Line or Multiple Lines text box field types) The message shown when the maximum length is reached.
- Number Format: The format in which numerical values are displayed.
- Tool Tip: Help text displayed upon mouse-over.
Once a language setting is established, it will appear in the Language Settings screen under Existing Translations.
This facilitates streamlined implementation of language settings for all custom fields.
- Language settings can also be exported from and imported into SmartSimple in XML format.
Values
When translating Check Box custom fields, it is imperative to utilize the StoreValue=DisplayValue approach to ensure that the value stored in the database remains consistent regardless of the language displayed to the user. Failure to adopt this method may result in discrepancies between stored values across languages, potentially causing data loss or inconsistency.
If the value stored in a Dropdown List field should differ from the displayed value in the combo box, use the following syntax in the Values section of the custom field settings:
StoreValue1=DisplayValue1;StoreValue2=DisplayValue2;StoreValue3=DisplayValue3;
- The value preceding the equals sign, referred to as the stored value, will be retained.
- The value following the equals sign, known as the display value, will be shown in the combo box (or check boxes) but not saved.
By default, the stored value is displayed when fields are referenced in List Views. Selecting the Show Display Value in List Views option in the custom field settings will present the display value instead.
There are two methodologies for translating custom field values using this technique:
Methodology 1: Use the English value as the stored value Values in the primary custom field (English):
--Please Select--;Yes;No
Values in the French Translation:
--Please Select--=--Sélectionner--;Yes=Oui;No=Non
With this approach, the stored value will consistently be the English text. This is generally the preferred method.
Methodology 2: Use a different value as the stored value This method may be used to store values as codes. (Note: This approach is sometimes used even if the custom field is not translated.) Values in the primary custom field (English):
-=--Please Select--;1=Yes;2=No
Values in the French Translation:
-=--Sélectionner--;1=Oui;2=Non
This method can also be used to store abbreviated versions of options. Values in the primary custom field (English):
High=Excellent (exceeds expectations);Medium=Okay (sufficient, but not great);Low=Poor (unacceptable)
In this scenario, the stored values would be High, Medium, or Low, while the combo box options displayed to the user are the descriptive texts following the "=".
XML Builder Translations
It is important to note that for an XML field, the section builder must be configured with a separate section for each language.
Within the Language Settings, reference the section corresponding to the relevant language.
Language Library
The Language Library facilitates the translation of any string value (text) into another language. It serves specific use cases.
- It may be necessary to modify captions of certain built-in labels to better align with your organization’s terminology. For example, you can change the default term "company" to "Organization" using the Global Terminology settings; however, setting the value of that string for a user in a different language requires the Language Library.
- You may wish to abbreviate some existing captions. For instance, "Organization Hierarchy" is a standard menu item, but you might prefer to refer to it simply as "Hierarchy."
- Certain components of the Reporting System may require translation via the Language Library.
The Language Library settings are located under the System tab within Global Settings.
Edit Translation
Each entry in the Language Library includes the following fields:
- Label – Specifies the text string to be translated.
- Language – Specifies the language of the translation. This setting is compared to the user's language preference to determine if the translation is applicable.
- Translation – Specifies the translated text for the string in the selected language.
- URL – This field can be used to restrict the translation to a specific page. This is useful when the same string requires different meanings in different contexts. If left blank, the translation applies globally.
Example
In this example, the term "Organization" is changed to "Organisation" (British English spelling).
Similar translations are necessary for each occurrence of the term "Organization," including singular and plural forms, as well as within phrases such as "Organizational Hierarchy." Once additional translations are created, the list will appear as shown below.
These translations will be reflected throughout the system wherever these strings are referenced.
Text Strings Containing a Variable
With the November 2018 upgrade, processing of strings containing both text and variables has been modified. This primarily affects settings pages. As a result, you may need to adjust your Language Library entries to ensure proper translation of both text and variable field values.
System Administrators can view all strings containing variables by following these steps:
1. Click the user menu in the upper-right corner of the header and select System from the dropdown.
2. In the modal window, enable Translation Audit Mode, click Save, and close the modal.
3. Refresh the page using CTRL + F5 on a PC. Text that can be translated by the Language Library will be enclosed in square brackets and asterisks, e.g., [*text*]. Some text may be enclosed in @ signs, e.g., @text@.
If a string contains text enclosed in @ signs, it must be modified to function correctly with translations following the November 2018 upgrade.
Refer to the example below for guidance. The original text displayed is:
Enable and manage standard fields for my level 1
With Translation Audit Mode enabled, it appears as:
[*Enable and manage standard fields for @value:my level 1@*]
To translate this string, enter two separate entries into the Language Library. The first string is:
Enable and manage standard fields for @value@
The second string replaces the @value@ placeholder and should be entered as:
my level 1
Note:
- Omit the colon after the key; in this example, the key is "value."
- Ensure the key is enclosed in @ signs without spaces; for example, @value@ or @company@.
SSTranslate
SSTranslate is a built-in SmartSimple function used to translate blocks of text that may appear in a Web Page View field.
You may designate text blocks for processing by the Language Library using the ssTranslate() syntax.
Grammatical Gender
Certain platform text references configurable terminology (e.g., L1/L2/L3 names, types, statuses), and some languages feature grammatical gender. The default assumption is usually masculine; however, this may not always be accurate depending on context.
When text includes configurable terminology, it may be impossible to override grammatical gender system-wide since the configurable text can vary. In such cases, overriding must be done via the actual translation rather than relying on placeholders.
Example for French:
The phrase “New @value@” translates to “Nouveau @value@” where @value@ is the placeholder for the configured terminology.
- Correct if the configured term is “Payment” since its translation “Paiement” is masculine.
- Incorrect if plural (“Payments”) as it translates to “Nouveaux Paiements” requiring a Language Library entry for “New Paiements” as “Nouveaux Paiements.”
- Incorrect if the configured term is “Request” since its translation “Requête” is feminine, translating to “Nouvelle Requête,” and similarly when plural “Nouvelles Demandes.” This necessitates Language Library entries for “New Requête” as “Nouvelle Requête” and “New Demandes” as “Nouvelles Demandes” for the plural form.
Notes
- The Page X of Y navigation label may be translated using the following syntax:
Page @PN@ of @PT@
Example translation into Spanish:
