Overview
The Universal Tracking Application™, commonly referred to as the “UTA,” serves as a robust information-gathering tool integrated within the SmartSimple framework. This application can be utilized in a diverse array of contexts within your organization.
- Case management applications intended for use within professional services organizations.
- Grants management applications frequently utilized by grant-making organizations.
- Program management applications where conventional project tracking methodologies may not be applicable.
- Helpdesk applications for organizations seeking to monitor and report on support tickets.
- Contract tracking applications to manage contracts issued by your company and to facilitate invoicing as necessary.
General Characteristics of the Universal Tracking Application
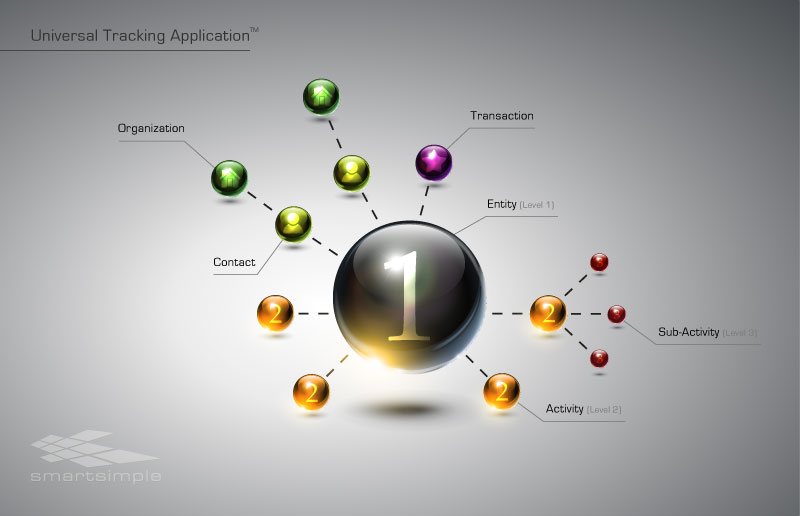
The UTA comprises two fundamental types of entities: the item to be tracked and the activities associated with tracking that item. The following diagram illustrates the general structure of the Universal Tracking Application.
“The Item to be Tracked”
The primary entity can be conceptualized as the “item to be tracked.”
The initial inquiry you must pose when developing a Universal Tracking Application is: “What is the item to be tracked?”
Contemplating this entity is crucial for defining the structural framework of the application.
For instance, if your objective is to track cases, it follows that the item to be tracked is a “case.” Conversely, if you aim to track customer support calls, the item may be referred to as a “support call” or a “support ticket.” The terminology and interpretation are entirely at your discretion. Within SmartSimple terminology, we denote the “item to be tracked” as the Level 1 Entity, which you will name to accurately reflect its nature, such as a case or a support ticket.
Creating a Universal Tracking Application
In this article, you will begin the process of creating a Contract Tracking application. Initially, this application will utilize only Level 1 items.
1. Navigate to the Configuration, Tracking Applications menu.
The Tracking Applications window will be displayed. Presently, no applications have been created.
Typically, this list will present the name of the application, its designation as it appears in the menu bar, and the description you provide for the application.
2. Select the New Application tab.
The New Application window will be displayed.
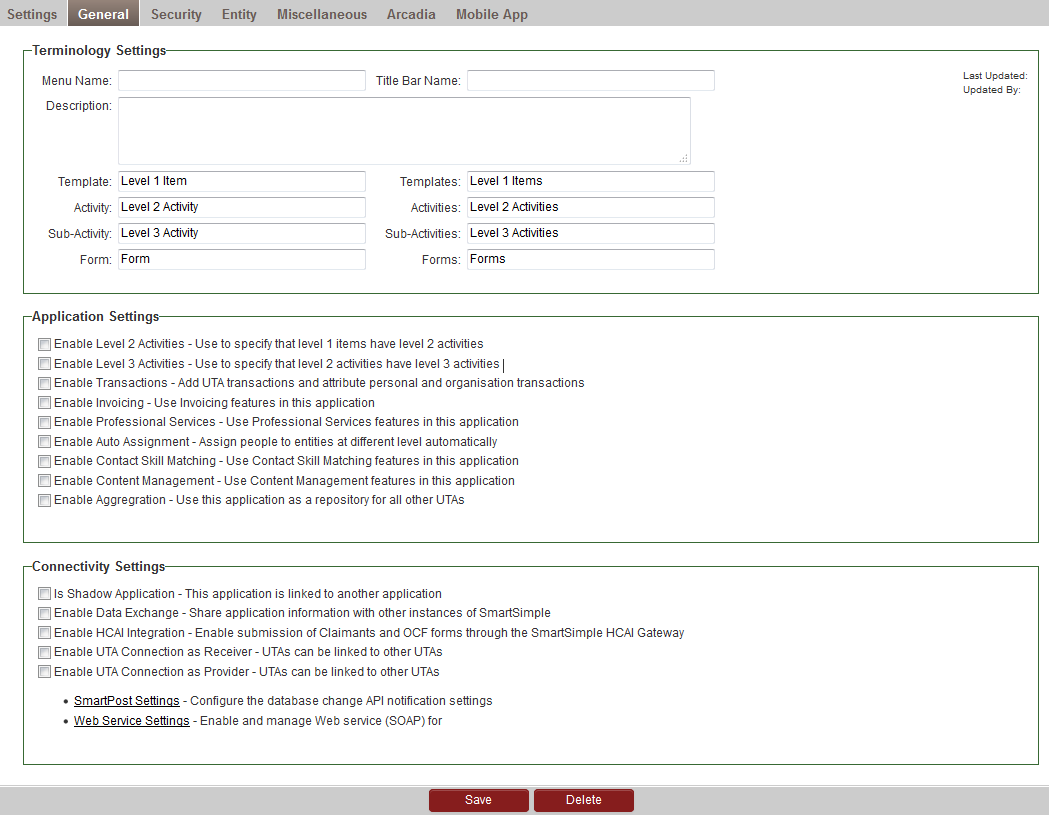
This page is utilized to establish numerous characteristics for the new application and is divided into ten sections.
- Application Settings – Governs the overall functionality of the application.
- Level 1 Item Settings – Defines the attributes of the Level 1 Entity. You must save the application at least once to access these settings.
- Level 2 Activity Settings – Specifies the attributes of the Level 2 Entity. Level 2 must be activated to view these settings.
- Access Role Settings – Defines the roles of users permitted to access the application.
- Contact Assignment Role Settings – Determines the roles that contacts can assume within a specific Level 1 Entity.
- Account Assignment Role Settings – Establishes the roles that organizations can assume within a specific Level 1 Entity.
- Account and Contact Settings – Defines the relationship between Level 1 and Level 2 items in other sections of SmartSimple, such as the account and contact screens.
- Publication Service Settings – Connects Level 2 items to external web services, such as publication databases.
- Terminology Settings – Defines the object names utilized throughout the application for Level 1, 2, and 3 entities.
- Field Settings – Defines the display of activities in the workflow list and the calendar.
Terminology Settings
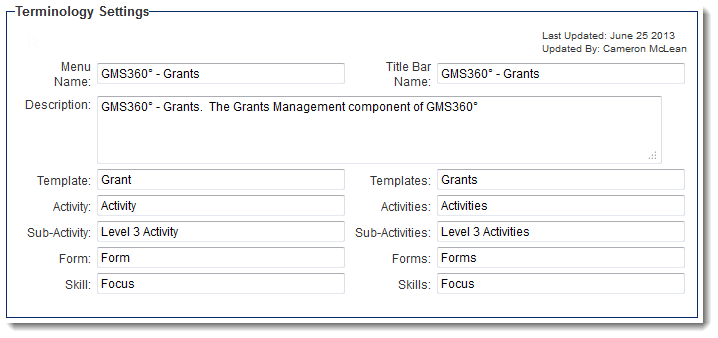
The Terminology Settings feature enables the customization of the terminology utilized within your instance of SmartSimple.
- Menu Name: The name of the application that will be presented on the left navigation bar.
- Title Bar Name: The name that will be displayed at the top Title Bar when the application is open.
- Description: Text that provides a description of your application.
- Template/Templates: Nomenclature for singular and plural references to Level 1s.
- Activity/Activities: Nomenclature for singular and plural references to Level 2s.
- Sub-Activity/Sub-Activities: Nomenclature for singular and plural references to Level 3s.
- Form/Forms: Nomenclature for singular and plural references to Forms.
- Skill/Skills: Nomenclature for singular and plural references to skills. This option is only visible when the Skill Settings feature is activated within the UTA.
Modifying the terminology in this section will alter the labels of various settings and objects across the administration and user interfaces.
Application Settings
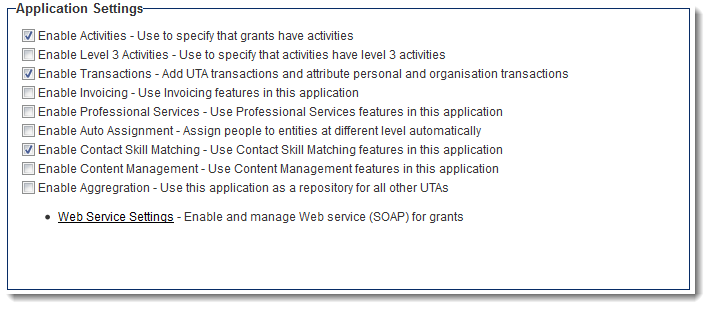
- Enable Activities - Use to specify that grants have activities - Activates Level 2s for use within this application. Upon selection of this option, configuration options for Level 2s will become visible.
- Enable Level 3 Activities - Use to specify that activities have level 3 activities - Activates Level 3s for use within this application. Upon selection of this option, configuration options for Level 3s will become visible.
- Enable Transactions - Add UTA transactions and attribute personal and organization transactions - Activates transactions for use within this application. Upon selection of this option, configuration options for transactions will become visible, including the Transaction tab on the UTA Settings Page.
- Enable Invoicing - Use Invoicing features in this application - Activates invoices for use within this application. Upon selection of this option, configuration options for invoices will become visible, including the Invoice tab on the UTA Settings Page. This option is mutually exclusive with the Enable Professional Services option.
- Enable Professional Services - Use Professional Services features in this application - Activates Professional Services for use within this application.
- Enable Auto Assignment - Assign individuals to entities at different levels automatically - Activates Auto Assignments for use within this application. Upon selection of this option, the Auto Assignment Settings section will become visible.
- Enable Contact Skill Matching - Use Contact Skill Matching features in this application - Activates Skill Settings for use within this application. Upon selection of this option, the Skill Settings section will become visible.
- Enable Content Management - Use Content Management features in this application -
- Enable Aggregation - Use this application as a repository for all other UTAs - Activating this will convert the UTA into an Aggregation UTA, allowing for the definition of associations between equivalent fields in each UTA.
- Auto Assignment Settings - Settings for automatic assignment of individuals at different levels - A hyperlink will appear when Enable Auto Assignment is checked. This is utilized to define rules for the automatic assignment of contacts to Level 1 and Level 2 entities (refer to Auto Assignments for further details).
- Web Service Settings - Enable and manage Web service (SOAP) for grants - Allows for the posting of data to an external system outside of SmartSimple, and the storage of results into a custom field on the object against which the Workflow was triggered. Refer to Web Services for additional information.
Enabling Level 2 activities alters the Configuration screen layout and adds a section for defining these activities.
Once these basic settings are saved, the configuration page will display the settings for Level 1, Level 2 (and Level 3, if enabled) entities.
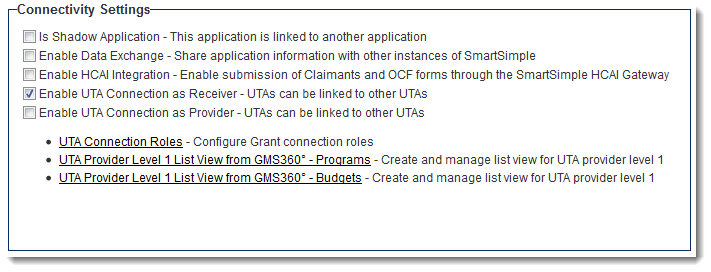
Connectivity Settings
- Is Shadow Application - This application is linked to another application - Selecting this option indicates that this UTA is a Shadow Application, which will reveal the Shadow Application Settings section at the bottom of the page.
- Enable Data Exchange - Share application information with other instances of SmartSimple - Selecting this option indicates that this UTA will allow for the transfer of information between individual instances using SmartSimple's Data Exchange functionality.
- Enable UTA Connection as Receiver - UTAs can be linked to other UTAs - Selecting this option indicates that this UTA will serve as a Receiver for information held in another UTA, and will reveal the UTA Connection Roles hyperlink.
- Enable UTA Connection as Provider - UTAs can be linked to other UTAs - Selecting this option indicates that this UTA will act as a Provider of information to another UTA, and will reveal the Shadow L1 Connection Settings and Shadow L2 Connection Settings hyperlinks.
- UTA Connection Roles - Configure Grant connection roles - Allows for the definition of a Role for Consumer/Provider relationships, including the ability to create role-based custom fields to track attributes of the association between specific consumer and provider records.
- L1 Provider Connection Settings - Configure L1 Provider UTA connection settings - Utilized to link Level 1s in the Provider UTA to the Consumer UTA based on the required status(es), template(s), and ID field.
- L2 Provider Connection Settings - Configure L2 Provider UTA connection settings - Utilized to link Level 2s in the Provider UTA to the Consumer UTA based on the required status(es), template(s), and ID field.
- UTA Provider Level 1 List View from Provider - Create and manage list view for UTA provider level 1 - Configures the list view for how Level 1 Provider information will be displayed on the Consumer UTA. This configuration is applied to the Consumer UTA.
- UTA Provider Level 2 List View from Provider - Create and manage list view for UTA provider level 2 - Configures the list view for how Level 2 Provider information will be displayed on the Consumer UTA. This configuration is applied to the Consumer UTA.
- UTA Consumer Level 1 List View from Consumer - Create and manage list view for UTA consumer level 1 - Configures the list view for how Level 1 Consumer information will be displayed on the Provider UTA. This configuration is applied to the Provider UTA.
- UTA Consumer Level 2 List View from Consumer - Create and manage list view for UTA consumer level 2 - Configures the list view for how Level 2 Consumer information will be displayed on the Provider UTA. This configuration is applied to the Provider UTA.
Security Settings
- Access Role Setting - Regulates who has visibility of the UTA. If access is not defined, the label will not be displayed in the menu navigation, and/or an access denied message may be encountered.
