Overview
The UTA Security Matrix feature within your SmartSimple instance enables the restriction of user interactions with the Universal Tracking Applications (UTA) in your system, as well as with the associated entities linked to each application. The Security Matrix facilitates the definition of how users may engage with various data levels within an application, tailored to their interaction requirements. It is imperative to enable the Security Matrix and assign permissions to each role, thereby granting varying levels of access to the Universal Tracking Application.
Note: System Administrator privileges are required to enable the Security Matrix.
Configuration - Essentials
Enabling the Security Matrix
The initial step involves creating the Universal Tracking Applications for your system. Once these applications have been established, you may proceed to activate the Security Matrix feature, ensuring that access levels corresponding to user roles are appropriately secured and authorized.
System Administration (gear icon) >> Tracking Applications >> [Edit] *UTAname >> Security (tab) >> Security Matrix
Upon enabling the Security Matrix, all users will lose access to data within the application until role-specific permissions are established.
Setting Role-Based Security Permissions
Following your selection of the Security Matrix hyperlink, the next step is to designate which roles will possess which security permissions.
The Security Matrix page will display a series of tabs at the top, leading chronologically to the security matrices for Level 1, Level 2, and Level 3 entities within that UTA (if applicable to more than one Level 1 entity)
Each security matrix comprises a list of the respective UTA user roles, accompanied by the following column headings: Access, Deny, View, Add, Edit, Delete, and Assign
Select the roles that should have access to the application in the Access Role Settings box. Only the roles designated in the Access Role Settings will be available for configuration within the Security Matrix. Click the Save button again, followed by clicking the Security Matrix link. The Security Matrix window will then be displayed. 
Functionality of the Security Matrix
- The current view pertains to security associated with the Grant level (Level 1).
- Two additional tabs are utilized to manage security associated with the Activity (Level 2) and Level 3 Activity levels.
For each role granted access to the application in the "Access Role Settings," an identical set of options will be presented at each level.
Role Engagement
All access is predicated on user roles. Each set of access permissions can be configured according to the following role engagement criteria:
- All – All users within this role are permitted to perform the designated actions.
- Owner – Only a user in this role, associated through the "Owner" standard field, may perform the designated actions.
- Assigned – Only users assigned to the item—either in the "Assigned" standard field or designated as a contact with this role—are authorized to perform the designated actions.
- Organizations – Only users in this role associated with organizations assigned to this item are authorized to perform the designated actions. This constitutes an indirect permission. For instance, if a company is linked to a project and this permission is employed, an individual from that company holding this role would be able to perform the designated actions.
- Person – Only users in this role associated through the "Person" standard field are permitted to perform the designated actions.
Types of Permissions
The following six types of permissions are available:
- Deny – Users in this role are prohibited from accessing this item.
- View – Permission to view the item.
- Add – Permission to create a new item.
- Edit – Permission to modify an existing item.
- Delete – Permission to remove an existing item.
- Assign – Permission to assign other contacts to the item.
Establishing the Security Matrix
1. Configure the permissions as illustrated below:
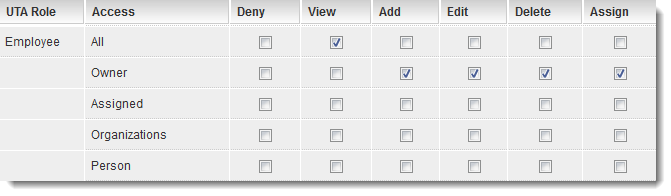
- All employees are permitted to view all items.
- Only the employee designated as the "Owner" of a specific record is authorized to view, add, edit, delete, and assign other individuals to that record.
2. Click the Save button.
3. Navigate to the Activity Access tab.
The identical set of roles and permissions will be displayed, this time pertaining to the Level 2 items.
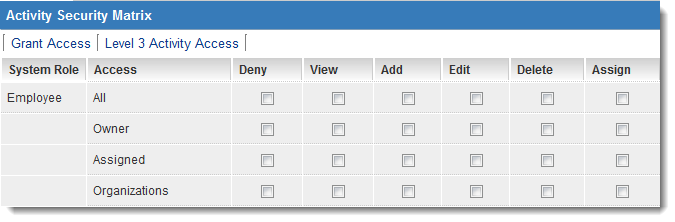
4. Configure the permissions to match those of the Level 1 items.
5. Click the Save button.
6. Repeat this procedure for Level 3 Activities.