Overview
User Roles represent a fundamental aspect of SmartSimple, as they are established within the system by System Administrators to categorize users and facilitate the establishment of Role-Based Security permissions. Most of your configuration requirements will involve the utilization of role-based security settings.
The Key Control Element - Roles
Roles possess the capability to govern the following features within your SmartSimple system:
- The Administration Interface menu - the items displayed in the administrative interface are governed by the user role. Certain users may see different menu items than others, based on their assigned role.
- Portal Interface - a specific portal view can be created for individuals in a designated role, overriding the display of the administrative interface.
- Role-Based Custom Fields - different information can be collected for various roles through role-specific custom fields.
- Manager Permissions - manager permissions across all applications and key features are linked to specific roles. These Manager permissions grant higher levels of access and functionality to that feature compared to other user roles.
- Role Permissions - permissions can be assigned to a role to allow the modification of other roles. For instance, a sales role may have the authority to change a Suspect role to a Prospect role, but not to a Customer or Employee role.
- Associations - when utilizing the Associations feature to link a contact with an organization to which they are not a contact, a role is employed to illustrate the relationship between the organization and the individual.
- Within SmartSimple, roles are utilized to define a context-specific role for an individual; for example, a customer may assume the role of Project Leader for a specific project. More commonly, a Staff Role may possess administrative permissions for a specific context. Refer to UTA role for additional information regarding roles that are specifically permitted for UTA-only.
- Workflows Overview - roles can be referenced in a collaborative workflow step; for example, it can be specified that all individuals with the Executive Role must approve a document prior to its distribution by the system.
Notes on Roles
Before adding numerous users to SmartSimple, it is essential to define roles:
- Any number of roles can be defined.
- A single user can be associated with multiple roles.
- For security reasons, it is advisable that only a System Administrator defines roles.
- Once a role is established, the administrator is responsible for associating users with those roles.
It is imperative to ensure that the role is defined prior to importing users or adding users via Auto Loader. Both methods will prompt you to select one or more roles for the users being uploaded.
The Everyone Role
A singular, significant, built-in role is the Everyone role. Every contact will be a member of the Everyone role, irrespective of any other roles that may be created and assigned to them. While a menu can be established for the Everyone role, it is not possible to create a portal for everyone or grant access to reports for the Everyone role.
- Leaving permissions blank in any location (excluding the Security Matrix) will imply View and Edit access for everyone, provided there is no Status Lock in effect.
- In instances where Status Locks are implemented, the default access for any user would be View access, unless they have Override Lock enabled (e.g., the System Administrator).
Configuration - Essentials
Accessing Roles
To access the list of roles available in your instance of SmartSimple, please follow these steps:
System Administration (gear icon) >> Roles and Security >> User Roles
- A list of roles available in the system will be displayed; if you wish to edit a role, click the pencil icon next to the name of the role. To create a new role, click the New button (+ icon).
Creating a Role
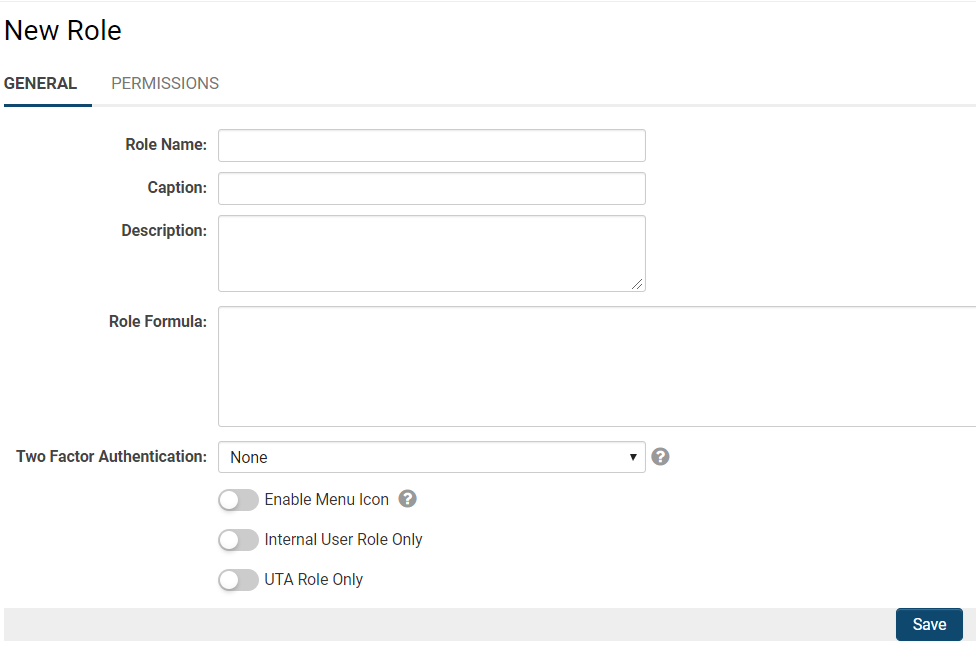
Only two fields must be defined to create a role: the name of the role and a descriptive narrative.
However, it is considered best practice to complete as many fields as possible, providing as much explanatory detail as feasible. The settings for a role are described below:
| Role Name | The unique designation of this user role. |
| Caption | The label of this user role; this is how the role is identified throughout the system. If you wish to modify the name of a role, altering the caption will suffice. |
| Description | The detailed narrative describing the role. |
| Role Formula | The role formula establishes a calculation that is executed whenever a contact record with this role is saved. Refer to Role Formula for further information and instructions. |
| Two Factor Authentication | Enable two-factor authentication for this role if necessary. |
| Enable Menu Icon | This option will display a menu icon on the right side of the screen for this role. |
| Internal User Role Only | If enabled, this role can solely be assigned to Internal users. External users will not have the option to be associated with this role. |
| UTA Role Only | This indicates that the created role is relevant only concerning records in a specific context. Refer to UTA Roles for additional information. If this option is activated, the role created will not be assignable to a contact's profile, but rather will only be selected as a role when that contact is associated with a UTA record. |
Upon completing the general edit fields for creating a new user role, please click the Save button at the bottom.
When a user is assigned to a role, that role will be displayed in the role list of the user's profile.
Role Permissions
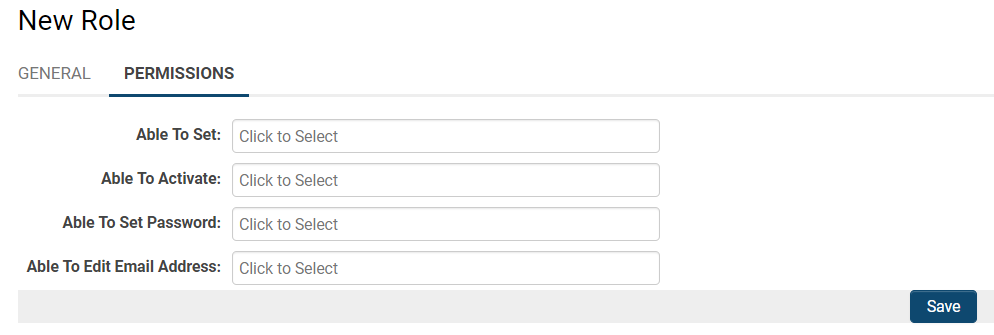
Accessing the second tab of the New Role page will present the permissions associated with that role.
| Able to Set | This permission governs the roles that a user can add or remove when configuring other users. Typically, only System Administrators are granted the authority to set all roles. |
| Able to Activate | This permission dictates the roles that a user must possess before the current user can activate their account. |
| Able to Set Password | This permission determines the roles that a user must have before the current user can manually assign a password. For instance, if you are viewing a user with the role of Applicant, but you can only set the password for the role of Researcher, then you will not be able to see or access the Set Password button from the Applicant user’s profile. |
| Able to Edit Email Address | This permission controls the roles that a user must have before the current user can modify their email address. For example, if you are reviewing a user with the role of Applicant, but you can only edit the email address for those with the role of Researcher, then when you access the Applicant user’s profile, you will only be able to view a Read-Only version of the Email Address standard field. |
Menu Settings for Roles
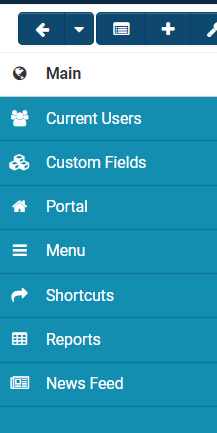
When you Edit an existing role, or after you create and Save a new role, the page will refresh and present a left-hand menu that provides access to various features of the role.
| Main | This section will display the primary details associated with the specific role, including the General page of fields as well as the Permissions that can be assigned for this role. |
| Current Users | This section will present a list of current users associated with this role. From the Current Users tab, you can add or remove users. |
| Custom Fields | This section will display a list of the Custom Fields associated with this role. You can add new custom fields by simply clicking the + icon at the top of the list. |
| Portal |
This section enables you to activate the portal associated with this specific role. You can activate the role-specific portal, set its priority, assign its logo, and select a template if necessary. If you enable the Portal option for this role, a new Menu tab will appear in the left-hand side menu. |
| Menu | This section displays all the tools and features of the SmartSimple system that you can select for visibility in this role's menu. Simply select the items you wish to hide and click Save. |
| Shortcuts | Shortcuts can be configured by role either as a Common Shortcut (applicable to all roles) or on an individual basis (for specific roles). For further details, please refer to Shortcuts. |
| Reports | This section will display a list of any Reports associated with the role. |
| News Feed | The news feed refers to any transactions or information retrieved from integrations, such as OFAC checks, Transactions, and more. For additional information, please refer to Category: Integrations. |
Remove or Add from Current Users
You also have the capability to Add or Remove users in bulk when you access the Current Users section of the role's Edit Page by utilizing the Add User button.
1. Click on the Current Users tab from the left-hand side menu. The list of current users, if applicable, will be displayed.
2. Click the + icon located at the top left, which will allow you to add new users to this role.
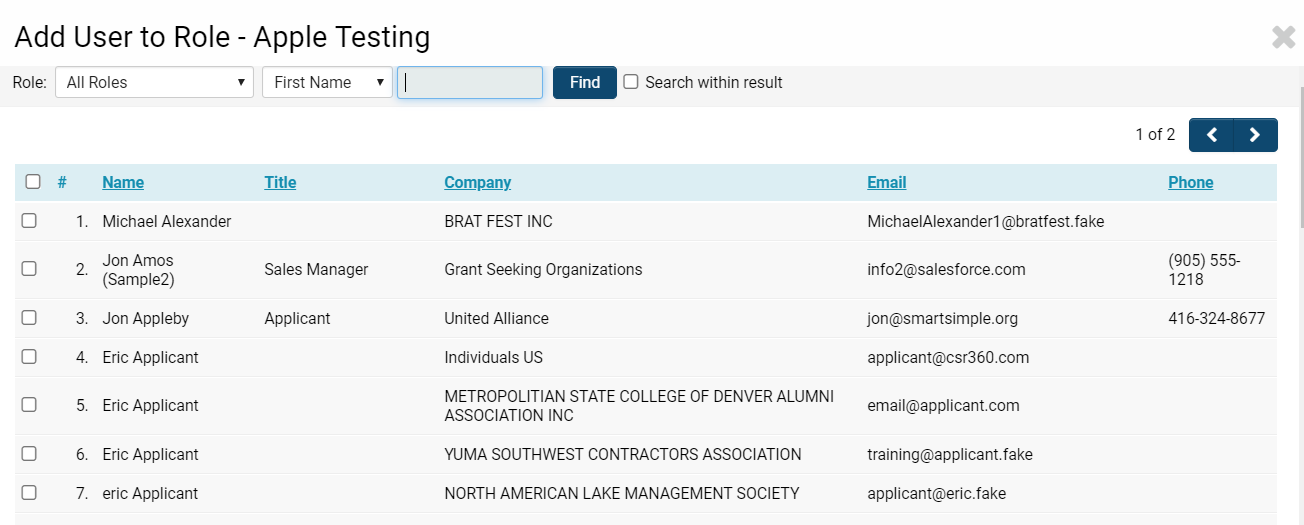
3. The Add User to Role screen will appear, featuring search options that include the ability to select specific roles as part of the search results.
- Tip: If this is a newly established instance, there may be no users assigned to any role; in that case, modify the role field in the search options to No Role Assigned.
4. Select all users that you wish to associate with this role.
5. Click the Add button.
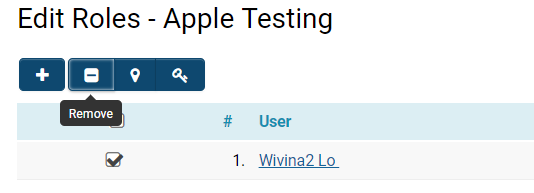
To Remove Users from a Current Role, simply navigate to the list of current users and select the names of the users you wish to remove from the role. Once at least one user is selected, new buttons will appear at the top of the list, enabling you to remove users.
Click Yes when the confirmation message appears if you are certain you wish to remove the selected user(s) from the role.

