Overview
The Autoloader feature enables the automatic creation and updating of SmartSimple information utilizing data extracted from an external file. Below is a comprehensive overview of the process:
- Upon the addition of a file to the SmartFolder/Configuration Folder, the Autoloader process will recognize the new file and commence the upload procedure.
- Once processed, the file will not undergo reprocessing unless a new file with the identical name is added to the folder.
- Each record from the uploaded file will update the corresponding record in the database.
- A log file will be generated to indicate the success or failure of each record update, and an email notification may be dispatched to a designated user to inform them of the outcome of the upload.
- If a new version of the file is added to the folder, this new file will be processed accordingly.
- The Autoloader can upload data to various objects within your SmartSimple instance, including companies, contacts, Universal Tracking Application Level 1 or Level 2, Level 3, Notes, and Associations.
Prerequisites
- You must hold the role of Global User Administrator within your SmartSimple instance to access the Autoloader feature and configure an upload process.
- The user responsible for uploading the file must possess write permissions for the designated folder.
- You must restrict the upload folder exclusively to file uploads, as the Autoloader will endeavor to process any file added to the folder.
Creating a SmartFolder/Configuration Folder
- Any SmartFolder/Configuration Folder can function as the source for an Autoloader.
- The folder must be utilized exclusively for the Autoloader, as every file uploaded will be processed.
- Incorrectly formatted files will be processed, potentially leading to data loss or the creation of invalid data.
IMPORTANT: Given that any file uploaded to a SmartFolder/Configuration Folder associated with an Autoloader will be processed, it is imperative that the SmartFolder/Configuration Folder is appropriately permissioned and labeled.
- The SmartFolder/Configuration Folder for Autoloaders should be permissioned such that only authorized contacts can upload files for autoloading.
- It is best practice to position all Autoloader-enabled SmartFolder/Configuration Folders within a parent folder named Autoloader (with role-restricted access) to mitigate the risk of inappropriate file uploads.
- When creating a new Configuration Folder, designate "Autoloader/Export Storage" as the Folder Type.
Preparing the File for Upload into the Autoloader
Define the format and structure of the data file, including the number of columns, the delimiter between each field, and the order of the fields.
- You must define a unique field that will link each record in the upload file to the corresponding record in the customer database. Standard fields such as customer name or phone number cannot be utilized.
- This common field must be present in every record of the upload file as well as in each customer record. For instance, a unique account number field added to the customer table can be associated with the same account number field in the upload data.
- The file to be uploaded must be in ASCII format, and there is no specific naming convention required.
- Each record in the file must be separated by a CR/LF (ASCII 13,10 /D,A) character combination.
- Each field must be delimited by one of the following characters:
Comma – “,” (ASCII 44/2C)
Tab – (ASCII 9/9)
Pipe – “|” (ASCII 179/B3)
Semi-colon – “;” (ASCII 59/3B)
Colon – “:” (ASCII 58/3A)
This can be accomplished by utilizing Notepad to create and edit the data for import, which can subsequently be saved with the txt file extension.
Alternatively, you may employ the Save As feature within Microsoft Excel to save the document as a csv file.
Notes:
- If any of the data to be imported contains commas and you are creating a csv file from Excel, it is advisable to export the data using pipes (|) as separators instead of commas. To accomplish this, change the settings on your PC prior to creating the csv file. The method for doing this varies by operating system but generally follows this outline:
Start -> Settings -> Control Panel -> Regional Settings -> Additional Settings Button. Click the "Number" tab and in the "List Separator" field, replace the current default separator with your desired option (such as the pipe symbol | ).
- If you use Microsoft Excel to create a csv file, it is recommended to open the document with Notepad to review its contents prior to Autoloading. If any data within the Excel document contains line breaks within cells, it will create a line break in the csv document. Each new line in the csv document will initiate a new record; therefore, you must ensure that all inner-cell line breaks are removed from either Excel or the txt document.
- Alternatively, when conducting a CSV import, any columns containing line breaks or delimiters within the content should be enclosed in double quotes. NOTE: Any double quotes within that content MUST be escaped with a backslash \ preceding the double quote to prevent them from being interpreted as the closing quote of the column. Below is an example of a 4-column CSV:
1st Record|Draft|"This content"|555-1212
2nd Record|Submitted|"That content"|123-4567
3rd Record|Draft|"Broken
Content"|444-5555
4th Record|Draft|"Normal Content Test"|321-9876
5th Record|Submitted|"Backslash Escaped \" quote content
Also with
multiple line breaks"|777-8888
6th Record|Submitted|"Normal Content again"|111-2233
- If the file contains special characters, convert the encoding to UTF-8.
- If any column has a number sign following the comma, always enclose it in double quotes to avoid data processing issues.
Note:
- The number of rows in the selected file must not exceed 100,000.
- The number of columns in the selected file must not exceed 100.
- No cell within the file should exceed the character limit of 32,000.
Configuration - Essentials
The following are the mandatory fields required for creating a basic autoloader:
1. Essential settings in the General Tab
- Define the Loader Name.
- Select the Folder Type: SmartFolder or Configuration Folder.
- Click the Folder Lookup button and select the folder designated for this autoloader.
- Select the File Type.
- Select the File Encoding.
- Define the Record Type for this autoloader.
- Select Item of the Record Type.
- Activate the autoloader.
2. Essential settings in the File Layout Tab
- Select the Number of Columns - according to the file sample to be uploaded into this autoloader.
- Ignore Lines should be set to 1 if the file includes a header in row 1.
- Select the Field Delimiter from the dropdown menu.
- Define the column mapping based on the field columns of the file to the Record Type fields from the dropdown.
Note that you can toggle the identifier if the file contains a unique identifier, ensuring the integrity of the data being added or updated.
3. Essential settings in the Process Tab
- Navigate to the Create / Update Options section and select the Create / Update Behavior for the autoloader.
Once all three tabs have been configured, click the SAVE button. The autoloader is now prepared to process the file that will be directed to the SmartFolder or Configuration Folder specified for this autoloader.
Configuration - Advanced
Column Mapping
After defining the number of fields, it is necessary to establish the field order to correspond with the column order in the upload file.
- The number of columns selected determines the number of fields available for mapping.
- Identifier. Activate the column designated as the identifier. This is crucial when updating existing records. One or multiple fields are required to match an uploaded record to an existing record within the system.
- The Table header field is necessary only when utilizing an XML or JSON file. You should populate this section with the column headers from the file intended for upload.
- Field is selected through a dropdown menu. (Refer to the Reference section below for information regarding standard field names)
IMPORTANT:
The following fields must be included in the Autoloader field mappings exclusively when updating existing records. These fields must not be utilized when employing the Auto Loader to create new records.
- Company ID (Company Auto Loader)
- User ID (Contact Auto Loader)
- Resource ID (Resource Auto Loader)
- Tracking ID (Level 2 / Level 3 Auto Loader)
- When utilizing the aforementioned fields, the IDs being Auto Loaded must correspond with IDs of records present within the system.
- If utilized, the fields should be designated as the Identifier.
- These fields are typically employed if you have extracted data from SmartSimple, including those ID fields, updated the data externally, and wish to import the revised information.
NOTE:
1. If you intend to deactivate a user utilizing the Autoloader, please select the Disable User Login (use value of 1) Field option and ensure that the uploaded file contains a value of 1 in the relevant cells.
2. If the Item or App Level option is configured to one of the Association options, then only the Associations ID can be used as an identifier. The system will enforce the Identifier when Associations ID is selected in the mapping, and will only notify users when they attempt to designate any other columns as identifiers.
Manual/Automated Autoloader
Triggered by sending a file to the SmartFolder/Configuration Folder
Automated Schedule
Decryption
PGP decryption is available in the Autoloader and occurs during the file processing. PGP encryption and decryption keys should be added in the Integration Key Management section. To configure this setting, navigate to the Autoloader configuration page, and under the General tab, proceed to the Decryption section, selecting the desired PGP decryption key to utilize prior to the Autoloader processing the file.
Bulk Upload of Specific Files to Designated Records
The Autoloader feature allows for the bulk upload of specific files to designated records. Previously, if multiple files associated with various records required updates within a particular UTA, user, or company, the process of locating each record and manually uploading the files was cumbersome, especially for files that required frequent updates. This functionality now enables users to upload all files in bulk, with the system automatically unpacking and allocating those files to the specified fields as needed.
To utilize this feature, please adhere to the following steps:
- Create a CSV file that includes the mandatory columns (File Name and Custom Field ID) along with the relevant identifier columns for the record type.
- Create a ZIP file containing the files you wish to upload or replace. Ensure that both the ZIP file and the CSV file have the same name.
- Navigate to Menu Icon > Autoloaders > Create or edit an Autoloader > Select the desired Processing Folder.
- Set the File Type to “CSV, Text”.
- Under Record Type, select the appropriate record type you wish to target ("UTA", "People", or "Company").
- Under Item, select the new “File Upload” option. If you selected a UTA as your Record Type, you will be prompted to select the desired Level 1, 2, or 3.
- Configure the column mappings as per usual.
- Upload the CSV and ZIP file to the processing folder selected in Step 3.
Note: This new option does not create new records or update other columns. The “File Upload” item solely facilitates the uploading of files.

Utilize the new "File Upload" option to enable the Autoloader to unpack a ZIP file and upload or replace files in specific upload fields as indicated in a CSV file.

The CSV file must share the same name as the ZIP file and must specify the record ID, upload field ID, and file name.
External Data Source
This section allows for the configuration of an external file source for users who prefer not to upload files manually.

The External Data Source is a dropdown menu that presents five available options:
Additional fields will be displayed upon the selection of any of these options, with the specific number and type of fields determined by the selected option.
FTP and SFTP

- Disable processing. Download file only - if selected, the system will only retrieve the file into SmartSimple without loading its contents.
- Delete File from Data Source After Downloaded - this option will remove the file from the SFTP site.
- Append Datetime Stamp to File Name - appends the date and time when the file is retrieved from the SFTP if it lacks a timestamp.
- URL - the URL from which the file(s) can be accessed, e.g., my.sftp.com or my.sftp.com:2222.
- Login Name - the username required for system access.
- Login Password - the password required for system access.
- Use Private Key - enable this setting when utilizing keys as credentials for authentication.
- Private Key File - upload the private key file.
- Path - the specific folder location on the system where the files can be found, e.g., "/" for the root directory or "/in" or "/out".
- File Names - specify the names of the files to be loaded via the Autoloader, e.g., HRFeed.csv, Payment_*.csv (Utilize * for wildcards in filenames).
Please be advised that upon saving settings, a Verify Connection button will appear adjacent to the Login Name Textbox. This button may be utilized to verify the accuracy of the URL, username, and password.
HTTP

- Disable processing. Download file only - if selected, the system will solely retrieve the file into SmartSimple without loading its contents.
- URL - the URL from which the file(s) can be accessed.
- File Names - specify the names of the files to be loaded via the Autoloader.
SOAP

- Disable processing. Download file only - If this option is selected, the system will exclusively transfer the file into SmartSimple without loading its contents.
- URL - The URL from which the file(s) can be retrieved.
- Login Name - The username required for system access.
- Login Password - The password required for system access.
- Function - The function invoked by the Web Service call.
- Request Body - The content of the Web Service message to be transmitted to the external service.
- Callback - The method utilized to send the response back to the client.
OData

- OData Version - The version of OData available from the endpoint.
- URL - The endpoint for OData.
- Login Name - The username required for system access.
- Login Password - The password required for system access.
File Preparation
This section facilitates data manipulation prior to the Autoloader transferring the data into the system.
This feature is accessible only when the File Type is either CSV, Text or Fixed Length Text.
This feature is not available when the File Type is XML.
Refer to Autoloader File Preparation for configuration instructions.

Settings Explained
This section delineates the detailed steps necessary to utilize the Autoloader. It is imperative to thoroughly review the file to be uploaded using a file editor.
Ensure that the file adheres to the layout criteria specified in the preceding section:
- Select the Configuration, Global Settings menu.
- Remain on the System tab and scroll down the page.
- Click the Autoloader link.
- Select the New Autoloader tab.
- Review each of the three tabs.
General tab

Setting the Autoloader Name
Given that it is possible to define multiple autoloaders, each autoloader process must possess a unique name.
- Assign a name to this autoloader process.
Setting the Folder Type
- Select Folder Type: SmartFolder or Configuration Folder.
- Click the Folder Lookup button to display the list.
- Choose the folder where the file will be added.
- The folder name will be populated in the Folder box.
Setting the File Properties
The File Type can be a CSV, Text file, XML file, Fixed Length, or JSON data.
The File Encoding can be UTF-8, UTF-16, or ANSI. This option will not be visible if the File Type is XML.
Defining the Record Type
The Record Type can be classified as Company, Contact, Resource, or a Universal Tracking Application.
If the selected Record Type is Company or Contact, the user must populate an additional Item field. Possible options include Company or Contact, Event, Transactions, Address, and Associations (User or Company).
If the chosen Record Type is a UTA, the user must populate an additional Level field. Possible options include Level 1, Level 2, Level 3, Transactions, L1 Company Association, L1 Contact Association, L2 Company Association, and L2 Contact Association.
If the selected Record Type is a UTA and the chosen Level is Transaction, the user must populate an additional drop-down field reflecting all levels that transactions are enabled against.
Activate Autoloader
Enable this checkbox for the Autoloader to execute.
External Data Source
The Autoloader can be connected to an external data source to retrieve the file and transfer it to the SmartFolder.
Select a connection type and complete the Schedule section below to specify the daily launch times of the Autoloader.
File Layout Tab
The File Layout section is utilized to determine the number of columns in the file and the Field Delimiter.

-
Number of Columns - The number of columns selected will define the number of columns in the upload file and the number of fields that can be updated in the database.
- The maximum number of fields that can be updated is 100 fields in a single file.
- If more than 100 fields are required, two upload files must be created.
- Ignore Lines - You can specify the number of rows to disregard from the beginning of the file. This feature is beneficial for ignoring column headers if they appear as the first row in any file.
- Field Delimiter - A drop-down list presenting delimiter options used to separate different values in the file into distinct columns. This will not be displayed when the File Type is XML or JSON.
- Record Node Name - This will only be presented when the File Type is XML.
- Record Node Filter - This will only be presented when the File Type is XML.
Process Tab

- Workflow Prior to Loader Initiation – This is a drop-down list that includes all workflows within the system, defaulting to "No." If users intend to execute a workflow prior to the Autoloader adding data to the system, they must select the appropriate workflow.
- Workflow Following Loader Completion – This is a drop-down list that contains all workflows within the system, defaulting to "No." Users should select the relevant workflow if they wish to execute a workflow after the Autoloader adds data to the system.
- Execute Report Following Loader Completion - This is a drop-down list containing all reports within the system. It will execute the configured Scheduled Export of the report, with the Frequency set to On Demand.
- Execute Sequential Autoloader Following Loader Completion – This feature facilitates the linking of Autoloaders.
- Trigger Formulas – This option enables the triggering of any template formulas associated with the selected record type and item/level. If this checkbox is not selected, these formulas will not be executed.
- Send Email with Log Upon Autoloader Completion – An email is dispatched each time the Autoloader executes, including a report of the upload process. (Note: The log file is also stored in the same directory as the uploaded file.)
- Send Email Notification When Autoloader Fails to Complete – An email is sent when the FTP/SFTP connection fails or when the Autoloader process is unexpectedly terminated.
- Send Email with Log When Autoloader Encounters Failed Records - An email is sent when the Autoloader fails to complete.
- Email Recipients – This field specifies the email address that will receive notifications. Multiple email addresses may be included, separated by commas.
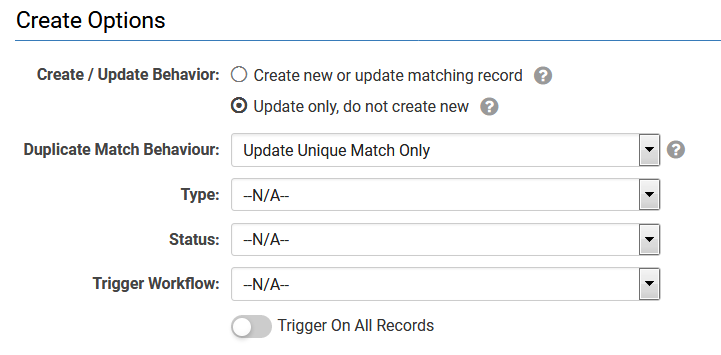
Creation Options
This section of the Autoloader is designed to determine how new records in the upload file should be managed.
The specific fields displayed will vary based on the selected Record Type and Item or List values previously chosen.
Company Record / Company Item

- Creation/Update Behavior - To create a new record, please enable the Create new or update matching record checkbox. If the alternative checkbox Update only, do not create new is enabled, existing records will be updated, while new records will be rejected.
-
Duplicate Match Behavior – This defines the behavior when multiple records are matched by the same identifier key. The drop-down allows users to specify the behavior when multiple records are matched using the Identifier field(s).
- Update Unique Match Only - This will only update when one matching record is found.
- Update All Matches - This will update all matching records.
- Account – This determines where in the organizational hierarchy new records should be added.
- Is External – Select this option when creating external companies under the root company.
- Category – This determines the organizational category to be associated with the new records.
- Trigger Workflow – A drop-down list of all workflows related to the Record Type. It defaults to N/A.
- Trigger On All Records - This checkbox is available if you wish to execute a workflow against all records, whether new or updated. This can be utilized to create companies with multiple categories.
Contact Record / Contact Item

- Creation/Update Behavior - To create a new record, please enable the Create new or update Matching record checkbox. If the alternative checkbox Update only, do not create new is not enabled, existing records will be updated, while new records will be rejected.
- Duplicate Match Behavior – This defines the behavior when multiple records are matched by the same identifier key.
- Account – This determines where in the organizational hierarchy new records should be added.
- Role – This determines a user role to be associated with the new records. If multiple roles are desired for a user, a workflow must be triggered for each record (see below for further details).
- Trigger Workflow – A drop-down list of all workflows related to the Record Type. It defaults to N/A.
- Trigger On All Records - This checkbox is available if users wish to execute a workflow against all records, whether new or updated. This can be used to activate users with multiple roles and to automatically email a password to newly created contacts.
Company or Contact Record / Event or Transaction Item

- Creation/Update Behavior - To create a new record, please enable the Create new or update Matching record checkbox. If the alternative checkbox Update only, do not create new is not enabled, existing records will be updated, while new records will be rejected.
-
Duplicate Match Behavior – This defines the behavior when multiple records are matched by the same identifier key. The drop-down allows users to specify the behavior when multiple records are matched using the Identifier field(s).
- Update Unique Match Only - This will only update when one matching record is found.
- Update All Matches - This will update all matching records.
- Type – A drop-down list of all Event or Transaction types, depending on the specific Item selected. It defaults to N/A.
- Status – A drop-down list of all Event or Transaction statuses, depending on the specific Item selected. It defaults to N/A.
- Trigger Workflow – A drop-down list of all workflows related to the Record Type. It defaults to N/A.
- Trigger On All Records - This checkbox is available if users wish to execute a workflow against all records, whether new or updated.
UTA Record / All Levels
- Creation/Update Behavior - To create a new record, please enable the Create new or update Matching record checkbox. If the Update only, do not create new checkbox is not enabled, existing records will be updated, while new records will be rejected.
-
Duplicate Match Behavior – This behavior pertains to instances where multiple records are matched by the same identifier key. The drop-down menu allows the user to specify the behavior when multiple records are matched using the Identifier field(s).
- Update Unique Match Only - This option will only update when a single matching record is found.
- Update All Matches - This option will update all matching records.
- Type – This is a drop-down list of all Level 1, Level 2, Level 3, or Transaction types, contingent upon the specific Level selected. The default setting is N/A.
- Status – This is a drop-down list of all Level 1, Level 2, Level 3, or Transaction statuses, contingent upon the specific Item selected. The default setting is N/A.
- Trigger Workflow – This is a drop-down list of all workflows related to the Record Type. The default setting is N/A.
- Trigger On All Records - This checkbox is available if you wish to have a workflow execute against all records, whether they are new or updated.
Updating Account Owners
When updating company-type information, you can automatically associate an account field with a user field to establish "account ownership." This section is displayed at the bottom of the Autoloader page only if the Record Type is set to Company and the Item is designated as company.

For example, if the imported account file contains an employee ID field, it can be matched to the user table, thereby providing each user with an employee ID field.
Updating Account Parent
When updating company-type information, you can automatically associate an account field with a parent account field to establish "company hierarchy." This section is displayed at the bottom of the Autoloader page only if the Record Type is set to Company and the Item is designated as company.

For example, if the imported account file contains a parent ID field, it can be matched to the account table, thereby providing each company with a parent company.
Example: Updating Account Parent AutoLoader Configuration:
The AutoLoader Parent ID field is an Account field that will be populated with the second value (Parent ID) from the CSV record below.
Example: AutoLoader Source File:
Action: A two-column report containing the Company ID and the Parent ID must be created, exported to a CSV file, and uploaded to the associated AutoLoader SmartFolder.
Result: The Account records with a Company ID IN (278520,297733,316703) will have their Parent ID changed to 349238.
Updating Event / Transaction Parent Company
When updating company-type information related to an Event or a Transaction, you can automatically associate an account field with a transaction or event field to establish a parent for the transaction. This includes utilizing standard Account fields. If no matches exist, you may select the required action using the No parent matched action drop-down.
- Reject Record - The record is not loaded into the system.
- Add as Orphan Record - The record is loaded into the system but is not attached to a parent company.
- Attach to Dummy Account - The record is loaded into the system and is attached to the parent company specified in the Default Parent ID field.
This section is displayed at the bottom of the Autoloader page only if the Record Type is set to Company and the Item is designated as either Event or Transaction.
Updating Parent Company
When updating people-type information, you can automatically associate an account field with a user field to correctly attach the user to the appropriate account. This section is displayed at the bottom of the Autoloader page only if the Type is set to People.

Updating Event / Transaction Parent User
When modifying user-type information associated with a transaction, you may automatically link a user field to a transaction field to establish a parent user for the transaction. In the absence of matching records, you may select the appropriate action from the No parent matched action drop-down menu.
- Reject Record - The record will not be entered into the system.
- Add as orphan record - The record will be entered into the system but will not be linked to a parent company.
- Attach to dummy account - The record will be entered into the system and linked to the parent company specified in the Default Parent ID field.
This section is displayed at the bottom of the Autoloader page only if the Record Type is set to People and the Item is classified as either Event or Transaction.
Branch, Company, and Owner Custom Field Matching
When updating UTA information, you may automatically associate a standard field on the UTA with user and company fields to establish individual or organizational ownership. This section is displayed at the bottom of the Autoloader page only if the Record Type is set to UTA and the Level is classified as Level 1.

Updating Tracking Parent
When updating UTA Level 2 or 3 information, you may automatically associate a field on Level 2 with a field on Level 1, or associate a field on Level 3 with a field on Level 1, to establish a relationship between the entities.
In the absence of matching records, you may select the appropriate action from the No parent matched action drop-down menu.
- Reject Record - The record will not be entered into the system.
- Add as orphan record - The record will be entered into the system but will not be linked to a parent company.
- Attach to dummy account - The record will be entered into the system and linked to the parent entity specified in the Default Parent ID field.
This section is displayed at the bottom of the Autoloader page only if the Record Type is set to UTA and the Level is classified as Level 2 or Level 3.

Parent Record Match Field IDs
This section facilitates data manipulation prior to the Autoloader loading the data into the system.
It is only available when the File Type is XML.

Ad Hoc Upload URL
This setting within the Autoloader provides a more user-friendly and accessible interface for importing data into the system, enabling users to verify the file prior to uploading it to a SmartFolder for processing by the Autoloader. This feature is intended for use when the External Data Source is not configured.

History Tab
Available following the February 2019 upgrade.
This new feature in the Autoloader introduces a History information tab. The list includes the file name, the user who uploaded the file, start time, end time, records added/updated, and the status of the last run.

- # - Item number
- File - The filename that was processed. If the file is deleted from the SmartFolder, the filename will not be displayed in the list.
- Uploaded By - The name of the user who uploaded the file.
- Start Time - The date and time the file was processed.
- End Time - The date and time the file was completed.
- Added - The number of records that were added.
- Updated - The number of records that were updated.
- Failed - The number of records that failed to update/add.
-
Status - The status of the process.
- Processing - The file is currently being processed and is not yet complete.
- Completed - The file has been successfully processed and completed.
- Interrupted - The process was terminated, e.g., GORT was abruptly terminated (e.g., server restart).
- Data Problem - The file contains a data issue, e.g., a pound sign at the start of the column. Data with # should be enclosed in double quotes, e.g., ,"another column","#111 Peter Street","another column",
- Connection Failed - The connection to the external data source failed.
- No file / download file failed - A connection was established, but no file existed in the external data source subfolder.
- File problem
- File failed pre-processing
- Error processing file
- Wrong file type
- Process ID - Unique identifier of the process.
Example Autoloader Configurations
Organization Autoloader
HR Feed Autoloader
UTA L1 Autoloader
Example of Using Ad Hoc Upload URL
Upon clicking the Upload File button, you will be directed to the first page of the Ad Hoc Autoloader interface. Utilize the 'Choose file' button to select the file intended for upload, followed by clicking the 'Upload' button.

You will then proceed to the second page of the Ad Hoc Autoloader interface, which allows users to review the file being uploaded, including the mapping of data to respective fields.

If the data and mappings are satisfactory, please click on the 'Add to SmartFolder and Autoloader Queue' button. This will take you to the third page of the Ad Hoc Autoloader interface, confirming that the file has been successfully added to the SmartFolder.

Additional Considerations
Important Note Regarding XML Files
If any elements within an XML file being autoloaded contain specific special characters, it may disrupt the XML structure, rendering the message unreadable by the receiving server. The less than symbol (<) and the ampersand (&) are two primary special characters of concern. When including fields that may contain these characters, a special wrapper should be utilized to ensure that the receiving server interprets them as data content rather than part of the XML structure:
<![CDATA[ CONTENTS ]]>
For instance, an address or company name may contain ampersands, and should thus be represented as:
JaneSmith
- It is advisable to utilize CDATA for any field containing text, as the content is often unpredictable.
Note Regarding JSON Files
The JSON format should commence with a data node, as illustrated in the example below:
{
"data":[{
"Name":"Acme Corporation",
"Phone":"416-123-4567",
"CompanyID":"496246"
},
{
"Name":"Super Banana Ltd.",
"Phone":"800-555-1234",
"CompanyID":"496244"
},
{
"Name":"Red Apple Supply",
"Phone":"917-123-0000",
"CompanyID":"496248"
},
{
"Name":"Orange you Glad",
"Phone":"410-222-2030",
"CompanyID":"496242"
}
]
}
Reference: Standard Field Names and Variables
The table below serves as a reference for comparing Level 1 Standard Field terminology found in the UTA, within the Autoloader, in the Database, and the Variable syntax.
| UTA L1 Standard Field Name | Autoloader Standard Field Name | Database Name | Variable List |
| n/a | Level 1 ID | opportunityid | @opportunityid@ |
| Application Type | Type Name | opportunitytypename | @type@ |
| Type ID | opportunitytype | @typeid@ | |
| Application Name | Name | name | @name@ |
| Customer | Client | company | @client@ |
| Client ID | companyid | @clientid@ | |
| Client Custom Field | companycfield | ||
| Status | Status | stagename | @status@ |
| Status ID | stageid | @stausid@ | |
| Revenue | Revenue | revenue | @revenue@ |
| Currency | |||
| Currency (USD, CAD, etc.) | currencyid | @currencyname@/ @currencycode@ | |
| Currency Exchange (USD, CAD, etc.) | excur | @excurrencycode@/ @excurrencyname@ | |
| Exchange Rate | excur_rate | @exrate@ | |
| Close Date | Close Date (yyyy-mm-dd) | closedate | @closedate@ |
| Probability | n/a | @probability@ | |
| Description | Description | description | @description@ |
| Requirement | n/a | @requirements@ | |
| Owner | |||
| Owner ID | updatedby | @ownerid@ | |
| Owner (First Name Last Name) | updatedbyname | @owner@ | |
| Owner Email | updatedbyemail | @owner.email@ | |
| Owner Custom Field | updatedbyfield | ||
| Branch | Branch | branch | @branch@ |
| Branch ID | branchid | @branchid@ | |
| Branch Custom Field | branchcfield | ||
| Workflow | n/a | n/a | n/a |
| Contacts | n/a (added Import Contacts on UTA) | n/a | n/a |
| Activity List | n/a (requires separate autoloader) | n/a | |
| End Date | End Date (yyyy-mm-dd) | oenddate | @enddate@ |
| Start Date | Start Date (yyyy-mm-dd) | ostartdate | @startdate@ |
| Modified Date | n/a | @modifieddate@ | |
| Institutions | n/a (requires a workflow) | ||
| End Time | n/a | @hour(fullenddate)@:@minute(fullenddate)@ | |
| Start Time | n/a | @hour(fullstartdate)@:@minute(fullstartdate)@ | |
| Person | |||
| Person ID | oppeopleid | @personid@ | |
| Person (First Name Last Name) | oppeoplename | @person@ | |
| Person Email | oppeopleemail | @person.email@ | |
| Person Custom Field | oppeoplefield | ||
| UTA Providers | n/a (requires a workflow task) | ||
| Status Indicator | n/a | n/a | |
| Transactions | n/a (requires separate autoloader) | ||
| UTA Providers (L2) | n/a | ||
| Modified By | n/a | @modifiedby@/ @modifiedbyid@ | |
| Created Date | n/a | @createddate@ | |
| Created By | n/a | n/a | |
| Invitations | n/a | n/a |