Configuring Global Settings
1. Navigate to Global Settings - Integrations - Integration Key Management.
2. Click on New Integration Key. You will be prompted to fill in the following fields:
- Key Type: set to DocuSign
- Integrator Key**:
- Secret Key**: a unique secret code for the client (refer below for a description of where these can be found)
3. Return to SmartSimple and click Save after entering both keys.
4. Within the Integrations tab, locate the Online Signature Provider section, and select DocuSign. Subsequently, click the button labeled "Activate DocuSign Access" and input your DocuSign login credentials. After saving, the text adjacent to the button should display: DocuSign Access: Enabled.
5. Configure your Web Page View field and utilize the tags outlined below to integrate DocuSign functions with your SmartSimple data. Ensure that the following two field options are enabled:
- Online Signature: This will enable a new button in the Web Page View labeled "Online Signature".
- Enable Save to Server: This will permit a copy of the signed PDF document to be stored within SmartSimple.
- Additionally, you may create an Upload field, if desired, to store the signed PDF file. Utilize the Store-To Value option in the Web Page View field to reference this additional field.
6. Ensure that you have established a role for your Signees, and that the intended individual is added as a Contact using this role. The Web Page View field must contain list syntax that specifies the role ID; this is how SmartSimple determines to whom the e-signature request should be directed.
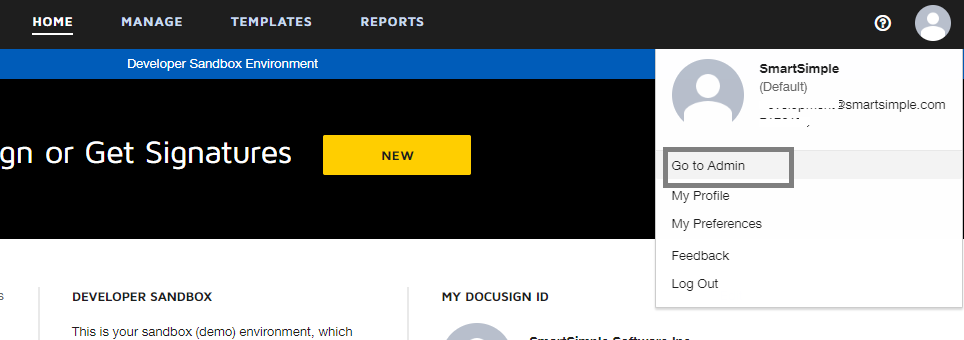
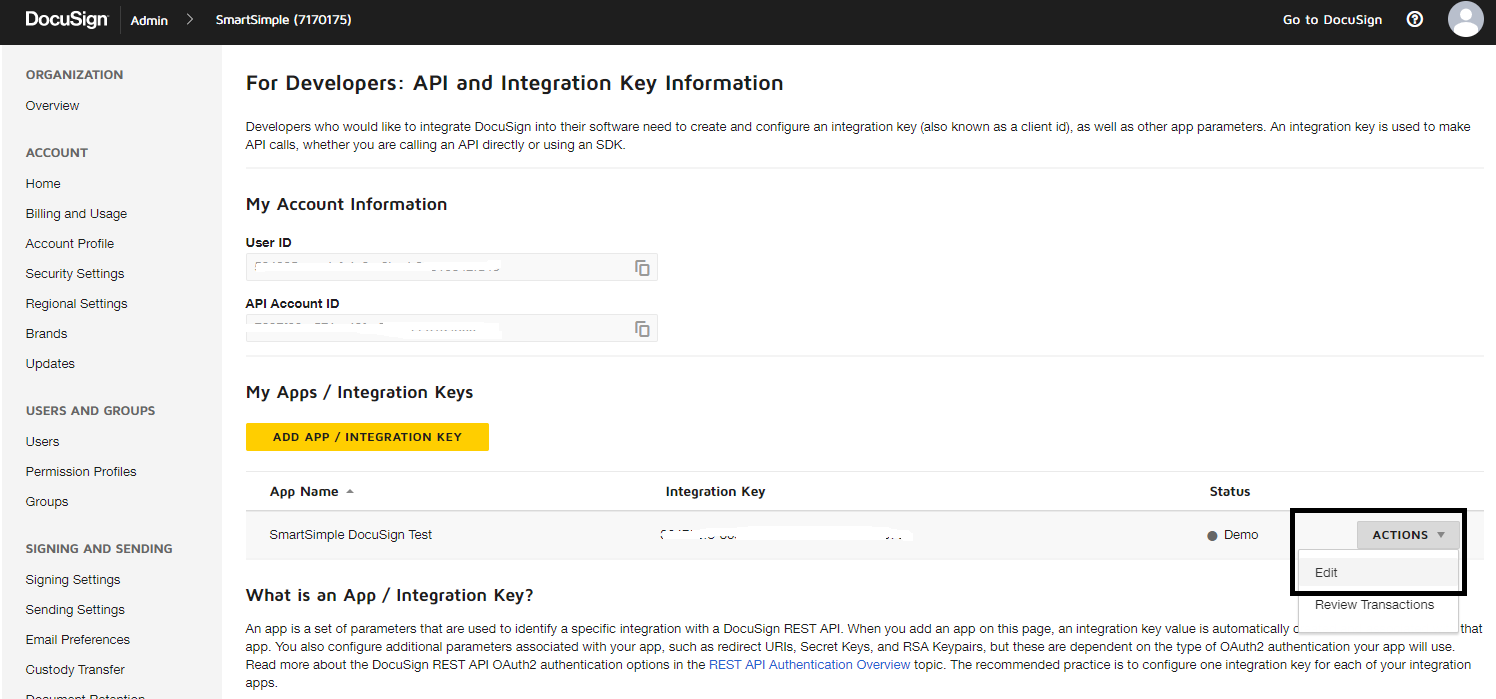
* To obtain the Integrator Key and Secret Keys, log into your DocuSign account, click on the "User" icon, navigate to Admin-->Integrations-->API and Keys (in the left menu), click on the Integrator Key, and you will be able to add new Secret keys there.
Tip: Within the Web Page View window, you can click the Online Signature button to check the status of the current request once it has been submitted.
DocuSign Account Set Up
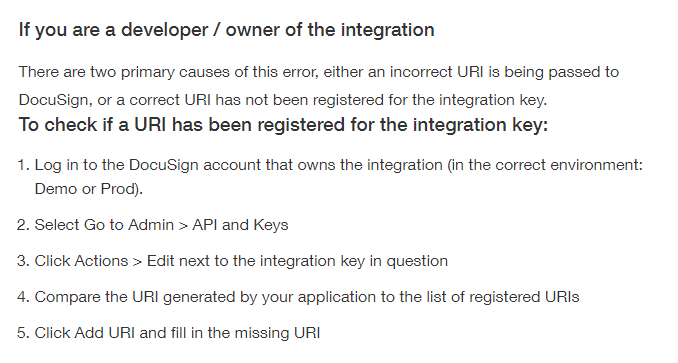
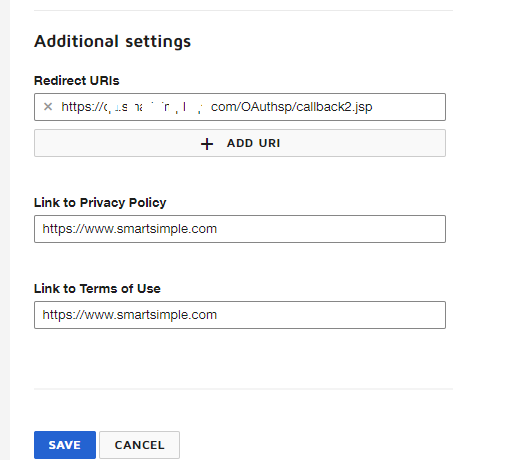
To utilize DocuSign as a signature provider in SmartSimple, it is necessary to register for an account with API capabilities through DocuSign. DocuSign requires users to establish a sandbox account (reference: https://www.docusign.com/blog/dsdev-new-api-and-keys-page/) in order to create an integration key for their DocuSign API integration. After obtaining an integration key from your DocuSign sandbox account, you will need to provide the Redirect URIs (refer to screenshots for additional instructions) to complete the setup process for the DocuSign - SmartSimple integration.
For the Redirect URIs:
1. Navigate to Global Settings - Integrations - Integration Key Management.
2. Click on New Integration Key. You will be prompted to fill in the following fields:
- Key Type: set to DocuSign
- Key name: set to DocuSign
3. Copy the Redirect URL
4. Utilize this URL for the DocuSign API account (when signing up for an API account on the DocuSign site).
The Redirect URI must include your system's URL with /OAuthsp/callback2.jsp appended at the end, as illustrated below:
Redirect URI Example:
https://youralias.smartsimple.com/OAuthsp/callback2.jsp
DocuSign Tags
Please utilize the tags provided below to configure the contact details and signing order for the signatories.
| Function | Tag Format | Example | Notes |
| Populate the email subject | <!--SignatureEmailSubject Place Subject Here--> |
<!--SignatureEmailSubject @name@ Test Email Subject--> |
Include a variable here, such as the Level 1 name. |
| Populate the email body | <!--SignatureEmailBody Place body text here.--> |
<!--SignatureEmailBody This is a test.--> |
|
| Configure the DocuSign expiration date | <!--SignatureExpiryDays Insert Numeric Value--> |
<!--SignatureExpiryDays 14--> |
After submission to DocuSign, the document will expire after 14 days. Signatories will not be able to access the document if it remains unsigned at the time of expiration. |
| Configure the CC email list | <!--SignatureCC email;Name,email2;Name2--> |
<!--SignatureCC abc@fake.com;ABC Smith,qa1@fake.com;QA1--> |
Emails will be copied to the individuals included in this list. |
| Configure the email language | <!--SignatureLocale Language Code--> |
<!--SignatureLocale en--> |
Sets the email language, such as 'en', 'fr', etc. |
| Configure the email flow for multiple signatories | <!--SignatureFlow Indicator--> |
<!--SignatureFlow P--> |
If you specify the signature flow as 'P' (Parallel), emails will be sent to all signatories simultaneously. If you specify the signature flow as 'S' (Sequential), emails will be sent in sequence; for example, the email will only be sent to the second signatory after the first signatory has completed signing the document, and so forth. |
| Set the Signature Block location | <!--SignatureBlock Anchor String--> |
<!--SignatureBlock Anchor String--> |
To ensure the Signature Block appears in a fixed position within the document, you must include the SignatureBlock tag with the defined anchor string, and then, within the document itself, include a text string that matches the anchor string.
|
| Date Block | <!--DateBlock AnchorString--> |
<!--DateBlock Date of Birth: --> |
In this case, the anchor string is "Date of Birth: ". DocuSign will locate "Date of Birth: " in your HTML and require the user to enter a date in the format of MM/DD/YYYY. |
| Date Signed | <!--DateSigned AnchorString--> |
<!--DateSigned Signed On: --> |
Here, the anchor string is "Signed On: ". DocuSign will find "Signed On: " in your HTML and place the date of the signature beside it. |
| Set the location of the Initials Block | <!--InitialsBlock InitialsAnchorString--> |
<!--InitialsBlock Your Initials:--> |
In this instance, the anchor string is "Your Initials: ". DocuSign will locate "Your Initials: " in your HTML and position the Initials Block below it. If the specified AnchorString is not found in the document, or if this tag is not included in your HTML, signatories will have the option to place their initials anywhere in the document. |
| Use Dynamic Format | <!--DynamicFormat 1--> |
<!--DynamicFormat 1--> |
Specify the positions of different blocks dynamically and generate fillable PDF fields. For further details, please refer to the section on Generating Fillable PDF Forms for E-Signatures. |
Identity Verification
Various recipient/signer authentication methods are supported, including ID verification, phone authentication, access code authentication, and knowledge-based authentication (available only for U.S. residents). To utilize this feature, clients must have the Identification Verification feature enabled in their DocuSign account. Please log in to your DocuSign account and navigate to “Admin – Signing and Sending – Identity Verification”.
For ID verification and phone authentication, a DocuSign workflow must be created.
For detailed instructions, please visit: https://support.docusign.com/s/document-item?language=en_US&bundleId=yff1696971835267&topicId=uhm1697826856678.html&_LANG=enus
Note: The actual verification process occurs on DocuSign’s end, and recipients will be presented with various options to verify their identity based on the configured verification or authentication method in the Web Page View custom field.
ID Verification
Clients will need to create their own Identity Verification Workflows within their DocuSign account by navigating to “Admin – Signing and Sending – Identity Verification”. DocuSign provides a list of accepted ID options for different regions (such as passport, driver's license, bank ID, etc.).
When establishing a new ID Verification Workflow, there are various DocuSign settings that must be configured.
Accepted forms of identification vary by region. Clients can review these by accessing the Advanced settings of each ID verification workflow configuration page.
When reviewing each ID verification workflow, a Configuration ID for API integrations is available at the bottom of the screen. Clients must provide this in their Web Page View field for each recipient. Different identification workflows may be used for various recipients (for example, one using eID, another using phone authentication, and one without the need for verification).
Phone Authentication
Clients will need to create their own Identity Verification Workflows within their DocuSign account by navigating to “Admin – Signing and Sending – Identity Verification”. The recipient's phone number must be included in the Web Page View inside the verification syntax. DocuSign will utilize this number to send an SMS or call the recipient for verification purposes.
The syntax to be applied to the Web Page View is as follows:
A new syntax for this identity verification begins with “Verification,” where the syntax is delimited by a semicolon ( ; ).
ID Verification (IDV)
- Configuration ID for API integrations (workflow ID in DocuSign Identity Verification)
<!--Verification fake2@gmail.com;4ggg7cce-6c25-82e8-4444-8888d18947ef -->
Phone Authentication
- Configuration ID for API integrations (workflow ID in DocuSign Identity Verification)
- phone=[country code]-[phone number without symbols] for each recipient
<!--Verification fake1@gmail.com;9bbb5cce-6c25-42d6-8934-2799d18947ef;phone=1-6475558888-->
Since phone authentication also requires a workflow ID, the only method to differentiate is to indicate that this is for phone authentication by using “phone=”. DocuSign necessitates separate values for country code and phone number.
Knowledge-Based Authentication (U.S. residents only)
According to DocuSign: Knowledge-based authentication necessitates that recipients answer detailed questions about themselves based on data available in public records (such as their current and former addresses). The DocuSign eSignature KBA feature employs an identity verification service from LexisNexis Risk Solutions that validates user identities in real time.
- ID Check (Enter the string exactly as ID Check. This syntax is used by DocuSign to differentiate this type of authentication)
<!--Verification fake2@gmail.com;ID Check-->
Access Code Authentication
- accesscode (please enter the string exactly as accesscode)
- value=BQ908C (The text the user must enter when prompted for the Access Code by DocuSign. For instance, if a custom field value is used as the access code for recipients, include the value in the syntax.)
<!--Verification fake3@gmail.com;accesscode;value=BQ908C -->
Note: If the workflow ID of the DocuSign Identification Verification is not found in the client's DocuSign account during the submission of a signature request, DocuSign will return an error.
For additional reference regarding DocuSign ID Verification, please visit: https://www.youtube.com/watch?v=bJw4kzvhXK0
Generating Fillable PDF Forms for E-Signatures
Web Page Views can be configured with fillable forms and exported as a system-generated PDF for electronic signatures. All fields must be created from the WPV template HTML content using the specific syntax indicated above.
Note
In order for DocuSign to retrieve signatory emails, names, etc., you must embed them in your HTML. They will subsequently be utilized in the emails sent to signatories. For example:
[#(?object=contact;criteria=roleid='12527';orderby=firstname) <!--SignatureFlow P--><!--signature ~email~;SIGNER;~firstname~;~lastname~;~Index~;~companyname~-->#]
If you have three signatories assigned to Level 1, the HTML in your Web Page View will be embedded with the information for all three:
<!--signature ttest@smartsimple.com;SIGNER;Tony;Test;1;SmartSimple Software -->
<!--signature fake@smartsimple.com;SIGNER;Fake;Man;2;Fake Co. -->
<!--signature fake2@smartsimple.com;SIGNER;Fake2;Mann;3;Fake2 Co. -->


