Overview

An example field configured as a budget sheet.
This field type can be utilized to create worksheets or tables, including budget sheets and information lists. It accommodates a wide range of complexities, from simple tables to multi-section, multi-year budgets. This is achieved through the capability to configure sub-sections within the same worksheet and define automatic cell calculations, resulting in a highly robust and flexible field.
By default, data for this field is stored in a structured XML (Extensible Markup Language) format. However, there is an option to use this field as a presentation layer for lists of sub-activity records. For instance, this field may be employed on a UTA Level 1 record to display any associated UTA Level 2 records, facilitating the user in updating activities or creating new ones.
If you aim to create a basic list or budget, you may also utilize the field titled Special - Basic Data Table.
| Summary | |
| Commonly Used in Markets (Philanthropy, Research, Insurance) | All |
| Used By (User Type) | All |
| Requires Administrator Setup | Yes |
| Configuration Complexity (Low, Medium, High) | High |
| Time to Configure (Minutes, Hours, Days) | Hours |
Field Options
All common options:
General Settings
Permissions & Availability
Classic Options
For further information, please refer to Custom Fields – General Information.
The options listed below are specific to this particular field type.
XSL Template: Used to define the appearance of the XML.
XML Tag Mapping: Utilized for Tag Maps.
XML Javascript Function: Employed for JavaScript and jQuery functions such as validations.
Show View XML Button: Used to display the XML button, which opens the XML feed (code) in a new window.
Show Upload Button: Used to display the upload button, allowing users to upload an XML file. If the node structure matches that of the field, it will populate the cells with the appropriate values.
Show Up/Down Button: Used to display an up and down arrow on each row of a dynamic XML section, enabling users to move rows up and down.
Show Clear Button: Used to display the Clear button on the XML field, allowing users to quickly clear all values from the XML form.
Custom Field Ids: Utilized to reduce variable processing time by specifying field IDs of custom fields referenced from within the current field.
Configuration - Essentials
Creating the field
Typically, Advanced Data Table custom fields are established for UTA levels 1, 2, or 3 (e.g., a grant application) or are created for organizations. To create the field:
- Navigate to the desired settings area where you wish to create a worksheet (e.g., the UTA level 1).
- Click the New Field (+) button.
- For Field Type, select Special - Advanced Data Table.
- Enter a Field Name, Caption, and then Save.
- Utilize the Section Builder button to initiate the process of creating the XML tables.
- Use the Custom Field button to navigate back from the Section Builder to the Field settings to configure the display of tables.
Create a Simple Table
Through the Section Builder , you can create sections and define the attributes of each section and the cells within them. You can specify the number of rows and columns, the display format, calculation formulas, and modify other parameters.

The section builder interface.
- While editing the custom field, click on the Section Builder button (the four square icon) in the action bar.
- Create a New section and enter a Section Name (e.g., Expenses).
- Specify the Number of Rows and Number of Columns desired.
- Once you Save , you will be directed to the Cell Details tab.
- Define a Display Name for the column headers (e.g., Item, Amount, Date).
- Define a Display Name for the first column of each row (e.g., Salaries, Equipment, Other).
- Within each of the column headers, you can define a Format for the column (e.g., Text, Currency, Date). For the Number format option, you may also specify a precision.
- When you are finished, click the Build button.
Note:
- When selecting the format Currency for a column header, ensure that you specify the column alignment as Right Align. This facilitates easy comparison of values for the user. This step is also necessary if you intend to export this data to PDF for printing.
- You must use unique node names for sections, rows, and columns within this field.
Create a Table with a Dynamic Number of Rows

An example section configured for dynamic rows.
In addition to defining a fixed number of columns and rows, you can also configure a section to accommodate a dynamic number of rows. The user entering the data can add rows as necessary during the entry process. This is achieved by entering 0 for the Number of Rows, which subsequently reveals the following configuration options:
- Maximum Number of Rows: Set a maximum limit to the number of rows that can be entered, or leave it as 0 for no limit.
- Maximum Message: The message displayed when the maximum limit is set and reached by a user. A default message is displayed if this input is left empty.
Setting the Number of Rows to 0 also unveils the following configuration options for each column header within the Cell Details tab:
- Has Total: Display the total sum of the column.
- Total Row Label: For columns without a total display, this option allows you to enter a label for the total sum of another column. For example, if column 3 is displaying a total, you could configure the Total Row Label of column 2 to display 'Total'.
Configure the Display of Tables
The presentation of the XML Data custom field is configured in the General Settings tab of the field. This is defined in the XSL Template (Extensible Style Sheet Language) input. The XSL Template includes a sample template link. Once you have inserted the sample template, you will need to specify which sections should appear and their respective locations.

The XSL template and configuration interface.
- While editing the custom field, locate the XSL Template link and insert the Sample Template.
- Locate the marker below.
<!---- Insert section variable here ---->
- Below this marker, insert variable references for each section using the following syntax (e.g., @section.Expenses@) in the order in which you wish the sections to appear.
Note:
- Ensure that you are utilizing the Section Node Name and not the Section Name.
- Section Node Name is case sensitive. For example, if your Section Node Name is Expenses, then @section.Expenses@ will work, but @section.expenses@ will not, as it contains a lowercase e.
@section.SectionNodeName@
Configuration - Advanced
Creating formulas (calculations) in cells

In the section builder, you declare the formatting such as currency or numeric for specific columns and select the precision. You can also perform calculations on numeric and currency data (e.g., to sum the contents of column one over two rows, enter =[1,1]+[2,1]).
Adding a formula to a cell (working with data in the same section)
- Navigate to your custom field.
- Click the Section Builder button in the action bar.
- Select the desired Section to edit it.
- Select the desired Cell.
- Enter the desired formula into the Content input.
- Click Build.
The syntax for basic calculations within a section:
| Operation | Symbol | Example |
| Add | + | =[row#,column#]+[row#,column#] |
| Subtract | - | =[row#,column#]-[row#,column#] |
| Divide | / | =[row#,column#]/[row#,column#] |
| Multiply | * | =[row#,column#]*[row#,column#] |
Thus, if you wished to add the values of row 1 and 2 together in column 1, you would enter =[1,1]+[2,1].
To minimize divide by zero errors, you may first check if the denominator is 0 (and set the value to 0) by utilizing the following syntax:
=(ssParseNum([1,3])==0 ? 0 : ([1,2]/[1,3])*100)
Adding a formula to a cell (working with data in different sections)
Refer to cells in different sections using the following syntax:
[@section.sectionname.id@_rownodename_columnnodename]
Example:
=[@section.expense.id@_Total_Amount]-[@section.income.id@_Existing-funds_Amount]
If you need to display data in the header of a section (row 0) from another section, you can use the following:
@xml.customfieldname.sectionnodename.rownodename.columnnodename@
Validate values when saving the worksheet
Clicking on a cell within the section builder will present you with the cell properties. There are two cell properties utilized for the validation of cells when the XML worksheet is saved.
- Validation Script: Validates the input field.
- Validation Message: The content displayed when the validation script is not satisfied (e.g., Value must be greater than 100).
Examples:
- Total Amount greater than 0, for currency formatted column totals
ssParseNum([this])>0
Message: Total must be greater than $0.00
- Date is at least 30 days in the future
datediff(ConvertDateStr([this],'@dateformat@'),'@date(currentdate)@','d') > 30
Message: Please select a date that is at least thirty (30) days from today.
- Cell is not empty
[this].length>0
Message: Please provide a value.
- Check if the user selected something other than the default Combo Box value
[this]!="Default Combo Box Value"
Message: Please select a value. Note that Default Combo Box Value should be substituted with the default value you have configured, e.g., --- Select One ---.
- Integer greater than 0 (Allow only an integer or if your field on the XML is formatted to display/use a comma.)
parseInt([this])>0
Message: Please provide a numeric value greater than 0.
- Value entered in one cell cannot exceed 20% above or below the value in another cell
(ssParseNum([this])>=(ssParseNum([1,4])*(0.80)) && ssParseNum([this])<=(ssParseNum([1,4])*1.20))
Message: Value entered in one cell cannot exceed 20% above or below the value in another cell.
Validating values when saving record (SmartCheck, Submit Logic, Browser Script)
In addition to validating values when you save the worksheet you can also validate the worksheet when you save the record (e.g. save a level 1 grant application).
When creating validation for an this custom field use the Appear Mandatory option. Appear mandatory does not enforce the validation but will make the field look mandatory (it adds the asterisk and or color) just like the mandatory option. Once you have checked Appear Mandatory, validate this field using one of the following validation methods, when the record is saved.
SmartCheck Validation
Use SmartCheck for validation when possible. SmartCheck validation is a secure server-side method. SmartCheck also displays all error messages in a context as well as in one central place.
Validate a table node is not empty and display a message.
if("@level1.xml.fieldname.sectionnodename.rownodename.columnnodename.nodevalue@"=="")
{result.isPassed=false;
result.addMsg('xml_@fieldname.id@','YourAlertMessage');	}
Submit Logic Validation
Utilize Submit Logic in conjunction with Submit Buttons to validate a worksheet.
Ensure that a node is not blank when saving the worksheet.
"@level1.xml.fieldname.sectionnodename.rownodename.columnnodename.nodevalue@"!=""
Special - Browser Script Validation
You may input JavaScript and jQuery into the XML JavaScript Function input to create specific validations. Employ the following syntax when referencing a value in your variables.
@xml.customfieldname.sectionnodename.rownodename.columnnodename@
The following function enables you to verify an already selected value from an existing row when utilizing dynamic rows:
// REPLACE '7172_dsItem_Population' AND '7172_dsItem_Population_' WITH SPECIFIC XML FIELD ID

var saveFunc=saveXML;
saveXML=function() {
			checkdupeval();
			}
function checkdupeval() {
var result = 0;
var numOfRows = document.getElementsByName('7172_dsItem_Population'); //section node
var ctr=1;
for (ctr=1;ctr<numOfRows.length;ctr++)
{
var field1='7172_dsItem_Population_'+ctr;
var lastfield='7172_dsItem_Population_'+numOfRows.length;
var a = document.getElementById(field1).value;
var b = document.getElementById(lastfield).value;
if( a == b)
{
	alert ("Please list each population no more than once.");
	result = 1;
}
}
if(result==0)
	saveFunc();
}
The following function allows you to check for an already selected value from an existing row across multiple sections when using dynamic rows:
var saveFunc=saveXML;
saveXML=function() {
if (checkdupeval_Section1() == 0 && checkdupeval_Section2() == 0 && checkdupeval_Section3() == 0) {
      saveFunc();
  }

            }
function checkdupeval_Section1() {
var result = 0;
var numOfRows = document.getElementsByName('16580_row_COUNTY');  // REPLACE '16580_row_COUNTY' AND '16580_row_COUNTY_' WITH SPECIFIC XML sectionid_rownodename_columnnodename for Section 1
var ctr=1;
for (ctr=1;ctr<numOfRows.length;ctr++)
{
var field1='16580_row_COUNTY_'+ctr;
var lastfield='16580_row_COUNTY_'+numOfRows.length;
var a = document.getElementById(field1).value;
var b = document.getElementById(lastfield).value;
if( a == b)
{
    alert ("Please list each option no more than once for Section 1.");
    result = 1;
}
}
  return result;

}

function checkdupeval_Section2() {
var result = 0;
var numOfRows = document.getElementsByName('16581_row_COUNTY');  // REPLACE '16581_row_COUNTY' AND '16581_row_COUNTY_' WITH SPECIFIC XML sectionid_rownodename_columnnodename for Section 2
var ctr=1;
for (ctr=1;ctr<numOfRows.length;ctr++)
{
var field1='16581_row_COUNTY_'+ctr;
var lastfield='16581_row_COUNTY_'+numOfRows.length;
var a = document.getElementById(field1).value;
var b = document.getElementById(lastfield).value;
if( a == b)
{
    alert ("Please list each option no more than once for Section 2.");
    result = 1;
}
}
  return result;
}

function checkdupeval_Section3() {
var result = 0;
var numOfRows = document.getElementsByName('16582_row_COUNTY');  // REPLACE '16582_row_COUNTY' AND '16582_row_COUNTY_' WITH SPECIFIC XML sectionid_rownodename_columnnodename for Section 3
var ctr=1;
for (ctr=1;ctr<numOfRows.length;ctr++)
{
var field1='16582_row_COUNTY_'+ctr;
var lastfield='16582_row_COUNTY_'+numOfRows.length;
var a = document.getElementById(field1).value;
var b = document.getElementById(lastfield).value;
if( a == b)
{
    alert ("Please list each option no more than once for Section 3.");
    result = 1;
}
}
  return result;

}
The following function allows you to hide the Add Row button for a specific section when the record is in a specific status:
function onloadfunc() {
    <!--@sslogic("@statusid@" = "XXXXX" )--> //Replace XXXXX with the ID of the status in which the button should be hidden
    $('#addrowbutton_@section.SECTION.id@').hide(); //Replace SECTION with the section name
    <!--@end-->
}
The following function allows you to hide the Delete Row button:
function onloadfunc() {
    $("a[name='@section.SECTION.id@_deletebutton']").remove(); //Replace SECTION with the section name
}
Managing Level 2 / 3 Activities with a Section
System administrators have the capability to configure this field to add, modify, or delete Level 2 records on a Level 1 entity or Level 3 records on a Level 2 entity.
In the Section Builder, when the Number of Rows for a Section is set to '0', the Enable Mapping option will become visible.
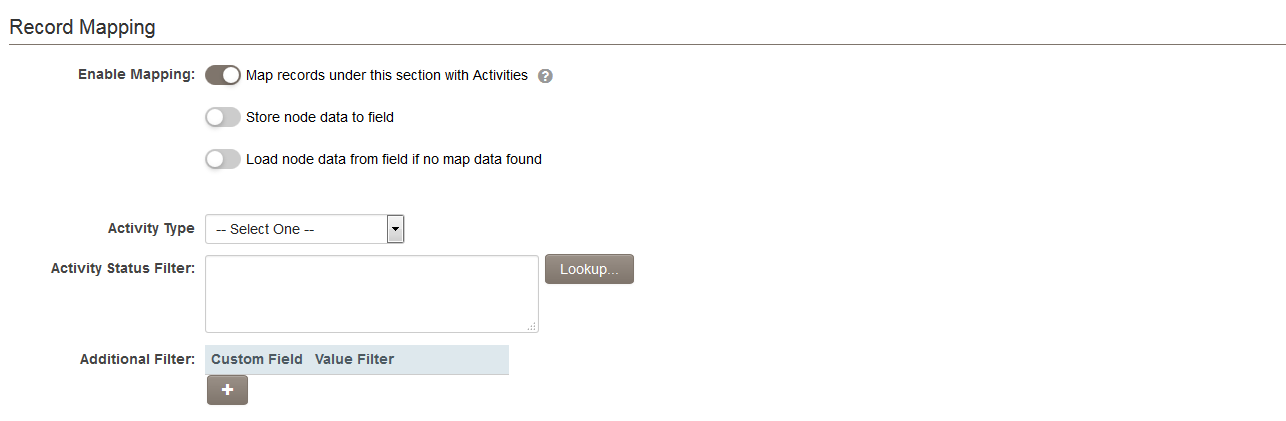
When Enable Mapping is selected, you may choose one type of activity to be referenced by this field.
The Activity Status Filter setting allows you to filter the activities to be referenced by their status.
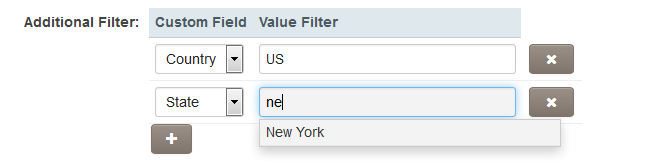
The Additional Filter setting enables you to select custom fields and associated values, which are utilized to filter the existing activities that will be listed within this field. The custom fields employed must be fields with pre-defined options (e.g., Select One - Dropdown List, and Select Many – Check Boxes).
When constructing your section, you will need to map the fields on the Level 2s that will be referenced by the section.
For each Section column, please enter the field name from the Level 2 type that you have selected from the Activity Type dropdown in the Map Field section:
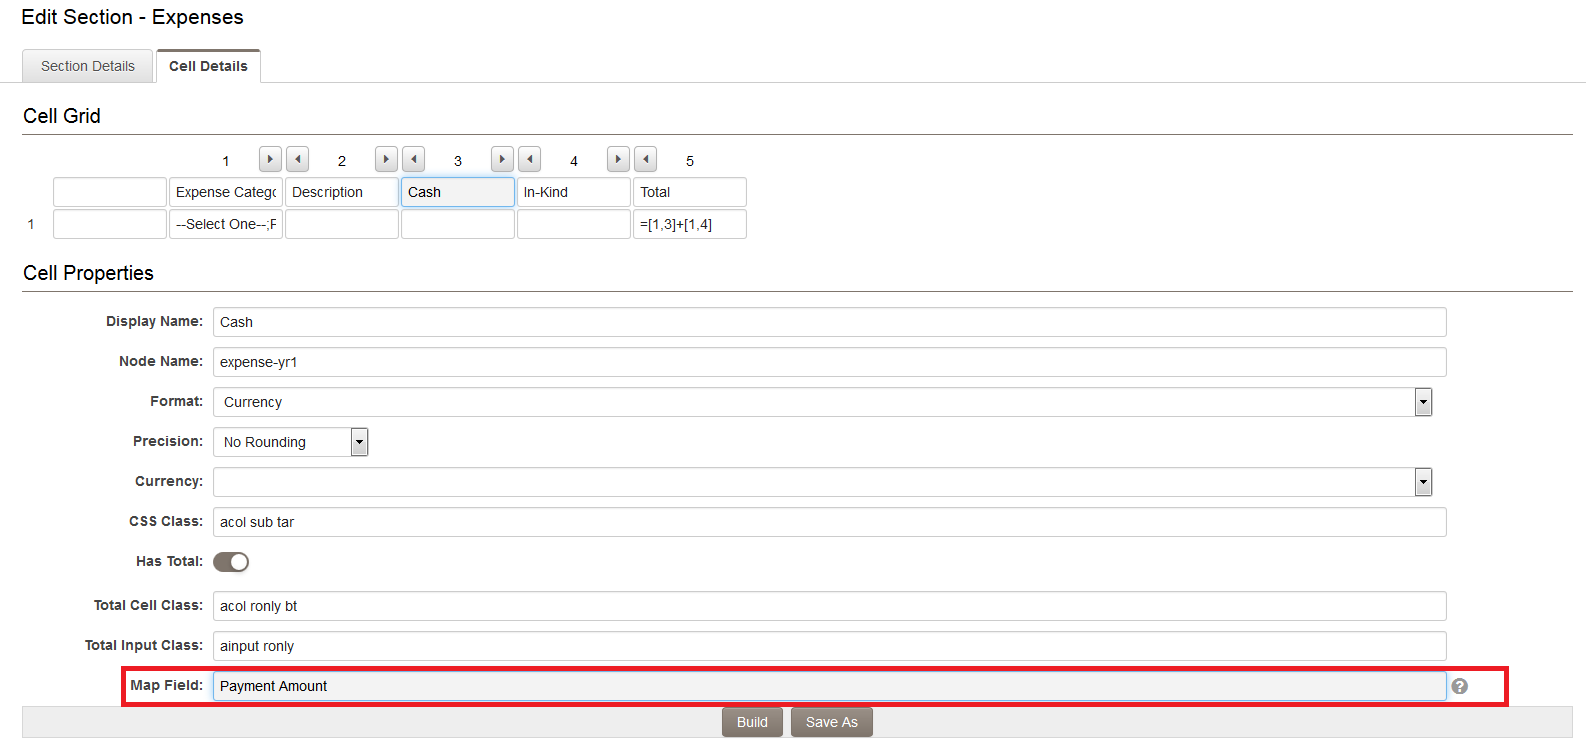
The syntax for the Map Field section is as follows:
- for custom fields, the field name (i.e., Fund Name);
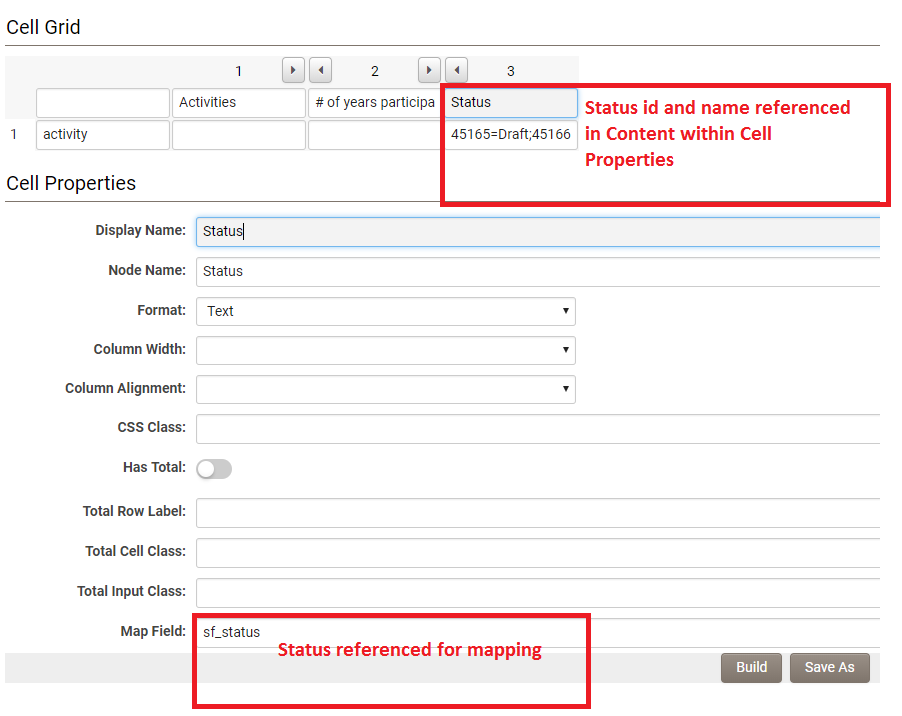
- for Standard Fields, utilize the prefix sf_ followed by the system name for the standard field (i.e., sf_status).
Refer to the Standard Level 2 Field List article for a comprehensive list of system names for Level 2 standard fields. If the Standard or Custom field possesses a limited number of pre-defined options, these must be defined in the Content section of the cell properties.
It may be necessary to reference certain standard field options using both the displayed name and stored ID values.
Upon adding this section to the Template of your field, the list of Level 2 activities will be displayed when the worksheet is opened. Level 2s can be added, deleted, and modified directly from the Level 1 Advanced Data Table field.
Displaying XML Data
Displaying Advanced Data Table Data on an Object

The Advanced Data Table custom field can be opened in a new or modal window. The Open in Modal Window option is recommended. You can enable this option under Document Options.
By default, the information entered into this field type is concealed until the user clicks a button. However, there exists a method to display the information entered into this field on your object, such as a grant application, without necessitating the user to click a button and launch the modal window.
Utilize the Display - Text and Variables custom field to exhibit the content of the Advanced Data Table on the object. The same syntax can be employed elsewhere in the system when referencing the values of this field.
- Navigate to the desired location where you wish to create the custom field.
- Click the New Field (+) button in the action bar.
- For Field Type, select Display - Text and Variables.
- Enter a Field Name.
- For Variables, input @xml.CustomFieldName.SectionNodeName.html@ (replace the CustomFieldName and SectionNodeName with the actual names from your XML example @xml.Budget.Expenses.html@).
- Scroll down to the Display section.
- For Caption, select Hide Caption (it is recommended that you hide the caption for the display to utilize the full screen width).
- Click Save.
- Return to the Advanced Data Table field and click Save (this updates the linkage and ensures that when data is entered into the worksheet, the data displayed on the object will also be automatically updated. If this step is overlooked, information entered into the Advanced Data Table will only refresh in the Display - Text and Variables field when the object is saved).
Note: It may be advisable to create two Display - Text and Variables custom fields for each Advanced Data Table custom field: one for printing and another for displaying on the object.
Access, Display, and Format Options for Data
The syntax options for accessing, displaying, and formatting the data from the Advanced Data Table field are detailed below.
- Extract the value from a specific individual cell using the field name.
@xml.fieldname.sectionnodename.rownodename.columnnodename@
- Extract the value from a specific individual cell using the field id.
@xml.#fieldid#.sectionnodename.rownodename.columnnodename@
- Extract a numeric value and return it in comma format (i.e., 1000 will display as 1,000).
@xml.fieldname.sectionnodename.rownodename[# ~comma(columnnodename.nodevalue)~ #]@
- Extract a numeric value and return it in currency format.
@xml.fieldname.sectionnodename.rownodename[# ~currency(columnnodename.nodevalue)~ #]@
- Extract a numeric value and return it in a specific currency format.
@xml.fieldname.sectionnodename.rownodename[# ~currency_eur(columnnodename.nodevalue)~ #]@
Further currency formatting options are detailed below:
| usd | $300.00 |
| eur | €300.00 |
| jpy | ¥ 300 |
| zar | R 300.00 |
| inr | ₹300.00 |
| frca | 300,00 $ |
- Extract a numeric value and return it in currency format with two decimal places. If sourced from a dynamic XML section, multiple values will be displayed.
@xml.fieldname.sectionnodename.rownodename[# ~currency_eur(columnnodename.nodevalue,2)~ #]@
- Extract a value and return the number of characters in the field.
@xml.fieldname.sectionnodename.rownodename.columnnodename.nodevaluelength@
- Extract a numeric value and return it in currency format with two decimal places for values sourced from a static XML section.
<!--@sscalculation(format("@xml.fieldname.sectionnodename.rownodename.columnnodename.nodevalue@",2))-->- Extract a filtered row count from a dynamic XML section.
<!--@sscalculation(@xml.XML Field.People.Person[#(?criteria="~type.nodevalue~" == "A") 1+#]@ 0)-->
- Extract a percentage value and format with two decimal places. If sourced from a dynamic XML section, multiple values will be displayed.
@xml.fieldname.sectionnodename.rownodename[# ~percentdisplay(columnnodename.nodevalue,2)~ #]@
- Extract date values and return them with specific formatting using the following syntax: Return the date in the user's date format.
@xml.fieldname.sectionnodename.rownodename.formatdate(columnnodename.nodevalue)@
- Return the year.
@xml.fieldname.sectionnodename.year(columnnodename.nodevalue)@
- Return the month.
@xml.fieldname.sectionnodename.month(columnnodename.nodevalue)@
- Return the month name.
@xml.fieldname.sectionnodename.monthname(columnnodename.nodevalue)@
- Return the day.
@xml.fieldname.sectionnodename.day(columnnodename.nodevalue)@
- Return the day of the week.
@xml.fieldname.sectionnodename.dayweek(columnnodename.nodevalue)@
- Count the number of rows created by the user in a dynamic XML section.
@xml.fieldname.sectionnodename.rownodename.nodecount@
- Return the XML feed (code) from the field.
@fieldname.xmlvalue@
- Return multiple rows for XML with dynamic sections.
@xml.fieldname.sectionnodename.rownodename[# ~columnnodename.nodevalue~ #]@
- Return filtered row values for XML with dynamic sections.
@xml.fieldname.sectionodename.rownodename[#(?criteria="~colunnnodename.nodevalue~" == "matching criteria")~columnnodename.nodevalue~ #]@
- Return multiple rows for XML with dynamic sections in a custom HTML table.
@xml.fieldname.sectionnodename.rownodename[# #]@
~columnnodename.nodevalue~ |
~columnnodename.nodevalue~ |
~columnnodename.nodevalue~ |
- Return a single value in the total row of a Dynamic XML.
@xml.fieldname.sectionnodename.total.columnnodename.nodevalue@
- Return the Display Value of a cell containing a dropdown value selection, including both a Display and Stored value (example: 0=Please Select;1=Yes;2=No).
@xml.fieldname.sectionnodename.rownodename.columnnodename.displayvalue@
Styling Advanced Data Table for Web, Print, and Conversion to PDF

To ensure that data entered into an Advanced Data Table fits on the screen and can be converted to a PDF without any data being cut off, administrators must upload two external CSS stylesheets to a SmartFolder, reference them in the Advanced Data Table and the Display Text and Variables fields, and add some code to both of these fields.
Note:
- Ensure that your Advanced Data Table contains 8 or fewer columns to guarantee it will print and fit on the screen.
- If users are expected to enter paragraphs of information, they should do so in a new row or new section, rather than adding another column.
- If your worksheet does not appear as expected, ensure that Apply Default Styles is toggled on in the Section Builder, and then click Build on each of your sections in the Section Builder.
Styling Advanced Data Table for Converting to PDF and Printing
You can print the content of your Advanced Data Table by displaying it in a Display Text and Variables custom field. To accomplish this, the content must fit within 700 pixels wide (portrait) or 900 pixels wide (landscape); otherwise, content will be cut off when a PDF is generated. To ensure that content does not get cut off and that columns between sections align, we will utilize CSS in a SmartFolder and modify our Display Text and Variables custom field.
- Navigate to the desired Display Text and Variables.
- Paste the contents of display.html into the Content section of the field.
- Update the href to point to the relative path of the file named xml-print.css that you uploaded to the SmartFolders.
- Add your desired variable example @xml.Budget.Expenses.html@ inside the div with the class="xml8col".
- Change the 8 in class="xml8col" to reflect the number of columns in your section. Note that you must have 8 or fewer columns.
- If you wish for this table to be displayed wider for landscape printing, add the word landscape to the class example class="xml8col landscape".
- Save your custom field.
You now possess a version of your Advanced Data Table that can be displayed on the object, such as the level 1 application, and can be converted to a PDF using the Web Page View custom field.
If you created two Display - Text and Variables custom fields, one for printing and one for on-screen display, the aforementioned instructions pertain to the print version, as it will reduce the font size and constrain the content to 700 pixels. In this print version, utilize the SmartFields View setting and select Include. This will incorporate this field in the PDF. For the second Display - Text and Variables intended for on-screen use, set the SmartFields View to Exclude. This will conceal the on-screen version from the PDF. Lastly, for the on-screen version, do not employ the xml-print.css or the div wrappers.
Reporting on Advanced Data Table Data
Extract values in a report using the following syntax in the report builder. This will return a single value for static sections specific to the row and multiple values for dynamic sections across all rows.
ExtractValue([this], '/worksheet/sectionnodename/rownodename/columnnodename')