Overview
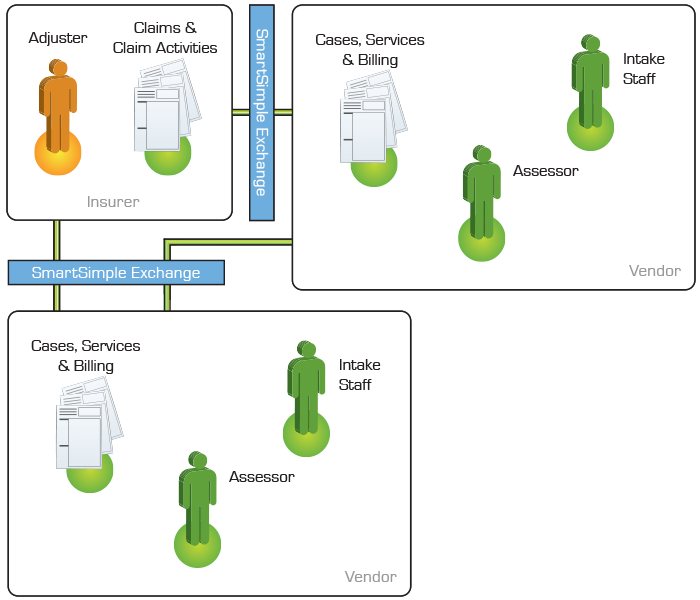
The SmartSimple Data Exchange technique offers a secure method for transferring information between SmartSimple systems. This technique is primarily utilized for sharing information between an Insurer and a Service Provider, or among multiple Service Providers.
What are the benefits of Data Exchange?
Support for Intra-Organizational Case Management
Multiple organizations can engage in the same case while maintaining unique information about the case that is not disclosed to others.
Encrypted Electronic Transmission
- Data is compressed (to minimize size), encrypted (to ensure confidentiality), and transmitted between SmartSimple systems.
- The secure transmission of medical briefs and Insurer Examination reports expedites turnaround time within a regulation-imposed and time-sensitive cycle.
What type of Data is transmitted via Data Exchange?
- Claim Information (Level 1 Entity)
- Assessment Information (Level 2 Entity)
- Billing Information (Level 3 Entity)
- Notes associated with the Claim
- Contact Information
- Attached Files and Documents
What is the Data Exchange Technical Protocol?
- The user initiates the process by clicking a button.
- The system compresses the information into a zip file.
- The data is encrypted with a key using DES/MD5.
- The package is posted to a single target server via HTTPS (SSL).
- The recipient server is notified of the new note or package.
- The user unpacks the package, and new data is added or updated in the system.
Note: The size limit for export packages is 250 MB.
What is the Data Exchange Business Protocol?
Business protocols may vary and are implemented as specified by the Insurer. Commonly adhered to business rules include:
- The sender must add a note prior to exporting the package.
- Uploaded documents must conform to the naming conventions prescribed by the Insurer.
How can I track data exchange on a Claim?
You can monitor the Claim Exchange through the following means:
- Exchange History
- Notes Exchange History
- Incoming Packages
- Exported Packages
How is Data Exchange Configured?
Data Exchange is configured through the following steps:
- Configuring a Sending Instance
- Configuring a Receiving Instance
Troubleshooting Data Exchange Issues
Issue: Why am I unable to export the claim to an Insurer?
Resolution: You may only export a claim that was originally received from the Insurer via Data Exchange.
Issue: I encounter an error when unpacking a package.
Resolution: Refer to the notes on unpacking for commonly encountered data exchange errors.
Configure Exchange Settings
When utilizing the Data Exchange feature of the Universal Tracking Application, you can configure settings when sending a package to another instance.
This can be enabled on the Settings page of the UTA within the Exchange Settings section:

The sender may specify a custom field to record acknowledgements indicating when the receiving party has unpacked the package.
This field will be populated on the sending instance once the package is unpacked on the receiving instance.
The sender can also click the Sending List to access the list of instances to which they will be sending packages.

They can then click on the hyperlink in the sending Alias column to access the Sending to Settings Page for an existing recipient or click on the New Sending tab to configure the Sending to Settings Page for a new recipient.
Sending To Settings Page
The Exchange Configuration screen is displayed. This page is divided into six sections.
- Sending To Settings – outlines the details of the receiving instance.

- Registered User Roles – specifies which user roles should be utilized as part of the transfer process. Only users associated with the roles selected here will be synchronized.

- Registered Organization Categories – determines which organization category roles should be utilized as part of the transfer process. In this instance of SmartSimple, there are currently no categories defined.

- Registered Personal Transactions – identifies which user transactions should be part of the transfer process.
![]()
- Key Setting – utilized to generate the key to be employed by the receiving instance.

- Export Information – a series of tabs used to determine the contact, organization, and transaction fields to be included in the transfer.

Setting Sending to Settings
Next, you will configure the Sending to details. The following settings are required for each organization to which you will be sending information:
- Alias - Enter the alias of the receiving instance.
- Id - An arbitrary two-digit number unique to the receiving instance.
- Description - Provide the full company name of the receiving instance.
- Post URL - Enter the full URL of the receiving instance, including the "http://" prefix.
- Export Workflow - Specify the instance to be executed when the package is exported.
1. Enter the required Sending to information.

2. Click the Save button.
Copying Sending to Settings
There are instances when it is necessary to modify an alias while retaining all other settings in the data exchange.
The alias serves as a primary key in the exchange settings and is a critical component in the entire data exchange process.
Consequently, rather than allowing manual overwriting of the alias, SmartSimple provides the functionality to copy existing Sending to settings and modify the alias as part of this process.
- Navigate to the Sending To Settings section for the alias you wish to modify.
- Click the Copy button located at the bottom of the settings screen.

- In the subsequent screen, enter the new alias and click OK.

- The Sending to Settings for the new alias will be saved with all previous settings duplicated.
NOTE: If a Sending to Setting already exists for the new alias, it will not overwrite the existing settings to prevent any unintended errors.
Receiving from Settings
This section outlines the alias, description, and workflow to be associated with packages received from the sending instance.

The following settings are utilized to configure the receiving instance:
- Alias - The alias of the sending SmartSimple instance.
- Id - An arbitrary two-digit number unique to the sending instance.
- Description - The full company name of the sending instance for identification purposes.
- Unpack Workflow - A workflow that is executed upon unpacking the package.
When creating an Unpack Workflow, select the UTA Name as the Workflow Type and set the Trigger When to --Deactivate--.
Key Settings
This section is designated for storing the key generated in the sending instance and the source URL of the sending instance.

The values are as follows:
Acceptance Key - A combination of the Id and Alias of the sending instance. Decryption Key - A key code generated by the system of the sending instance. Source URL - The URL of the sending instance.
Unpack Rules
Unpack rules are established to determine whether new templates (Level 1) and types (Level 2 and Level 3) should be rejected in an incoming package.

Company and People Import Settings
This section specifies how attached companies and contacts should be managed when received in a package.

Exporting Companies and Contacts
It is also possible to export the companies and contacts associated with the UTA item during the export process. By utilizing this method, these companies and contacts will be recreated within the receiving instance if they do not already exist.
| Setting | Description |
| Level 1 People | Determines whether contacts associated with Level 1 should be imported into the receiving instance. |
| Level 1 Contact Companies | Determines whether companies associated with contacts linked to Level 1 should be imported into the receiving instance. |
| Level 1 Companies | Determines whether companies associated with Level 1 should be imported into the receiving instance. |
| Level 2 People | Determines whether contacts associated with Level 2 should be imported into the receiving instance. |
| Level 2 People Companies | Determines whether companies associated with contacts linked to Level 2 should be imported into the receiving instance. |
| Level 3 People | Determines whether contacts associated with Level 3 should be imported into the receiving instance. |
| Level 3 People Companies | Determines whether companies associated with contacts linked to Level 3 should be imported into the receiving instance. |
| Default Company | Select a location in the organizational hierarchy where new companies should be added. |
| Merge People | Determines the behavior when merging individuals:
|
| Merge Companies | Determines the behavior when merging companies:
|
| Default People Role | Defines the user role that should be associated with new individuals that are created in the system. |
| Default Company Category | Defines the company category that should be associated with new companies that are created in the system. |
Package Mail Settings
These settings establish an email alert that is triggered when a new data package is received from the sender. This email will be automatically generated by the system.

- Acknowledge Users - Email addresses of recipients or groups. Utilize the Lookup button to select users.
- CC - Email addresses of recipients or groups who will receive a copy of the email.
- From Address - The email address from which the message is sent, if applicable. If this address is not provided, the address will default to smartsimplemailer@smartsimple.com.
- Subject - The subject line for the email alert.
- Body - The content of the email message to the recipient.
Variables may be incorporated into all the aforementioned fields to personalize the emails. List Syntax can be employed to include multiple recipients.
Notes Email Settings
These settings establish an email alert that is triggered when new notes are received from the sender. This email will be automatically generated by the system.

- Acknowledge Users - Email addresses of recipients or groups. Utilize the Lookup button to select users.
- CC - Email addresses of recipients or groups who will receive a copy of the email.
- From Address - The email address from which the message is sent, if applicable. If this address is not provided, the address will default to smartsimplemailer@smartsimple.com.
- Subject - The subject line for the email alert.
- Body - The content of the email message to the recipient.
Variables may be incorporated into all the aforementioned fields to personalize the emails. List Syntax can be employed to include multiple recipients.
Protecting Fields
This section is utilized to define the Level 1, Level 2, and Level 3 fields that are to be protected.

- By default, NO FIELDS are protected, thus all fields will be updated based on the incoming information.
- By default, the Level 1 fields are displayed. If Level 2 and Level 3 entities have been enabled, then tabs will be displayed to allow access and enable these fields.
- If you enable Company & Contact Settings, additional tabs will be displayed to allow for the protection of fields in these entities as well.
Setting the Receiving Settings
1. Configure the details of the sending instance within the Receiving From Settings.

2. Configure the Acceptance Key, Decryption Key and Source URL in accordance with the sending instance.

You will need to transfer the decryption key from the sending instance into the receiving instance.
3. Ensure that the three Unpack Rules remain unchecked.

4. Configure the Company & People Import Settings to import all companies and contacts.

5. Click any Save button.
As there are no fields to protect in this example, the setup is now complete.
Automatic Unpacking of Incoming Packages
Utilizing the Data Exchange feature of the Universal Tracking Application allows for the configuration of all incoming packages to be unpacked automatically.
This functionality can be enabled on the Settings page of the UTA within the Exchange Settings section:
The recipient may also designate a user account that the system will utilize to perform the package unpacking.
Once this feature is enabled, all received packages will be automatically unpacked and will promptly appear in the corresponding UTA.
If an Unpack Workflow is established, it will be activated when the system unpacks the package.
The Unpack Workflow is selected on the Receiving from Settings page of the Data Exchange.
Important: When utilizing the Automatic Unpack feature, it is advisable to implement an Unpack Workflow or an Acknowledgement E-mail, configured on the Receiving from Settings page, to notify the appropriate contact(s) upon the receipt of a package.