Overview
A user is defined as a contact who is permitted to log in and access a SmartSimple instance. If the enable login feature is utilized during the addition of contacts, these individuals will be able to access the system and may be regarded as "users"; otherwise, they should be considered merely as "contacts." When granting login access to contacts, you have the option to send each individual an email containing their username, password, and the URL for accessing your SmartSimple instance.
- Due to variations in Organization Terminology across instances, please note that your specific instance may employ different terminology for users and contacts. However, the associated functions, such as activating or adding users, will remain consistent across all instances.
- Individuals added to the system function similarly to organizations. A person object may encompass information regarding both internal staff and external contacts/vendors. All individuals are stored in a uniform format and table within the database, each possessing their own set of standard fields.
- Each individual will have a singular parent organization within the Organization hierarchy, though they represent a diverse array of users and contacts at various organizational levels. For instance, you may have Teaching Assistants and Professors at the Department level, and Deans at the University level.
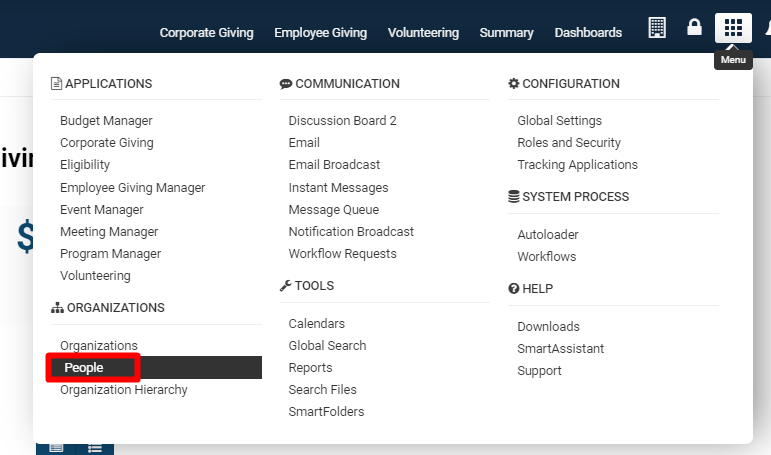
You can locate all individuals in your SmartSimple instance by clicking on the 9-square menu icon located at the top right of your page and selecting the People hyperlink.
During the contact setup process, you will assign "roles" to contacts. A user can access and manipulate information only to the extent permitted by their membership in specific roles, in conjunction with those roles' ability to manage system-wide permissions. Consequently, roles delineate user access to system resources such as the interface they encounter (Administrator versus standard user portal), the applications they can access, the fields they can view within each application, and the reports they are authorized to generate.
- Example: A user assigned the role of System Administrator will possess greater control and visibility within the system compared to a user whose role is solely Employee.
- Note: Although a user may be assigned multiple roles, the system will always default to the minimum level of access.
Configuration—Essentials
Depending on your role, you may or may not possess the ability to add, delete, or modify contacts. Typically, the System Administrator role is endowed with the highest level of security access to all contacts. In certain instances, internal staff roles may similarly have the capability to modify contacts.
All users have the ability to edit their own contact profiles.
Adding Users and Contacts
You can incorporate individuals into the organization hierarchy through any of the following methods:
- Manually entering contacts
- Uploading in bulk via Import Wizards
- Uploading in bulk through Autoloader
- Activating one or more company sign-up pages
- Importing contacts from Microsoft Outlook using the Outlook Plug-in feature [Deprecated download and support for Outlook Plug-in as of July 9, 2020]
- Importing utilizing the API functionality along with a custom program that your organization may develop
Manually Adding Users
Note: If you activate the login feature when adding individuals, they will be able to log into the system and can be considered "users." Absent this user activation, they are simply contacts.
Individuals are always incorporated into some level of the hierarchy; therefore, when you wish to add a new person, you must first select the appropriate organizational level.
1. Click the 9-square menu icon located at the top right of your screen.
2. Under the heading Organizations, select Organization Hierarchy.
3. Choose the organization to which you wish to add the new individual.
- The root organization is displayed first beneath both the internal and external tabs.
- The internal records are listed beneath the first tab; the external records are listed beneath the second tab.
- Depending on the instance, the terminology for your internal versus external headings may differ.
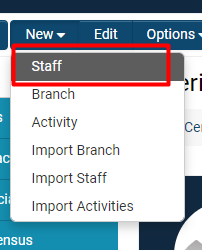
4. Click the New button, which will reveal a drop-down menu that allows you to add a new user.
- Our duplication check is based on email information; therefore, if a user shares the same email address as an existing entry in the system, they will not be added as a new contact.
6. If Roles are available in your SmartSimple instance, you may need to select the appropriate role for this contact.
- Please note that even if you select multiple roles, our system will default to the minimum level of access.
- In the event that this is a brand new instance, there may be no users assigned to any role. In such a case, simply change the Role to No Role Assigned by clicking Next.
7. The new user details will be displayed, including standard fields that must be completed.
The fields marked with an asterisk (*) are mandatory, and you will not be able to proceed without completing them.
Standard People Fields
The standard fields utilized to describe an individual are as follows:
| Standard Field | Description |
| First Name | The first name of the individual |
| Last Name | The last name of the individual |
| Title | Business title of the individual |
| Prefix/Suffix | Prefix and suffix of the contact |
| Phone/Extension | Direct line for the individual and their extension |
| Email address (an email address is required to enable a user to log into the system) | |
| Primary Contact | Check this box to indicate if this individual is the primary contact at the organization |
| Organization | The organization to which this individual should be associated - altering the organization will relocate that individual to another organization |
| Address | If different from their organization, the street address of the individual |
| Address 2 | Additional address line (such as an apartment or suite number) |
| City | If different from their organization, the city address of the individual |
| Province | If different from their organization, the province address of the individual |
| Country | If different from their organization, the country of the individual |
| Postal code | If different from their organization, the postal code of the individual |
For additional options regarding the configuration of a contact's standard fields, please refer to Contact and Account Standard Fields.
8. After completing the user's standard fields, you may choose to Save Draft or Save the contact record. Selecting Save Draft will only retain the information displayed on the page. If you select Save, the information on the page will be validated, and the contact will be added.
Importing Contacts
The import process involves transferring external data (for instance, if it is already contained within an Excel file) into an Import Window, validating the information mapping prior to uploading, and subsequently uploading the data to SmartSimple. Should there be a need to separate contact information, this procedure will be repeated: once for organization records that categorize companies within the organization hierarchy, and once for the contact data that will establish user profiles.
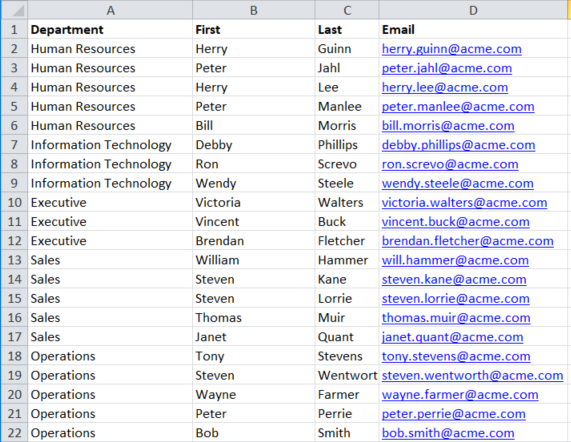
In the following step-by-step example, contact information from an Excel spreadsheet will be imported into a copy of SmartSimple. This process follows the importation of organization records, as the system will utilize the department names within this data to ascertain the appropriate level of association within the organization hierarchy for each user.
This example pertains to internal users, necessitating their addition to the internal hierarchy of the organization.
Prior to commencing this process, highlight rows A1 to D22 and select Ctrl + C to copy this information.
1. Click on the 9-square menu icon located at the top right corner of your screen.
2. Under the heading Organizations, select Organization Hierarchy.
- The internal records are displayed on the first tab. If you are importing external contact information, please complete this process on the second tab.
3. Click on the name of the root organization.
The details of the root organization will be displayed.
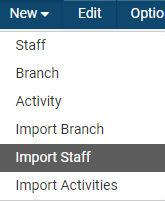
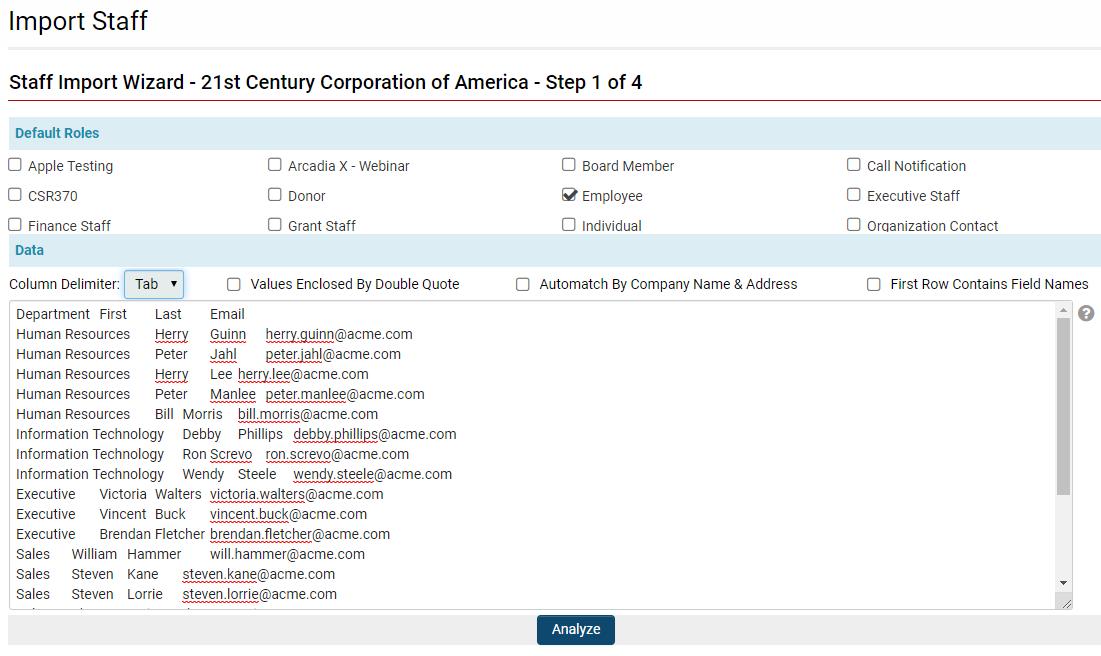
4. Click the New button, then select Import Staff.
- Please note that the term Staff may vary depending on your specific instance, as organizational terminology is subject to change per SmartSimple instance.
Step 1 of the User Import Wizard will be displayed.
5. Paste the data into the Import Wizard.
6. Set the role to Employee, or another relevant role that is available.
- If the desired role is not available, please refer to instructions on how to create user roles.
7. Set the Column Delimiter to Tab.
8. Verify the option First Row Contains Field Names is checked.
9. Click the Analyze button.
10. A confirmation pop-up will appear. Select the YES button.
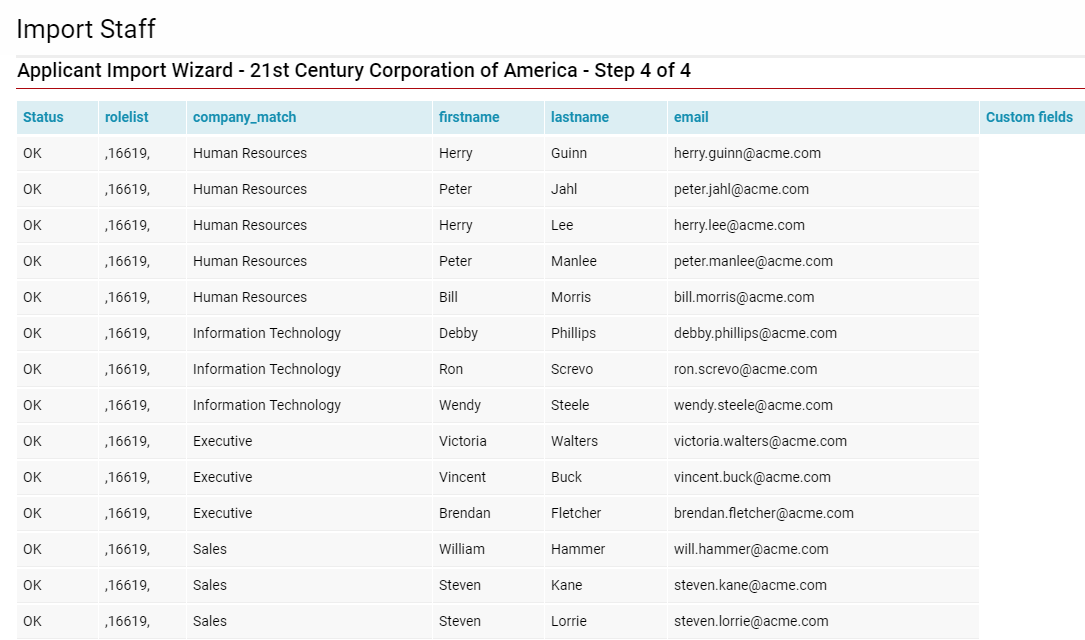
11. The analyzed data of your imported records will be displayed. At this juncture, you have the option to deselect any employees you do not wish to add; you may also modify their information, including email addresses. At the bottom of the screen, various methods to add users to the SmartSimple instance will be presented. Please select one, and then click Upload.
- The option to activate users and send them a password by email will explicitly notify your users that they have been added to your SmartSimple instance. This allows them to log in to the system and to manually change their password after.
11. Your successfully imported contact records will appear in a list.
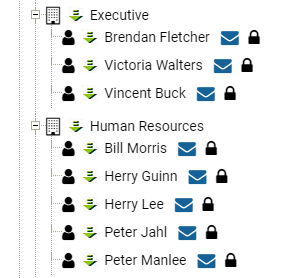
To confirm the successful importation of your internal contact records, please return to the Organization Hierarchy. By selecting the + button adjacent to an internal organization, you will be able to view the corresponding contacts.
Additionally, you may activate users from the Organization Hierarchy view if they were not activated during the import process.
Reversing an Upload
In the event that you have imported contact records by mistake, you have the option to reverse the upload.
User Activation
Via the Organization Hierarchy
Adding a user to a level within the hierarchy does not automatically grant them access to the system upon login. It is necessary to manually enable the user for system access. This process will convert a contact into a user from the Organization Hierarchy, thereby allowing them to log in and access SmartSimple.
1. Locate the desired contact(s) using the 9-square menu icon located at the top right of your screen.
2. For a complete list of all contacts, select People under the Organizations heading.
3. Within the Organization Hierarchy, you may access contacts by locating them under their respective internal or external organization.
Inactive contacts will be indicated by a lock icon next to their name.![]()
To the right of each user, the following icons are displayed: ![]()
![]()
The Envelope icon will open the Message Center, allowing you to send a message to the user. An alternative communication method is Instant Messaging, which is more effective for identifying online users.
The Key icon signifies that this user is permitted to log into SmartSimple; their Status is set to Enabled in the User Settings. This status also indicates that they will receive emails or a new password if they select Forgot Password from their account.
4. Click on the contact name to navigate to their profile.
5. To activate the contact, click the grayed-out Key icon located at the top right of their profile.
6. A confirmation pop-up will appear. You may choose to activate the user automatically (without a password), activate them and send an automated password to their email, or cancel the activation process.
- Users can also be activated using the key icon from their specific user profile, located at the top right of their page.
From Their Profile
Adding a user to a level within the hierarchy does not automatically grant them system access upon login. Manual activation is required to enable user access. This process will convert a contact into a user from the Profile, thus allowing them to log in and access SmartSimple.
You can most efficiently activate a user from their profile using the same key icon found in the organization hierarchy. The key icon is located at the top right of the user's profile page:
- The key icon will be grayed out if the user has not yet been activated.
- Clicking a grayed-out key icon will activate the user.
- Clicking a colored key icon will deactivate the user.
Another method for activating a user from their Profile is to provide User Access:
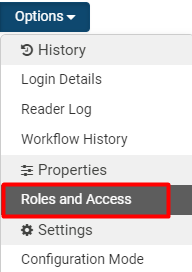
1. On the profile page of the newly added user, click the Options button to reveal a drop-down menu.
2. Under the heading Properties, select Roles and Access.
3. Once the modal window for Roles and Access opens, enable Advanced Options at the top left of the window to access the Access Types.
| Access Type | Functionality |
| User Access | Grants access to the system based on the user's membership in specific roles. |
| API Access | An account type utilized to access data in a SmartSimple instance via an API (Application Programming Interface) - does not provide access to the SmartSimple interface directly. |
No Access |
The user will not be able to log into the system
|
Global Administrator(System Administrator) |
The user will have the capability to manage the entire organization hierarchy within your SmartSimple instance. They will be able to:
For further information, including guidance on enabling or disabling the SysAdmin role for users, please refer to the Global User Administrator documentation. |
4. To enable standard User Access, toggle on User Access. If you wish to designate a new user as a System Administrator, please toggle that option on the right.
Establishing Login Restrictions
- [Deprecated March 11, 2021] You have the option to restrict a user's access to SmartSimple to a specific workstation by entering the workstation's IP address in their profile. Alternatively, you may lock the user to the next workstation they use to log into the system by toggling the Workstation - lock.
- If you wish to limit a user's access to the system for a specific timeframe, you can enable the Will Expire option and set the expiration date, after which the user will no longer be able to access the system.
5. After saving the selected access options, the buttons at the bottom of the modal window will present password setting and sending options.
- If you select Send Password, the user will receive an automated password via email. They can then log into the SmartSimple system and manually change their password.
- The option to Set Password is not typically recommended unless necessary, such as in situations where a client requires immediate password setup over the phone. The Set Password option is also highly recommended when testing on the Backup Server and Testing Instance, as an email will not be triggered and sent to the user in such cases.
- You may also Reset a user's password using the Set Password option.
Upon completing these steps, your new user will be enabled to log into the system using their password.
User Search
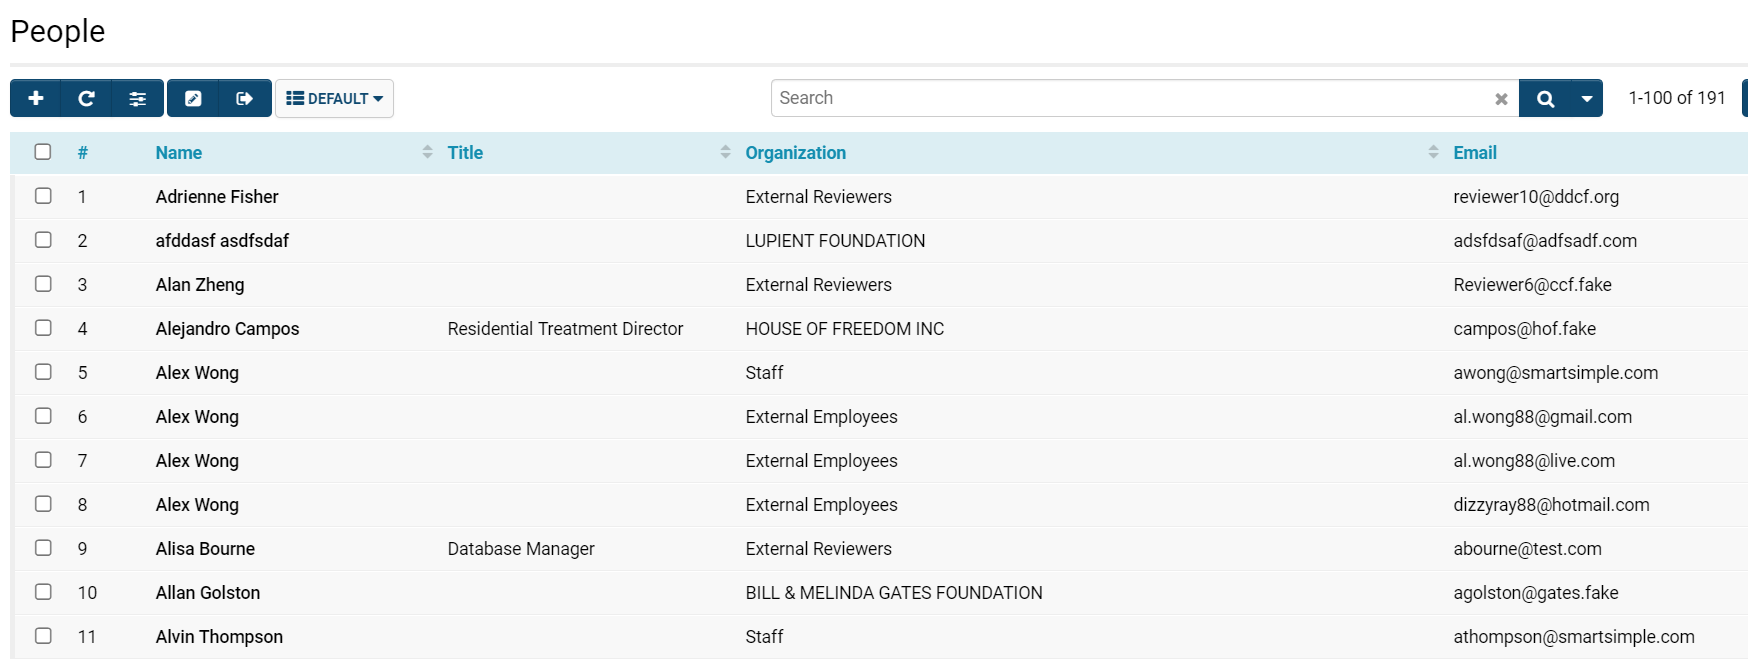
A convenient method to access all personnel records within your instance can be found directly on the People page.
1. Click the nine-square menu icon located at the top right corner of your page.
2. Under the Organizations heading, select People.
The People page will be displayed.
All contacts, both internal and external, will be listed. If security protocols are in place, such as view own accounts only under Roles and Security Settings, you may not have access to view all contacts.
The page is organized into several sections:
- People List: This section displays individuals based on the selected criteria. Initially, all contacts are shown. The columns visible in this list can be configured via List Views.
- Search: You may establish criteria for searching specific individuals using either the Basic Search or Advanced Search functionalities.
Configuration—Advanced
Restoration or Purging of Deleted Contacts
NOTE: Any records that have been deleted for over one year will be automatically purged.
When a user deletes a company or contact, these records are not permanently removed from the system database until one year has elapsed; however, they will be marked as deleted and will not appear in any future interactions.
In the event that a company or contact is deleted inadvertently, a System Administrator may restore them by following these steps:
1. Click the nine-square menu icon located at the top right corner of your page.
2. Under the Configuration heading, select Global Settings.
For deleted Company records, under the Organizations tab, select Deleted Companies & Accounts.
For deleted Contact records, under the Users tab, select Deleted Staff & Contacts.
3. Select the records that you wish to restore.
Contacts:
Companies:
4. Click the Restore button.
The records will be restored, along with any associated activities, notes, and custom fields. Please note that restoring a deleted company will also restore all associated deleted contacts.
If you select specific records and click the Purge button, those records will be permanently removed, and you will not be able to restore them under any circumstances.
User & Contact Settings
Please be aware that the terms Staff and Contact may have been renamed in your instance of SmartSimple. To modify the settings associated with users:
1. Click the nine-square menu icon located at the top right corner of your page.
2. Under the Configuration heading, select Global Settings (accessible to Global User Administrators only).
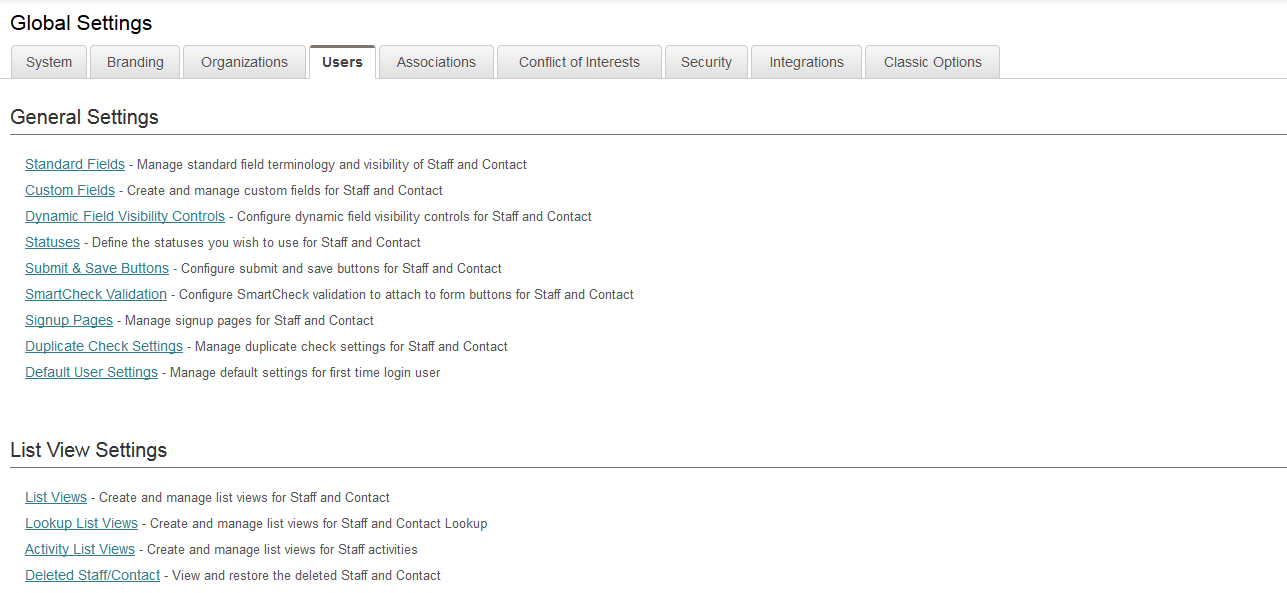
3. Under the Users tab, you will find the following hyperlinked categories of settings:
- Standard Fields: Standard fields associated with users.
- Custom Fields: Custom fields associated with both internal and external users.
- Dynamic Field Visibility Controls: Configure dynamic field visibility controls for users.
- Statuses: Statuses utilized for users.
- Submit & Save Buttons: Submit and Save buttons designated for users.
- SmartCheck Validation: SmartCheck validations to be attached to form buttons for users.
- Signup Pages: Manage external web pages where contacts can register.
- Duplicate Check Setting: Allows you to define which fields are prompted for and compared with existing contacts for duplicates when adding new users. See Duplicate Check.
- Default User Settings: Manage default settings for first-time login users.
- List Views: Configure the list view for users.
- Lookup List Views: Configure the fields displayed when using an Ajax lookup on users; also determines the list view for the Lookup dialog for the standard field "Organization." See Configuring Ajax List Views.
- Activity List Views: Configure the List View for user activities.
- Deleted Staff/Contact: Allows you to view, restore, or purge recently deleted users.
