Overview
The SmartSimple platform provides a comprehensive array of features aimed at enhancing email communication. These features encompass the ability to send bulk emails to targeted recipients, automated emails dispatched according to your workflow, and personalized ad hoc emails. Configuration options are available to tailor your email content and delivery methods, including the ability to modify the sender's address. It is essential to recognize that while the platform endeavors to send emails as configured, there are limitations and best practices that must be observed to optimize successful email delivery. These limitations and practices are subject to change, reflecting the evolving industry standards with which they are intended to comply.
Sending Email in Bulk
Email Broadcast
The Email Broadcast feature enables the sending of bulk emails to users. You can define the recipient list for a broadcast using the same search criteria available in the People list view. Specifically, users can be selected based on attributes such as their user roles, specific field values, company categories, or specific field values associated with the parent company of the user.
Group Email
The Group Email feature allows for the sending of emails from a List View of records, targeting users associated with these records. Presently, this feature is accessible from any UTA List View or Organization List View. This functionality facilitates the direction of messages to users linked by a specific role to a set of records, which can be filtered based on any criteria available in the List View, such as type, status, or field value. The email content can also reference the record, enabling the incorporation of information from the record into your message. For instance, a reminder email could be sent to the owners of UTA records that are currently in draft status, prompting them to submit their records.
Automation of Email
Workflow Acknowledgement Tasks
Within the Workflow automation module, there exists the capability to configure Acknowledgement type tasks. This functionality enables the triggering of automated email notifications based on the same conditions that may activate a Workflow. This offers considerable flexibility in dispatching email notifications based on a diverse range of criteria, targeting any number of users associated with the record that initiated the Workflow, while also allowing for the inclusion of contextual information from the record.
Reminder and Follow-Up Email
Activity records can be configured to send a standard reminder email prior to a specified date and time, or a standard follow-up email following a specified date and time. These settings for reminder and follow-up emails are presented as standard fields that can be enabled on UTA Level 2 or Level 3 records. Once these fields are enabled, users may opt to send these emails on a per-record basis by manually adjusting the timing for when they wish the email to be dispatched, relative to the end date and time standard field of that record.
Sending Ad Hoc Email
Message Center
Users can send individual ad hoc emails to other users by simply clicking on their email address while viewing their user profile. This action will activate the Message Center feature, allowing you to compose an email and send it to the designated address through the platform.
Configuration - Essentials
Email Domain
By default, emails are dispatched from the platform using a SmartSimple-managed domain. While the platform provides the option to configure emails to be sent from your corporate domain, caution must be exercised to prevent these emails from being classified as spam. For optimal email delivery results, the following configuration options are recommended.
Sending From a SmartSimple Domain
Configure emails to be sent from a SmartSimple-managed domain. This is the most reliable method for sending emails. Emails configured in this manner will be relayed via SmartSimple-managed mail exchange servers*. It should be noted that these domains are not monitored and are not set up to receive mail. You may use an alias of your choice in the format of alias@smartsimpledomain, for example, acme-recruitment@smartsimplemailer.com, although we recommend a general alias such as donotreply, e.g., donotreply@smartsimplemailer.com.
* Note: If you are subscribed to SmartSimple's Private Cloud offering and self-host your own infrastructure, your environment may not be configured to relay email through SmartSimple-managed mail exchange servers, and this configuration option may not apply to you.
The following table lists the SmartSimple-managed domains available for your use, along with the geographic location from which the email will be routed.
| Domain | Geographic Region |
|---|---|
| @smartsimplemailer.ca | Canada |
| @smartsimplemailer.eu | European Union |
| @smartsimplemailer.com | United States |
Sending From Your Own Domain via SMTP Relay
It is possible to configure emails to be dispatched from your corporate domain; however, it is imperative to also set up the SMTP relay function within the SmartSimple platform to facilitate the routing of emails through your corporate mail exchange system for successful delivery. This necessitates that your mail exchange system is configured to accept SMTP relay and to authorize email relay from the SmartSimple platform. Should you configure emails within the SmartSimple platform to utilize your corporate domain's "from" address without establishing SMTP relay, there is a considerable risk that the emails will be categorized as spam and not reach the intended recipients.
To Configure SMTP Relay in SmartSimple
The configuration for the SMTP relay functionality can be located in the Global Settings - Communications tab. Once this feature is configured, all subsequent emails generated by the platform will be routed through the designated server. It is essential, when utilizing this feature, to also configure a suitable email address wherever in the platform you can specify the "from" address of an email, ensuring that the platform can successfully relay emails to the specified mail exchange server. The following table outlines the settings available for configuration with SMTP relay.
| Setting | Description |
|---|---|
| Server | (Required) the web or IP address of the external endpoint of your corporate mail exchange server for connection, e.g., smtp.samplecompany.com. |
| User Name | (Optional) a username for the account that the SmartSimple platform will authenticate against your corporate mail exchange server. This attribute is optional if you are utilizing source authentication rather than account-based authentication. |
| Password | (Optional) the password for the aforementioned user, if a password is configured. |
| Port | (Optional) the port to connect to on the destination server, e.g., 587 (defaults to 25 when left blank). |
| Encryption | (Optional) enable or disable transit encryption, and specify the version. |
SMTP Relay Settings supports 2 authentication methods:
- Basic Authentication
- OAuth 2.0
Configuration for SMTP Relay using Basic Authentication:
- If your mail server is using account-based authentication, store credentials (username and password) in Global Settings - Integrations - Services Settings - Integration Key Management, create a KeyStore key with Type=Basic Authentication
- Go to Global Settings – Communications – SMTP Relay Settings
- Select Basic Authentication as the Authentication Method
- Enter the SMTP server host
- Select the Basic Authentication key and enter the SMTP Relay details (account-based authentication), leave it empty if your mail server is using source authentication
- Enter the port to connect to on the destination server, e.g. 587, (defaults to 25 when left blank).
- Select Encryption method
Configuration for SMTP Relay using OAuth 2.0:
- In Global Settings - Integrations - Services Settings - Integration Key Management, create a KeyStore key with Type=OAuth 2.0
- Enter the OAuth 2.0 authentication details in the key, these details such as the Client ID, Secret, all endpoints should be available from your SMTP provider account.
- Redirect URI/URL: https://[your instance URL]/OAuthsp/smtpauth.jsp
Office365:
- Authorization Endpoint: https://login.microsoftonline.com/[Tenant ID]/oauth2/v2.0/authorize (default, this may vary depends on your account)
- Token Endpoint: https://login.microsoftonline.com/[Tenant ID]/oauth2/v2.0/token (default, this may vary depends on your account)
- Scope: offline_access https://outlook.office365.com/.default
Gmail:
- Authorization Endpoint: https://accounts.google.com/o/oauth2/v2/auth (default, this may vary depends on your account)
- Token Endpoint: https://oauth2.googleapis.com/token (default, this may vary depends on your account)
-
Scope: https://mail.google.com/
- Go to Global Settings – Communications – SMTP Relay Settings
- Select OAuth 2.0 as the Authentication Method
- Select Provider
- Enter the SMTP server host
- Select the OAuth 2.0 key and enter the SMTP Relay details (account-based authentication), leave it empty if your mail server is using source authentication
- Enter the username of the SMTP account that will be used in the authorization process
- Enter the port to connect to on the destination server, e.g. 587, (defaults to 25 when left blank).
4. After setting is saved, click on the "Authorize SMTP" button to login and authorize your instance to use the SMTP account for SMTP Relay.
Depending on the user permission on mail provider site being used in SMPT Relay OAuth 2.0 settings, you might need to configure the “Enable Default From Address” under Global Settings – Communications – Email Options and Security – Security
To Configure SMTP Relay in Your Mail Exchange Server
Please refer to any documentation provided by the vendor of your mail exchange server for specific instructions on enabling SMTP relay functionality. Below are some general considerations to keep in mind during the setup process.
- Determine the method of authentication, and whether basic authentication with a username will be utilized.
- Verify the permissions of the account designated for the relay functionality. Is the account capable of sending emails to external entities/domains? Is the account permitted to send emails from other internal accounts? Consider the scenario where users may utilize the SmartSimple platform to send ad hoc emails with their individual email addresses as the "from" address.
- Be mindful of any sending limits that may be imposed by your mail exchange server, and assess this against the sending behavior of your SmartSimple system.
Sending From Your Own Domain without SMTP Relay
This configuration is not recommended, as it will result in emails being dispatched by the SmartSimple platform via the local mail server of the application server, significantly increasing the likelihood of being classified as spam.
Where to Set the Email Domain
Given the highly configurable nature of the SmartSimple platform, there are several distinct areas that allow you to specify the "from" address used in email composition. The table below outlines where to locate each of these settings and their respective controls.
| Setting | Description |
|---|---|
| Global Setting - Security - Password and Activation Policies - Activation Emails | The address associated with emails related to user creation and password management activities. |
| Global Setting - Communications - Email Options and Security - Enable Default From Address | The default address associated with automatically generated system emails, e.g., system alerts, MFA verification during authentication. |
| Global Setting - Users - Signup Pages | The address associated with the initial welcome email for each individual user signup page. |
| Global Setting - Workflows - Workflow Tasks (of type Acknowledgement) | The address associated with emails sent by Workflow automation tasks. |
| Global Setting - Email Broadcasts | The address associated with each email broadcast template. |
Email Templates
Administrators possess the ability to configure pre-existing templates for end users, thereby ensuring uniform branding and initial text content. These templates can subsequently be selected during the email composition process to automatically populate the email contents.
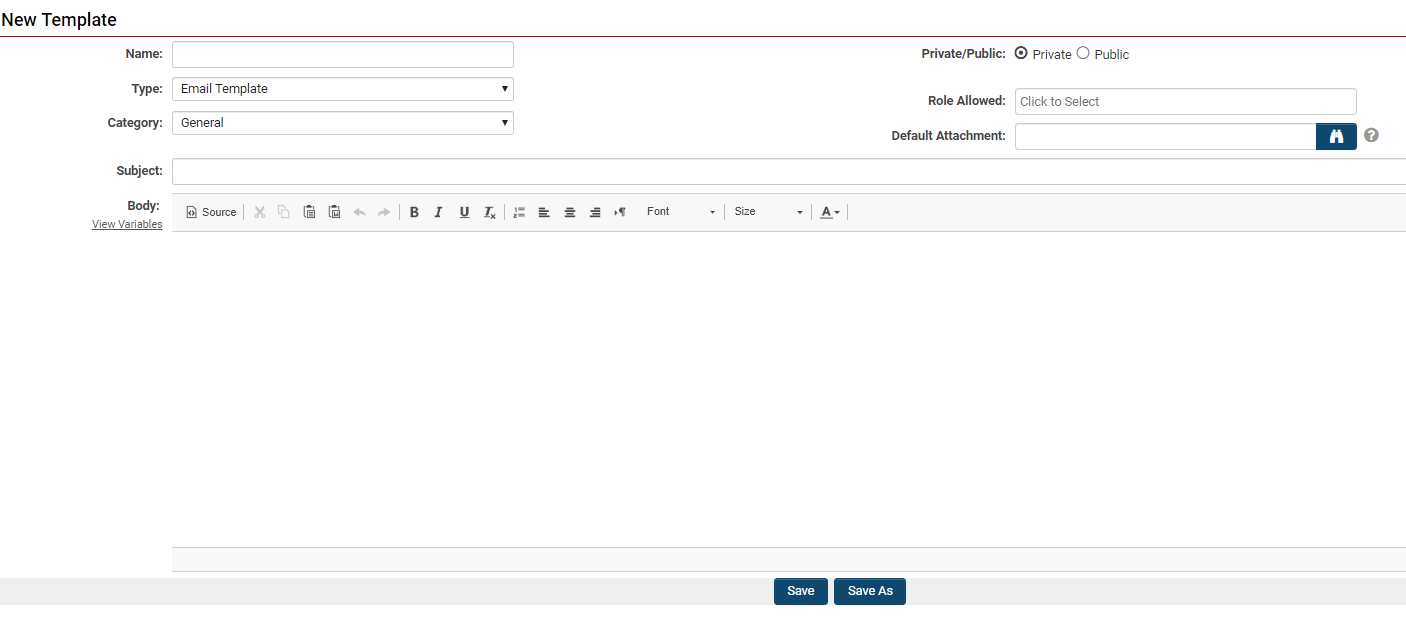
Creating a New Message Template
- Access the Main Menu, and then, under the Communication category, select Email.
- Proceed to the second tab labeled Templates. Any existing templates within the system will be displayed and available for editing.
- To create a new template, click the + icon located at the top left.
| Setting | Description |
|---|---|
| Name | The designation of the message template as it will appear in the template list. |
| Type | Two types are available: Email Template and Email Signature. Each user may have an Email Signature that will be automatically appended to the end of each message they create. |
| Category |
You may select from the following options:
|
| Private/Public | Select private if this template is intended solely for your use, or public if you wish to make this template accessible to other users. This option is not visible to users lacking manager permission for creating an Email Template. |
| Role Allowed | Select from available system roles to determine who may view and utilize this Email Template. |
| Default Attachment | Select an attachment to always include when utilizing this template to compose an email. |
| Subject | The default subject line to be used for the email. |
| Body | The default body text to be utilized for the email. |
Saving Email to the Platform
Configuring Activity Types to Represent Email
Emails may be saved to the platform in the form of activity records.
Email Anything Feature
The Email Anything feature enables the platform to generate distinct email addresses that are associated with individual records. Any emails directed to these unique email addresses are subsequently processed by the platform and linked to the corresponding record as a sub-activity. This functionality facilitates the monitoring of all email communications pertinent to a specific record as activities within the platform.
![]()
- The syntax (@objemail@) is utilized to generate a unique email address for objects within SmartSimple.
- This will attach the email as a subrecord to the record from which it has been triggered.
- The status of the email record is governed by the Received Activity Status setting. If a Workflow is defined for that status, it will be activated when the record is added.
Use Cases
- Review Forms - A reviewer can send an email to the application.
- Project Management - Staff can send emails to community contacts while maintaining a record of the communication, thereby eliminating the need for an Outlook Plugin.
- Letters of References - An applicant may provide a referee's email address, allowing the referee to respond with the letter of reference attached.
- Support Tickets - A client can directly email a ticket.
- Anonymous Email Address - Users can inquire about opportunities without disclosing their email address, similar to features available on online marketplaces.
Note: The "objemail" variable is not supported in the BCC or FROM fields. It should only be utilized in the TO or CC fields.
Example Usage
You may create a Read Only – System Variables Custom field with the following contents:
<script>// <![CDATA[
function copyToClipboard(element) {
  var $temp = $("<input>");
  $("body").append($temp);
  $temp.val($(element).text()).select();
  document.execCommand("copy");
  $temp.remove();
}
// ]]></script>
<span id="objEmail"><a href="mailto:@objemail@">@objemail@</a></span> <a>(Copy to Clipboard)</a>
Clicking on the email address will initiate a new email in your default email application.
Clicking Copy to Clipboard will copy the email address to your clipboard, enabling you to paste it (Ctrl-V) into your email application, among other uses.
Group Email
SmartSimple offers Group Email functionality across all levels of the UTA, allowing for the communication with multiple individuals associated with an entity. Variables can be utilized to present information relevant to the user, organization, or UTA levels 1, 2, or 3 in the emails. For instance, the first name of the recipient can be included in each email. Please refer to the Variable List for further information regarding variables.
Enabling Group Email
Prior to utilizing this feature, it is necessary to enable group email. To enable group email:
- Navigate to the desired UTA.
- Select Configuration Settings.
- Click on the Security tab.
- Select Visibility Permissions.
- Scroll down to Enable Group Email.
- Utilize the Lookup to select the roles for which you wish to grant permissions.
- If desired, enter Logic; refer to Visibility Condition for guidance on constructing conditions for the Logic input.
Utilizing Group Email from Within Individual UTA Record
To send a group email to any contacts associated with a level one from a level one record:
- Access the desired record in the UTA.
- Click the Edit button in the action bar (the record must be in edit mode to utilize group email).
- Select the Contacts tab.
- Choose one or more contacts that you wish to email.
- Click the Group Email button (this will open a modal window to guide you through the process).
- You will be presented with the list of contacts to be emailed; click Next.
- Select a Template from the dropdown menu.
- Enter a Subject.
- If you wish to save the email as an activity, check Save as Event (refer to the note below).
- Modify the body of your email as necessary.
- Click Next.
- Review the preview of how the email will appear, along with options to add CC recipients and attachments.
- Click Send Message.
- You will receive a notification confirming that the email was sent successfully, after which you may close the modal window.
NOTE: When selecting Save As Event, if an Email activity has been configured in the UTA, the email will be recorded against the record. If no Email activity is configured, the email activity will be saved against the contact profile of all recipients.
Utilizing Group Email from UTA List View
To send an email to contacts in a specific role associated with a specific UTA level 1, 2, or 3 record:
- Navigate to the desired UTA and select the appropriate list view (you may use the search panel to refine the list of records).
- Select the desired records.
- Click the Group Email button in the action bar (you must select a record to view the button).
- Select the roles to which you wish to send the email (please note that if the number of selected users is 0, no one will receive an email).
- Click Next.
- Choose a Template.
- Enter a Subject.
- Modify the email body as necessary.
- Click Next.
- Review the preview as well as options to add CC recipients and attachments.
- Click Next.
- The email will be sent, and you may close the modal window.
Note: The Group Email feature from a UTA list includes an option for Unique Recipients. If this option is selected, a single email will be sent to each recipient, even if they are associated with multiple records. Additionally, UTA levels 1, 2, and 3 variables will not be processed when this option is selected.
Email Options and Security
The Email Options and Security settings allow you to configure system-generated emails, determine access to email functionalities, set alerts for failed emails, and more.
System Administration (gear icon) >> Global Settings >> Communications (tab) >> [Email Options and Security]
Enabling Email Broadcast
To enable the Email Broadcast feature as a menu item for specific roles or for all roles, please follow these steps:
System Administration (gear icon) >> Global Settings >> Security (tab) >> System Feature Permissions >> Features (tab) >> [Email Broadcast - Access]
From the Email Broadcast Feature
Once the Email Broadcast and Email features have been enabled as menu items, you will be able to access them from your menu:
Menu (9-square) >> [Email Broadcast]
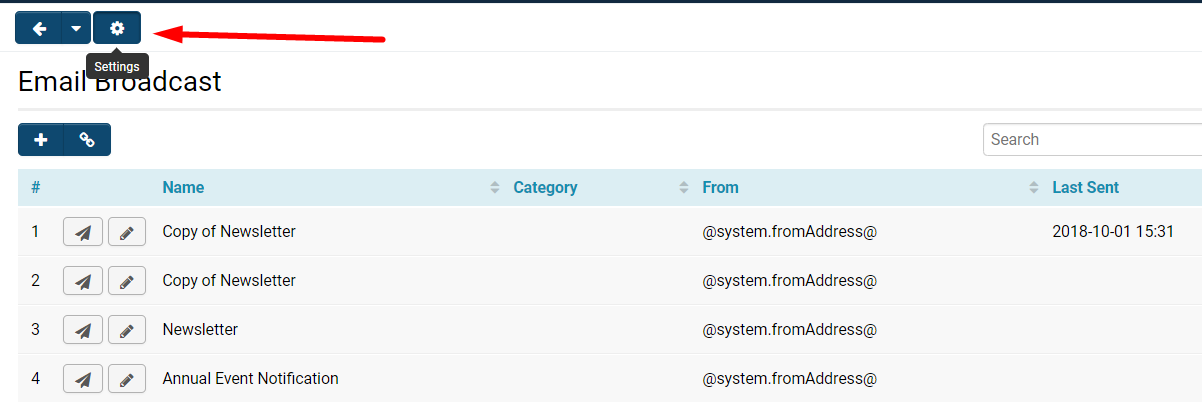
Once the Email Broadcast list is open, click on the cog icon at the top to access the Email Broadcast settings.
Email & Email Broadcast Settings
The Email Settings menu encompasses the following options under the heading Security.
| Enable Role Restrictions | Establish roles that are authorized to send emails to other roles and limit the filtering options utilized when searching for recipients. This feature operates in conjunction with User Roles settings. |
| Disable From Address | The email broadcast From field will be Read-Only. Managers may only configure the From address field to a value other than their own email address. |
| Recipients Under Association Company | Permit associations to function as recipients. |
| Enable on Behalf Of |
Send emails on behalf of the designated From Address; emails will be dispatched from an instance-specific email address to avert blockage of emails. For the DKIM Domain field, this function activates DKIM signatures for emails to enhance their authenticity. The domain entered must correspond with the domain of your SmartSimple server. The supported domains include: smartsimple.ca, smartsimple.com, smartsimple.ie, smartsimple.us. The selector name for any of these will be 'dkim.' |
| Enable Reply-To |
Send emails with the Reply-To configured to the specified From Address. Activating this option will allow you to select from a list of approved From Addresses, which includes the following:
|
| Enable Default From Address |
This email address will be designated as the default From email address when composing an email. Activating this option will allow you to specify which email serves as the default From address. |
Enabling Role Restrictions
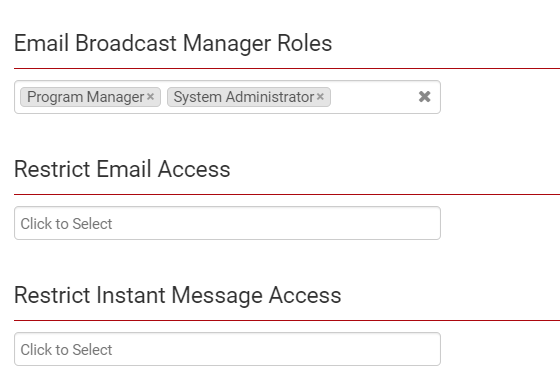
If the Enable Role Restriction feature at the top of the page has been activated, it will function in conjunction with the restrictions specified in this section. Simply click into each text box to reveal a drop-down menu of roles available in your SmartSimple system, from which you can select the roles that will have specific permissions or restricted access.
- Email Broadcast Manager Roles: Roles designated to function as Manager.
- Restrict Email Access: Enabling role restrictions will limit the recipients for users in that role. The email address field on new emails will become Read-Only. If a user attempts to click on an email address of an individual they are not permitted to contact, a pop-up message will indicate that they lack permission to reach that individual.
- Restrict Instant Message Access: Select which roles should not have access to Instant Messaging functionality within the system.
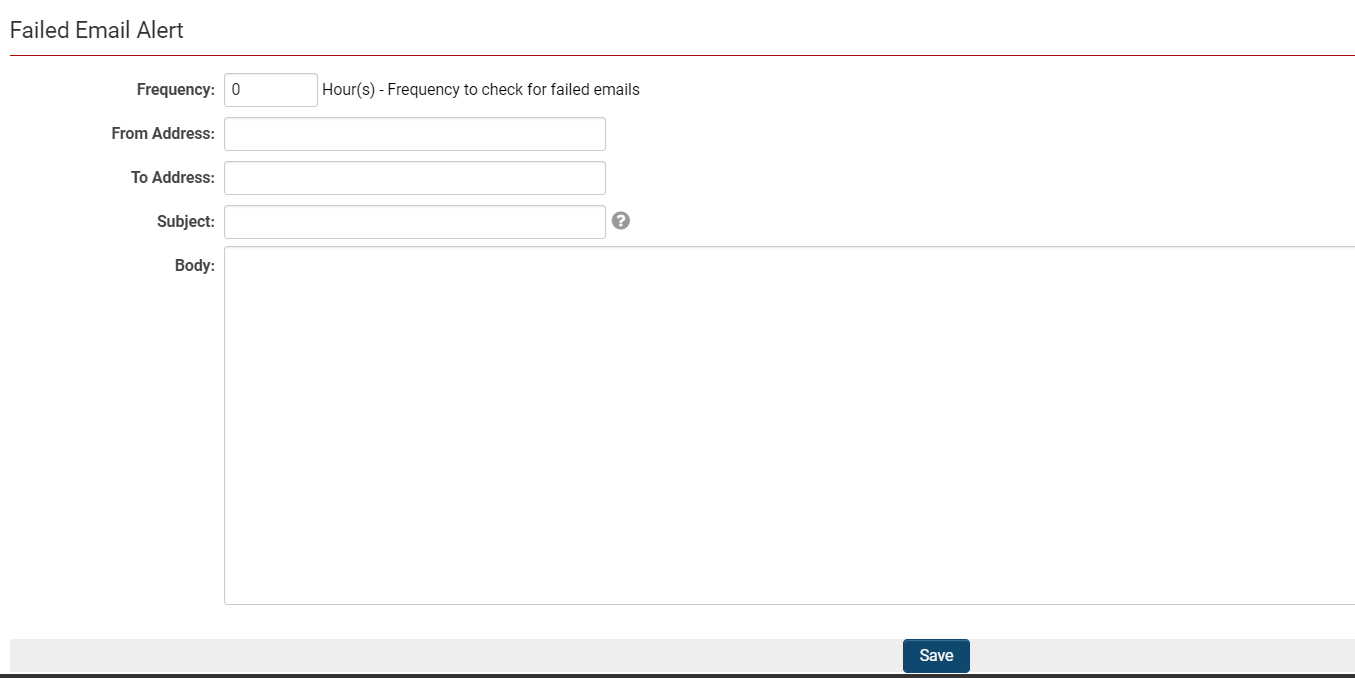
Enable Failed Email Alert
| Frequency | This will monitor failed emails from the Message Queue and subsequently send an automatically generated email notifying the senders based on the failed email template. |
| From Address | Must include a From Address Email. A common cause of failed emails is the absence of this information. |
| To Address | If specific staff members or the system administrator require notification of failed emails, the recipients of the failed email message should be listed here. |
| Subject | Enter the subject of the email here - e.g.: Failed to Send Email. The maximum length of the subject line is 255 characters. |
| Body | Content of the email to be dispatched to recipients. |
Click Save once you have completed all fields.


