Overview
This particular field type allows for the dynamic generation of a Microsoft Word document by utilizing the data stored within the SmartSimple platform. Essentially, it enables users to create Word documents that are automatically populated with relevant information from SmartSimple, streamlining document creation and ensuring accuracy.
Setting up a Word Merge within SmartSimple requires following a structured three-step process to ensure that the documents are correctly configured and integrated with the system’s data.
- The first step involves creating the Microsoft Word document that will act as the template. This template serves as the foundation for the merge process, containing placeholders or merge fields that correspond to the data points in SmartSimple you want to include in the final document.
- Once the template document is prepared, the next step is to upload this Word document into a SmartFolder within SmartSimple. This allows the system to access the template and use it as the source for generating merged documents.
- The final step detailed on this page is the creation of a Custom Field Type known as the Special - MS Word Merge custom field. This custom field is designed to map the specific SmartSimple fields that will be merged into the Word template. By configuring this mapping, users ensure that the correct data from SmartSimple is inserted into the appropriate locations within the Word document during the merge process.
Set Up: Creating the Field
Setting the Values
Having created the Word document to be utilized as the template (step 1) and uploaded it to a SmartFolder (step 2), you may now proceed to step 3: the creation of the MS Word Merge custom field that will dynamically populate the document.
- In the Values section, the form fields established in the MS Word document are assigned by name to the corresponding SmartSimple Field Names or Field IDs. The syntax is Mergefield = @SmartSimple field name@; where Mergefield represents a Bookmark assigned to a Form Field in step 1.
Examples:
signatory=@me.fullname@;
or
datesigned=@#565346#@;
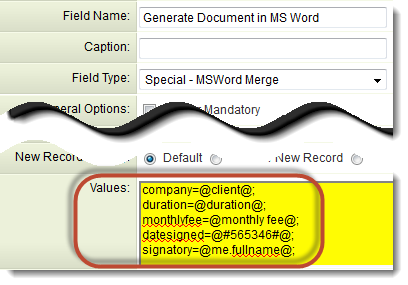
- Each Form Field on the MS Word Merge Document should be represented on a separate line in the MS Word Merge Field Values section, with each line concluding with a semi-colon.
- The variables utilized for the MS Word Merge are identical to those for a Web Page View Field and can be found at Web Page View Field Variables.
- Only fields containing text are eligible for use in the Word Merge. Please be aware that image fields, file fields, etc., cannot be utilized.
- Rich Text fields are unsuitable for inclusion in MS Word Merges due to the additional encoding required to support formatting.
- The order of the variables is not significant, as the variables are matched using the bookmark name.
- The only exception occurs when SmartSimple variables are merged into a Word table; in that case, the table references must be positioned at the end of the list of Values.
- It is possible to assign multiple fields from SmartSimple to a single MS Word form field, along with additional text and characters:
time=@starth@:@startminute@ @startpmam@;
This would display in the format: "12:35 pm" in the time form field.
or
contractdetails=@duration@ with a monthly fee of $@monthlyfee@;
This would result in "24 months with a monthly fee of $200" in the contractdetails form field.
- You may include <!--hideifnotfound--> preceding variables that may not be present to ensure that nothing is displayed, rather than the variable name.
- An example would be monthlyfee=<!--hideifnotfound-->@monthly fee@;
- You can incorporate HTML code within tags. The SmartSimple Word Merge engine will apply the HTML formatting to the value before merging it into the Word document.
- Please note that HTML code will only function when merging to a single record, not for the batch merge mode.
- Example:
bookmarkname=[#(?object=activity)~Index~#]
-
- You may utilize the following special characters in this section to control the output on the MS Word Merge document:
- ^p = Line break
- ^t = Tab
- You may utilize the following special characters in this section to control the output on the MS Word Merge document:
Custom Field IDs
You can utilize the Extract IDs and Display Field Names links in this section to display the associated Field IDs and Field Names.
Folder/File
You are also required to specify the file contained within the SmartFolder, as outlined in the preceding step, of the MS Word document.
Generating the Document
- To generate the document while viewing or editing a record, simply click the button associated with the MS Word Merge.
- The document will be dynamically created with the addition of the SmartSimple data.
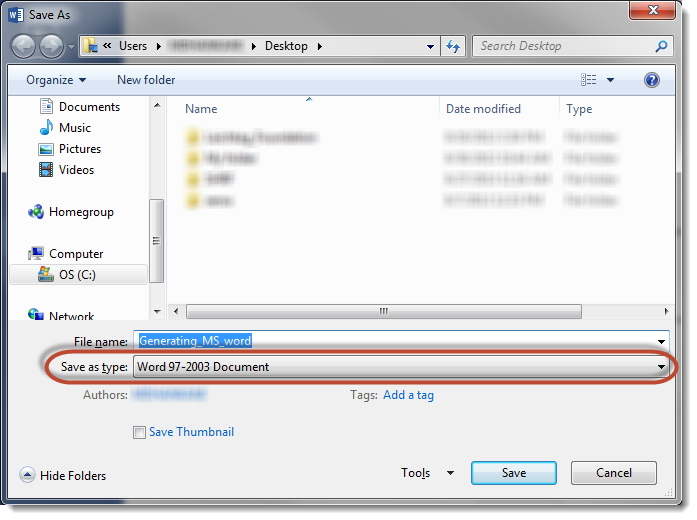
- Note: If the user wishes to edit or retain the document, they may need to utilize the MS Word Save As feature. Certain browsers may render it as read-only initially.
- Please remember to check the file size, as header and footer images may disrupt the document merging process.
Field Options
The options listed below are specific to this particular field type.
- Value - This allows the form fields created in the MS Word document to be assigned by name to the corresponding SmartSimple Field Names or Field IDs.
- Custom Field IDs - You may utilize the Extract IDs and Display Field Names links in this section to reveal the associated Field IDs and Field Names.
- Button Label: This is the text that will be displayed on the button of the field. If no text is provided, the system will default to a standard label. For Word Merge fields, the default label is "Open".
- Folder / File - The target file housed within your SmartFolder.
See Also
To establish a Word merge:
- Step 1 - Create the MS Word document that will serve as the template.
- Step 2 - Upload the Word document to a SmartFolder.
- Step 3 - Create a Special - MS Word Merge custom field.
Advanced Word Merge Features Include:
- Exporting List View Results to Microsoft Word
- Uploading an MS Word Merge Document to a Custom Field
- Including Tables in a Word Merge Document
- Using ReportProperty with a Word Merge Document
- Incorporating Check Boxes in an MS Word Merge Document
- Including XML in an MS Word Merge Document
- Applying Conditional Logic in an MS Word Merge Document
Uploading a Word Merge Document to a SmartFolder
Configuring a Word Merge in SmartSimple involves a three-step process:
- Create the MS Word document that will be utilized as the template.
- This page provides details regarding the second step, which is uploading the Word template to a SmartFolder.
- Create the Special - MS Word Merge custom field that aligns the SmartSimple fields you wish to merge with the Word template.
Uploading the Document
- Navigate to the SmartFolder where you intend to upload the Word template.
- Click on the "Browse..." button adjacent to "Upload File" at the top of the right-hand pane.
- In the File Upload screen, locate the Word template, select it, and click the "Open" button.
- Click the "Upload" button.
The screen will refresh, indicating that the file has been successfully uploaded to the SmartFolder.
Adding Form Fields to an MS Word Document
Configuring a Word Merge in SmartSimple entails a three-step process:
- Create the MS Word document that will serve as the template.
- Upload the Word document to a SmartFolder.
- Create the Special - MS Word Merge custom field that aligns the SmartSimple fields you wish to merge with the Word template.
Your Word document will contain Form Fields that are linked to "Bookmarks." The SmartSimple Word Merge field will be configured to correspond with the bookmarks and SmartSimple variables in the third step.
In this step, you will add the Form Fields and assign Bookmarks to each field in your Word document that is to be merged. The steps may vary slightly across different versions of Word.
It is important to note that SmartSimple's Word Merge feature is compatible with all versions of MS Word. Rather than utilizing the user's version of Word to create the merged document, the merge is executed by SmartSimple's Word Merge engine using a programmatic object compatible with MS Word (all versions). Once the merge is initiated, SmartSimple streams the resultant document back to the client’s browser, where the file extension of the streamed document (*.doc, *.docx, etc.) will trigger the launch of MS Word. If the user does not have MS Word installed on a Windows machine, the process will simply open the program associated with the document's extension.
MS Word 2000-2003
- From the View menu, select Toolbars and enable the Forms toolbar.
- Click within your Word document at the desired location to insert a Form Field.
- On the Forms toolbar, click the first button to insert a Form Field into your document:
- Right-click on the Form Field and select Properties. Subsequently, provide a name for the field in the Bookmark section.
MS Word 2007
- Click on the Menu button and select Word Options.
- In the Popular section, select Show Developer Tab in the Ribbon.
- Click within your Word document at the desired location to insert a Form Field.
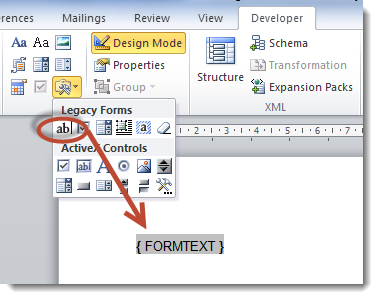
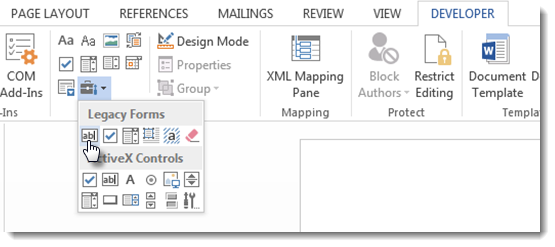
- On the Developer menu, select the Legacy Tools icon located in the Controls section:
- On the Legacy Forms menu, click the first icon to insert a Form Field.
- Right-click on the Form Field and select Properties. Subsequently, provide a name for the field in the Bookmark section.
MS Word 2010/2013
- Click within your Word document at the desired location to insert a Form Field.
- Click on the Developer tab.
- If the "Developer" tab is not visible, click on File > Options > Customize Ribbon, and check the "Developer" tab in the right-hand frame.

- On the Developer tab, click on the Legacy Tools button:
 .
. - Click on the Text Form Field button.
Word 2010
Word 2013
- A Text Form Field will be inserted at the cursor location.
- Right-click on the Form Field and select Properties. Subsequently, provide a name for the field in the Bookmark section.
In Word 2013, the document must be saved as a "Word 97-2003 Document":
Preparing Template for List View Export
List View Export to a Word Merge field requires that the fields used be Word Merge fields instead of the previously mentioned bookmarks. This method is also applicable for Word Merge fields utilized outside of the list view.
To ensure the functionality of the list view export, fields must be created using the following steps:
- In Word 2007 and later, select Mailings from the ribbon menu.
- If you have not already done so, click on Select Recipients, then choose Use Existing List.
When the Select Data Source dialog box appears, select a blank Excel document (or any existing Excel document you have accessible). This will enable the necessary buttons.
- Click on Insert Merge Field.

- Select the Address Fields radio button.
- With the first field on the list selected, click on Insert. The selected field name will now appear within the document.
For example: «Field_Name». - You may now close this dialog box.
- To rename the newly added Word Merge field, right-click on the field and select Edit Field
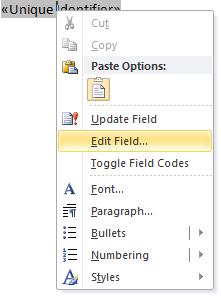
- You may now relabel the Field name to your preferred designation.
- You can copy and paste this field to other sections of your document and rename it accordingly.


Note: If you do not rename the field, the data merged within will be identical for all fields with the same name.