Overview
What and Why
The Excel Parser feature enables applicants to complete their budgets utilizing the Microsoft Excel application offline, after which they can subsequently upload the finalized Excel spreadsheet into your system. The data contained within the spreadsheet will be utilized to populate custom fields in your system, or it may be employed to generate multiple activities. This feature may serve as a preferable alternative to the Advanced Data Table custom field, particularly when dealing with complex budgets or tables of information comprising numerous columns.
This article will guide you on how to set up Platform3 and an Excel spreadsheet to facilitate the Excel Parser process, enabling your community to upload spreadsheets that will populate their applications and generate activities.
It is necessary to possess Global Administrator access in order to configure or modify the elements utilized in the Excel Parser process. Additionally, you must have Microsoft Excel to establish the spreadsheet that users will complete and upload.
Use Cases
The Excel Parser is typically employed for intricate tables of information with numerous columns, as found in budgets. This serves as an alternative to the Advanced Data Table custom field, which can be cumbersome to complete and complex to configure. It is also utilized to create activities such as budget items or project milestones. The Excel Parser may prove advantageous when there is a requirement to request extensive information from an applicant while only intending to work with or report on a subset of that information.
Best Practices
When configuring the Excel Parser, one can either populate fields on the record or create activities for the record, but not both simultaneously.
Configuration – Essentials
The Process from the Applicant's Perspective
-
Log into your instance and download the MS Excel template.

Refer to the instructions which include a link to download the required template for completion by the applicant.
-
Complete and save the template.

A sample completed Excel spreadsheet.
-
Upload the template and save the application.

Uploading the completed Excel spreadsheet.
-
Information in the template is parsed, and mapped fields are populated while activities are created.
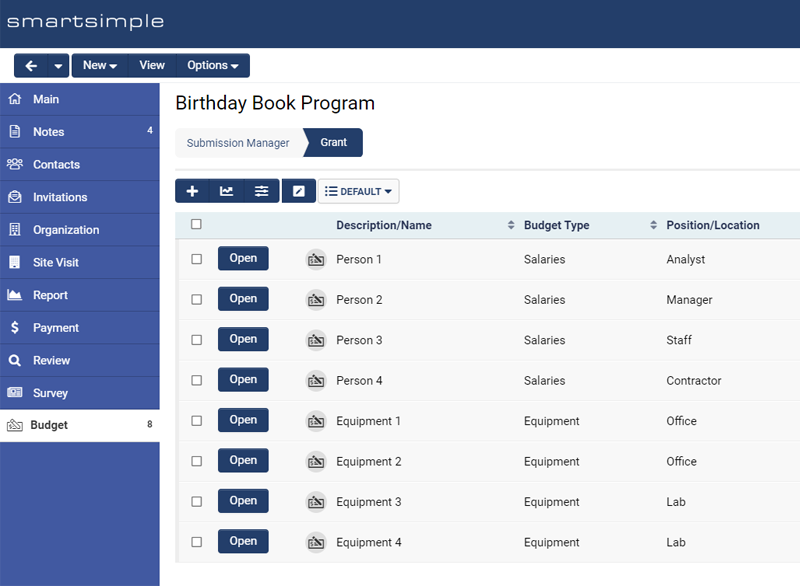
Activities created upon spreadsheet upload.
-
Optionally, you may delete the previously uploaded spreadsheet, then upload a new spreadsheet and save to update the information already present in your system.
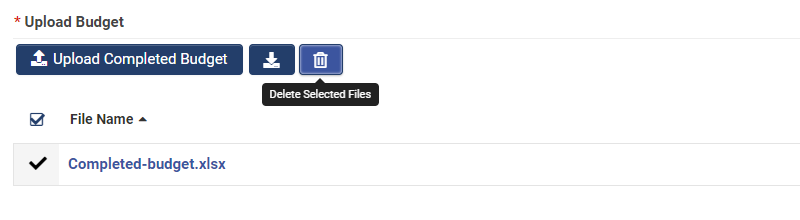
Select the uploaded spreadsheet and click the delete button, then upload a new spreadsheet to refresh your values in the system. Note: new values will appear upon refresh or save.


Preparing the Spreadsheet
We will now set up an Excel spreadsheet designed to create level two activities.
- Open Microsoft Excel and create a blank workbook.
- Configure the Excel Spreadsheet according to your desired layout by adding headings, applying cell formatting, and entering formulas as needed.
- Assign a background color to indicate the cells where you expect users to enter information. The remainder of the spreadsheet will be locked at a later stage.

A sample spreadsheet formatted with formulas, headings, and background colors.
Naming Cells
Platform3 requires knowledge of which cells you wish to parse; therefore, it is essential to name those cells for future reference. This can be accomplished by naming individual cells as well as groups of cells. In this instance, we will focus on naming individual cells to create activities.
- Assign a name such as Salaries to the header cell you intend to parse into Platform3. This named cell will be used to populate a specific custom field value later.
-
You can define the cell name in Excel by selecting the desired cell, navigating to the Formulas tab, and clicking on Define Name. Once a name has been assigned to a cell, it will be visible in the Name Box when the selected cell is highlighted.
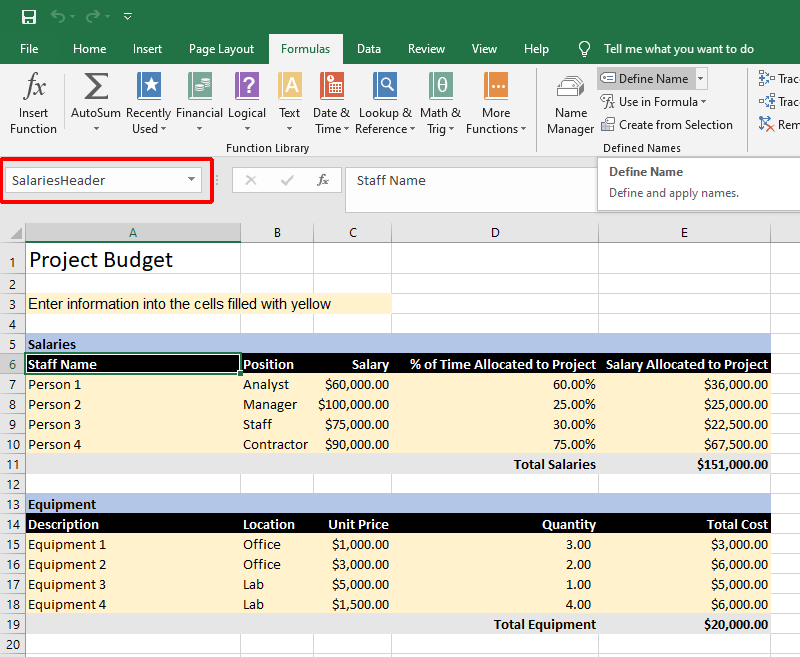
Defining a name for a cell for future reference. The defined name will be displayed in the name box when a cell or group of cells is selected.
- Assign a name such as StartingSalaries to the first cell you wish to parse into Platform3. While it is possible to name all cells in this row, I opted to name only the first cell and will refer to the other cells in the row using the syntax "col_1", "col_2", etc.
- You may also wish to assign names to additional cells; for instance, I have also named SalariesHeader and SalariesSubTotal to facilitate mapping to those as well.

Note: The Name Manager in Excel can also be utilized to view and modify all cell names defined within your spreadsheet.
Securing the Excel Spreadsheet
Having established our Excel spreadsheet and designated the cells for parsing, it is imperative to secure the spreadsheet. We will implement restrictions on the entire spreadsheet, with the exception of the specified cells, to prevent the applicant from adding rows, columns, or making any modifications that could potentially disrupt the parsing process.
-
Select all cells by clicking the box to the left of column A (located between column A and row 1).
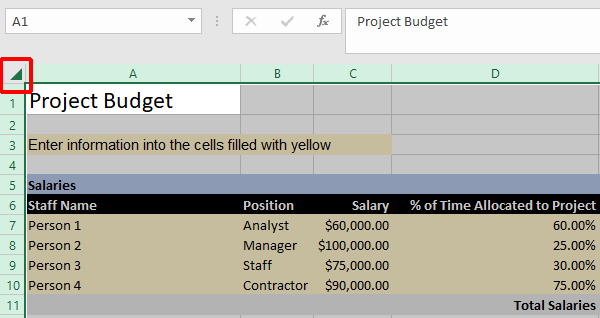
Select all cells in the spreadsheet by clicking between column A and row 1
- Right-click the same box, select Format Cells, and then navigate to the Protection tab.
-
Ensure that the "Locked" checkbox is checked.
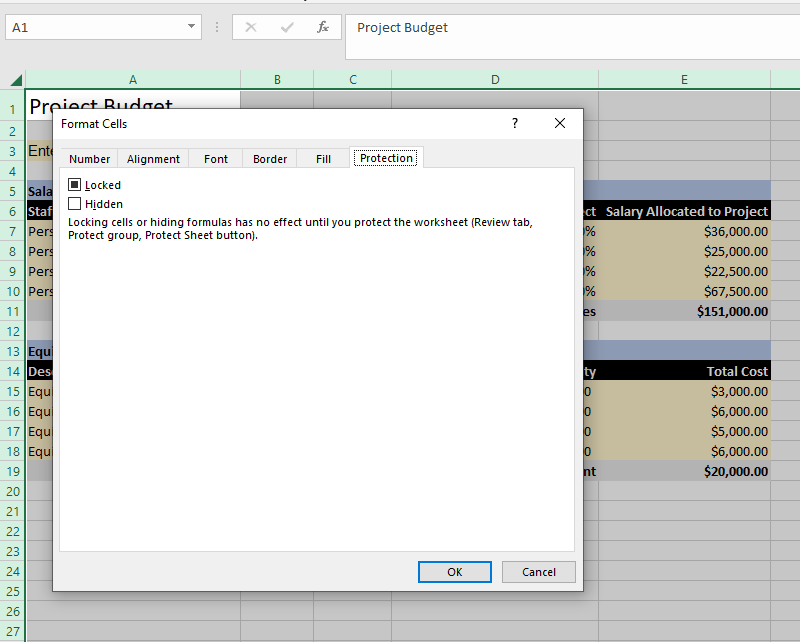
Ensure that all cells are locked
- Click OK (These initial steps ensure that all cells are locked. Refer to steps 5-6 for unlocking individual cells).
- Right-click the cell(s) that you wish to allow the end user to edit (i.e., the unlocked cells).
- Select Format Cells and then go to the Protection tab. Uncheck the Locked box. This action will unlock the cells designated for user input.
- Navigate to the Review tab and then select Protect Sheet (In earlier versions of Excel, this option may be located under the Tools menu, followed by Protection).
- Limit user permissions to selecting unlocked cells and enter a password in the prompt to secure the sheet.


The spreadsheet is protected with a password for unlocking
Users will now only be able to select and enter data into the cells that were unlocked in step #6. They will not have the ability to insert or delete columns or rows, add comments, or perform any other actions.
Upload the Spreadsheet to a SmartFolder
With the spreadsheet configured for the applicant's use, it is necessary to place the spreadsheet in a location accessible to the applicant. We will upload the spreadsheet to a SmartFolder.
- In your instance of Platform3, navigate to the Menu Icon > SmartFolders.
-
Create a new folder to contain the spreadsheet, naming it something like Excel Parser (Alternatively, you may place it in an existing folder).
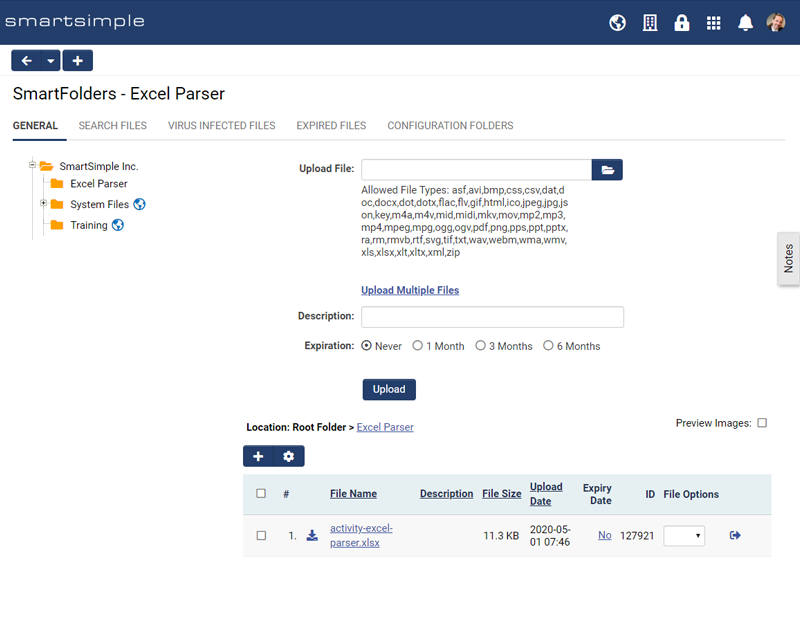
Upload the Excel spreadsheet template to a SmartFolder
- Locate the Excel spreadsheet file and upload it to your SmartFolder.
-
Once the file has been successfully uploaded, under File Options, change the dropdown to View URL to obtain the link to the uploaded file.
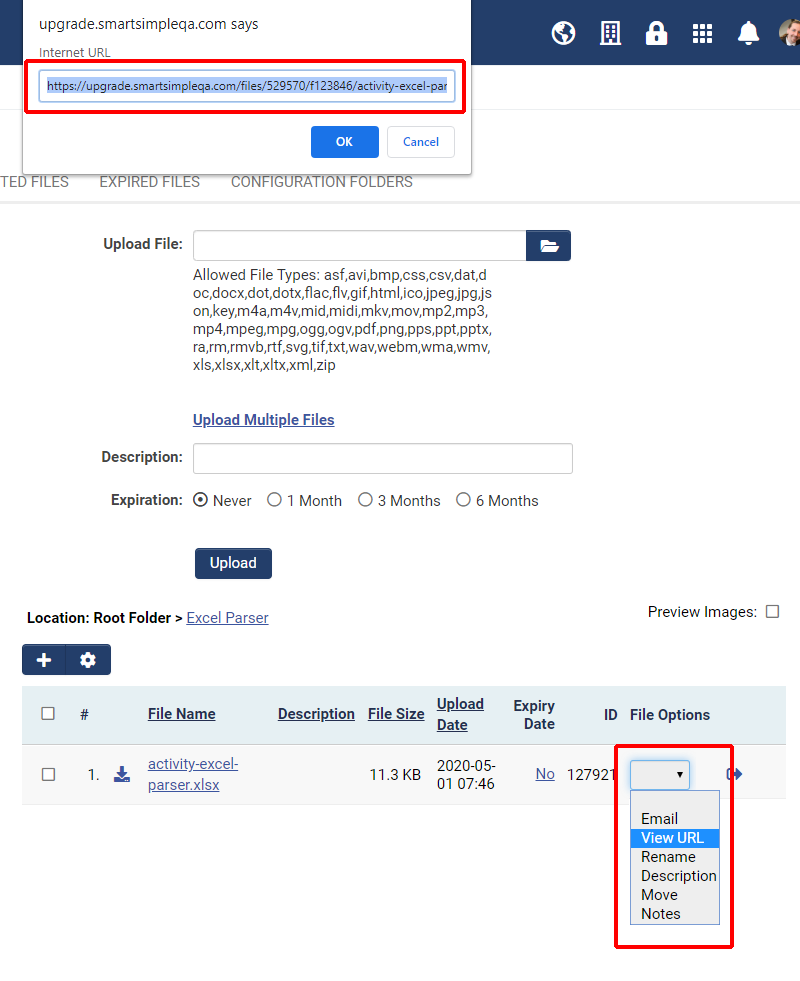
View the URL to access the path to the Excel spreadsheet template
- Copy the link to the spreadsheet into a notepad file and save it for future reference. The link should resemble:


https://alias.smartsimple.com/files/1234567/f123456/activity-excel-parser.xlsx
Create a Download Link
After uploading the spreadsheet to a SmartFolder, it is essential to provide a link for the applicants to download the spreadsheet template that they are expected to complete. You may include a link in the instructions for the “Upload - Multiple Files Storage” custom field that will be created later. However, I have opted to create a separate instructions field for enhanced visibility. Below are the steps to create an instructions field with a link to download the Excel spreadsheet that the applicant will complete.
- Navigate to the desired UTA, such as Submission Manager, and click the configuration settings icon (represented by a gear).
- Proceed to the relevant level tab; in my case, it was a Level 1 titled Grants.
- Click on the Custom Fields link.
- Create a new custom field of the type Display - Instructions and label it something like Budget Instructions.
-
For the content, input text similar to the following:

Content for the plain text editor of a Display – Instructions custom field
- Replace the link that appears as /files/1234567/f123456/activity-excel-parser.xlsx with the link to the spreadsheet you uploaded to the SmartFolder in the previous steps. Ensure that you remove the portion https://alias.smartsimple.com from your link. Always utilize relative links within Platform3 to guarantee proper functionality across different environments.
- Save the custom field.

Alternatively, you may also incorporate a button for the applicant to click in order to download the Excel template. Below is the code you would utilize. Similar to the previous steps, you will need to update the relative path accordingly.
![]()
Custom code to add a button for downloading the template.

An instructions custom field containing a link to download the spreadsheet template
Configuring the Multi-File Upload Field
Previously we added instructions and a link so the applicant can download the Excel template. Now we need to create a field where the applicant can upload the completed template so it can be parsed.
- Go to the desired UTA configuration settings, click on the desired level tab, and click the Custom Fields link.
- Create a new custom field of the type Upload - Multiple Files Storage and call it something like Upload Budget.
- Set the Caption Location to Above Field (this will give more space for longer captions and instructions).
- If you created an instructions custom field above, move to the next step, otherwise you can add instructions into this field as per the above using the relative link to the excel template.
- For Button Label enter something like Upload Completed Excel Template or Upload Completed Budget Template.
- If your applicants must upload a budget, toggle on Mandatory and add a Failed Validation Message something like You must upload a completed budget using the provided Excel template.
- Enter xlsx for allowed file type to ensure applicants can only upload the correct file format.
- After the July 2020 upgrade you may need to set the Minimum Number of Files to 1.
- Toggle on Enable Excel Parsing.
- Save the custom field.
Field Mappings on the Multi-File Upload Field
Previously we set up a field for the applicant to upload the completed spreadsheet and we created a spreadsheet with named cells or groups of cells. Now we need to tell your system what data we want to parse, and what we want to do with that data. Typically you will either populate a custom field with one or more values from the spreadsheet or as in this example we will create level 2 activities based on rows from the completed spreadsheet.
- On the Multi-File Upload custom field we set previously with Enable Excel Parsing will see a new section near the top called Field Mappings. This is where we define what will be parsed to where.
-
If you have already created the activity custom fields you want to map to, you will need to get the custom field IDs for each. Otherwise you need to create the desired activity custom fields.

Custom field IDs are found on each custom field's configuration page near the top
-
If you followed the instructions above you can place the following into the Field Mappings input and replace Custom Field IDs with your desired custom field IDs
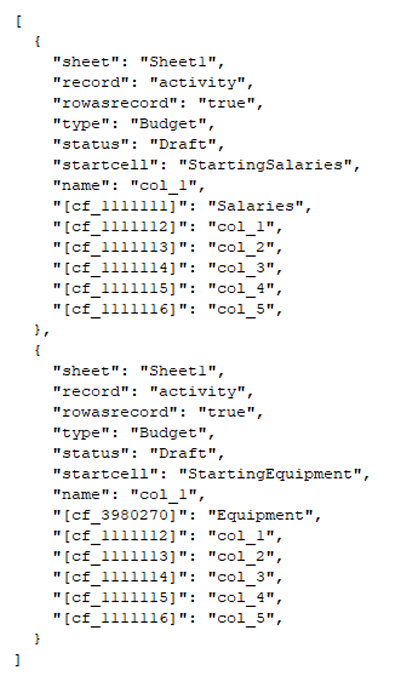
Code entered into Field Mappings
- Click Save.


Now you can test out the entire process from the applicants point of view and watch the activities get created and populated with data upon upload of the completed spreadsheet.
Note: if it does not parse correctly, start by checking that the names defined in your spreadsheet match the names in the field mapping, and check that the custom field IDs are correct. For more information on the Syntax see below.
Updating Existing Custom Fields and Activities
The applicant can upload a modified Excel template at any time to update the custom fields and activities. Please note if you need to change your template by moving or removing rows or columns, the data may not parse correctly after such modifications. Depending on the configuration you may be able to go to the field data and replace values to clear out what was previously uploaded and then upload a new completed spreadsheet again to repopulate. Also note the name of the activity must remain the same if you want to update it. If an activity has been renamed and a new spreadsheet has been uploaded a new activity will be created instead of updating the existing one.
Configuration - Advanced
Activity Syntax and Field Mappings
When you are mapping cells in your spreadsheet to fields in your system you can either map to the same record or you can create activities.
The example above showed how to map to activities. Where the syntax opens and closes with a square bracket [] then each set of activities are encapsulated in curly brackets {} and separated by a comma ,.
Inside the curly brackets you call the field/property in quotes, for example "name" for the name of the activity or "[cf_3980270]" for a custom field on the activity or "sheet" for the sheet within the excel document where the data is located.
This is followed by a colon : to separate the field from the cell being parsed.
After the colon enter the named cell you defined in the spreadsheet and do so in quotes. Example "Equipment" if you named the cell in the spreadsheet Equipment. Alternatively if you declared a starting cell, example: "startcell": "StartingEquipment", you can call each cell in that row using col_1, col_2, etc. Example "[cf_1111112]": "col_1", this will create an activity for each row mapping the columns as defined until the parser comes to a row with a blank first value. At this point the parser will stop and move to the next set of activities to parse and create.
Lastly add a comma , to separate each field/property to cell name mapping.
Note: if you enter a name mapping that does not exist, the parser will fail and may create only 1 activity or none.
Same Record Syntax and Field Mappings
Alternatively, if you don’t want to create activities you can populate fields on the record. For example you could map a cell to a custom field such as a Text Box - Text Single Line or multiple cells with one name to a single field such as a Basic Data Table.
If you want to map multiple cells in your Excel template to a basic data table using a range of cells you can do so by doing the same as listed above, except instead of selecting a single cell and naming it in the Excel spreadsheet you select and name a set of cells example A1 to E5.
Also in this scenario the syntax is different. The syntax for custom fields is :
[CustomFieldName1]=PersonnelTable;[CustomFieldName2]=SummaryTable
In this example the custom field name goes between square brackets [], followed by an equals sign = followed by the name you gave the cell or cell group in your excel spreadsheet.
lastly , each mapping is separated by a semicolon ;
Note: if you are populating a basic data table, you must set that custom field to Deny Modification, otherwise it will not update, and the current screen values will overwrite the parsed values on save.
Settings Explained
Field Mappings Syntax for Creating Activities
| Example | Description |
|---|---|
| [] | Start and end with square brackets |
| {}, | Each set of activities to be created are wrapped in curly brackets and separated by a coma, inside the brackets you will specify the mappings like "sheet": "Sheet1", |
| "field/property":"name" | Inside the curly brackets you find the specific mappings which are the field/property to set and the name you gave the cell in the spreadsheet. If you are referencing a custom field wrap it in square brackets inside the quotes example "[cf_1111112]": "col_1", |
| "sheet": "Sheet1", | "Sheet1" is the name you gave your sheet inside your excel document. If you gave your sheet another name change this value. |
| "record": "activity", | "activity" creates child records, empty for current record or "peer" for creating activities of same parent record. |
| "rowasrecord": "true", | "True" tells the system to create a new activity record for each row in the spreadsheet. |
| "type": "Budget", | "Budget" tells the system which activity type to create. Change this value to the desired type name in your system. |
| "status": "Draft", | "Draft" tells the system what status to set the activity to. Change this to match the desired status in your system. |
| "startcell": "StartingSalaries", | "StartingSalaries" is the name you gave the starting cell in your Excel Spreadsheet |
| "name": "col_1", | "col_1" is the column of data used for the level 2 name (subject standard field). Note: the name entered for “col_1” is used by the parser to reference and update that activity. Once an activity is created, the “col_1” name should not be changed. If a user changes the name of an activity found in “col_1” and uploads an updated spread sheet, the parser will not be able to update the existing activity and as such will create a new activity using the new name. |
| "[cf_3980270]": "Salaries", | "[cf_3980270]" is the custom field ID and "Salaries" is the named cell in the spreadsheet. The value in this cell will be used to populate this custom field. |
| "[cf_3980271]": "col_1", | "[cf_3980271]" is the custom field "col_1" is where the data will be pulled from based on the defined startcell which is named in the spreadsheet. |
Field Mappings Syntax for Same Record
When populating custom fields on the same record the syntax is much simpler. Wrap the custom field in square brackets, add an equal sign then enter the name as defined in excel spread sheet for the desired cell or set of cells. If you want to populate multiple fields, separate them with a semicolon.
Example:
[fieldname1]=NameInExcel1;[fieldname2]=NameInExcel2
Troubleshooting Tips
- Ensure the template file extension is .xlsx
- When updating custom fields on the same record, the custom fields must be set to Deny Modify