Overview
This custom field type is designed to store multiple files within a single field. Files may be uploaded either individually or in groups.
This field type is utilized for storing:
- Uploaded documents
- Uploaded media
- Documents created using the Web Page View type field with the Store to Server option.
Field Illustration
View Mode:
Edit Mode:
Field Options
The options detailed below are specific to this particular field type.
Security Options
- Allow External Access: If there is a report enabled for external access that includes files in this Multiple Files field, any individual viewing the report will be able to click on the file names listed for this field and access the underlying files.
- Enable Online Editing - When activated, an edit button will appear next to the documents within this field, allowing users to edit the documents online. Upon saving changes, the updated document will automatically be stored back into the corresponding Multiple Files field. (Note: Documents with special characters, such as apostrophes in the filename, may not be editable.)
- Real-Time Virus Scan - Conducts a virus scan on uploaded documents.
Other Options
- File Index - Enables file indexing and full-text searching using the Lucene full-text search engine, which is integrated into SmartSimple.
- Create Optimized Image Version: When selected, a smaller version (thumbnail) will be generated upon image upload. The thumbnail will be compressed and limited to 1024 pixels in width. The thumbnail can be referenced using the syntax @fieldname.compressedlink@. This feature aims to enhance the loading time of pages displaying numerous high-resolution images.
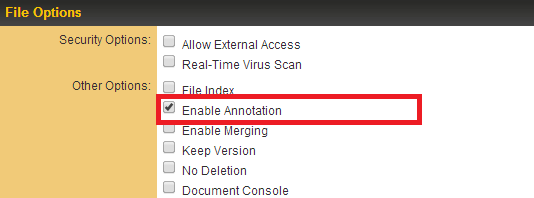
- Enable Annotation - Allows users to add annotations to uploaded PDF documents directly within the SmartSimple system.
- Keep Version - Facilitates version control over added documents. When a second document with the same name is uploaded, the name will be suffixed with V_# (where # represents the version number starting at 1). Additionally, if Online Editing is enabled, the updated version will not overwrite the original but will instead create a new entry with the next appropriate version number.
- Disable Delete - Restricts the user's ability to delete any files stored within the field. The Allow Delete Multiple Files Fields manager permission is required for users to bypass this restriction.
- Enable Merging - Permits users to select any or all PDF documents within the field to be merged into a single document.
-
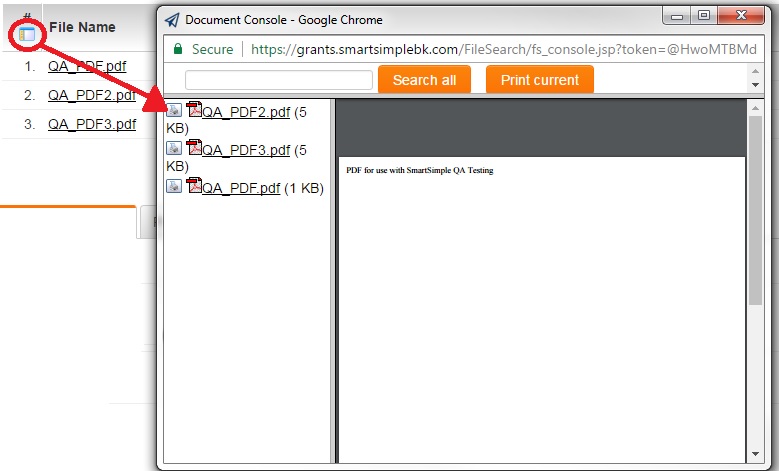
Document Console - Activating the Document Console allows users to easily preview and print the documents contained within the Multiple File field.
- Auto Convert Documents to PDF on Upload - Automatically converts Word Documents into PDF versions of the same document asynchronously.
- Enable Excel Parsing - Parses uploaded Excel files and populates mapped fields based on the content of the files; see Excel Parser.
- File Type Restriction - This option allows you to specify the only file types that may be uploaded, in a comma-separated list. Please note that file extensions (e.g., txt, jpg, pdf) must be in lowercase. Refer to the File Type Restriction page for further information.
- Maximum File Size - A drop-down menu providing options to set a limit on the file upload size.
- File Name Restriction - Enables enforcement of a file naming convention for files uploaded to SmartSimple. Consult the File Name Restriction page for more information.
- Workflow on Upload - Allows you to define a Workflow that will be triggered whenever a file is uploaded to this field.
Media Library Options
- Enable Media Library - Activates the media library interface. This option is only available in Arcadia mode.
- Enable Media Download - This option is only available when Enable Media Library is checked. It allows for the downloading of any uploaded media files.
- Enable Mobile Link - This option is only available when Enable Media Library is checked. It permits access to mobile links.
- Enable Closed Caption - This option is only available when Enable Media Library is checked. It allows access to Closed Captions (CC) and provides the ability to customize the label on the CC button.
- Enable Media Annotation - This option is only available when Enable Media Library is checked. It allows users to make annotations on the media item and customize the label on the Annotation button.
- Use Thumbnail Image in Print View - This option is only available when Enable Media Library is checked. If not selected, the print view will display the entire image. If selected, the print view will show the image at half width with metadata fields on the right-hand side. NOTE: This will require the latest Web Page View "SmartFields Sample Template".
- Watermark - This option is only available when Enable Media Library is checked. Entered text will appear as a watermark when any uploaded media is viewed.
The ability to delete files from Multiple File fields is granted to roles that possess the Allow Delete on MultiFile Fields Manager Permission.
File Size Upload Limitations (Size Restrictions)
Files with sizes up to 1GB may be uploaded into Custom Field Type: Upload - Multiple Files Storage and Custom Field Type: Upload - Single File Storage.
File Size Upload Times
| Region | File Size; Upload Time | |||||
|---|---|---|---|---|---|---|
| Canada (Peer1) |
The nested table must be on a new line>
|
Notes
- File upload time tests were conducted from the SmartSimple headquarters. Upload times may vary based on your Internet Service Provider and other factors.
- Last speed test conducted in August 2015.
Special Field Options
Indexing Multiple and Single File Fields
Both the Upload - Multiple Files Storage and the Upload - Single File Storage features include a file indexing capability. This functionality enables users to search for documents attached to the field, contingent upon the user possessing the requisite permissions to access said field.
Supported File Types
- When adding a document to this file, it is imperative to ensure that the document is indexable for searching purposes. The following document types are supported: Microsoft Word, Microsoft Excel, Adobe PDF, HTML, and RTF files.
Ensuring PDF Files are Searchable
- When utilizing PDF files, it is essential to confirm that the files are text-searchable. This functionality can be verified by opening the file in Adobe Acrobat Reader and ensuring that the Select Text tool is functional for selecting text within the file.
Indexing After Uploading
- The indexing process occurs upon the initial upload of the file. If you choose to index a file post-upload, it is necessary to re-index the field. Please follow the steps below to index the field:
- Locate and edit the Custom Field.
- Select the File Index checkbox.
- Click the Save button.
- Navigate to the File Index tab.
- Select the option labeled Re-index all files in this field now!
- Click the Save button.
Disabling a File Index
- To disable the File Index functionality and cease making attached files searchable, please follow these steps:
- Locate and edit the Custom Field.
- Deselect the File Index checkbox.
- Click the Save button.
- Navigate to the File Index tab.
- Select the option labeled Remove index from all files in this field now!
- Click the Save button.
PDF Document Options
Allow Merging (PDF Files Only)
- If utilizing a Multiple File field for storing PDF documents, you may enable a Merge button:
- While editing a record with a Multiple File field that has "Allow Merging" enabled, the Merge files button will be available:
- Clicking the Merge files button will allow you to select which PDF documents stored in the field you wish to merge into a single PDF document, as well as the order in which they are merged.
- The resulting document will also be stored within the Multiple File field. The original documents will remain unchanged.
- This feature facilitates easier printing of document "sets".
- The resultant file name must not contain any spaces.
Note Regarding Merging: Any PDF files that possess the Content Copying or Content Copying or Extraction security restrictions are not eligible for merging. * The settings can be reviewed by opening the PDF and navigating to File > Document Properties > Security (steps may vary depending on your PDF reader version).
Display Additional File Attributes (PDF Files Only)
- This feature enables the display of supplementary information (also referred to as Meta Data) extracted from each PDF in the list view of the files stored within this field.
- This is accomplished using the Extra Columns section:
Variables
The following extensions may be utilized with Multiple File fields:
- .numOfPages: the total number of pages across all PDF files stored in the field.
- .numOfFiles: the count of files present in the field.
Example: To verify if the custom field contains any uploaded files:
"@level1.Link-Multiple Files custom field name.numOfFiles@">0
- .uploadlink: the URL designated for uploading a file to the field.
- .value: the filenames of the files, delineated by pipes (|) along with file identifiers.
- .filenames(separator): the filenames of the files, separated by the separator specified within the parentheses.
- .files: the URL/path to each file, separated by pipes (|).
NOTE: To present a list of files in a tabular format with hyperlinks to the files, simply reference the field name. For example:
@Annual Financial Documents@
Example: Upload file function utilizing a hyperlink:
<a href="@Additional Files.uploadlink@" target="_blank">Click Here to upload</a>
Upload file function presented as a button:
<input class="Button" type="button" value="Upload Files" />
HTML 5 Upload Feature
As of May 2013, a new HTML 5 format for the file upload functionality on multiple file fields has been implemented. This new uploader eliminates the necessity for a Java applet plug-in; end users are no longer required to install any software to upload multiple files. Please note that HTML 5 is supported on the following browsers:
Users who are not utilizing one of these browsers will continue to utilize the file upload applet, which necessitates the installation of the Java applet plug-in.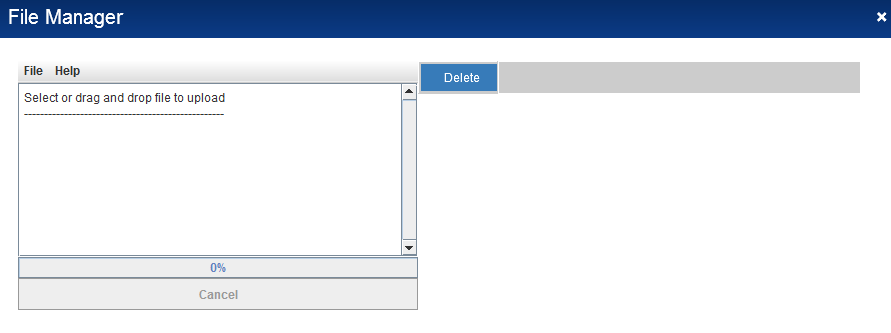
Notes
- Commas within the filenames of uploaded files will automatically be substituted with underscore characters ("_"). This measure is implemented to avert errors during JavaScript execution.
PDF Annotation
SmartSimple provides users with the capability to append annotations to uploaded PDF documents directly within the system.
When the "Enable Annotation" option is activated on a multiple-file upload field, PDF documents uploaded to that field become available for commenting and markup.
Users can add comments, drawings, text strike-throughs, and highlights to any PDF without the necessity for downloads or browser plug-ins.
Enabling PDF Annotation
- The PDF Annotation feature is a configurable option applicable to Multiple File custom fields throughout the system.
- To enable this feature, access the Multiple File custom field within the UTA Settings tab.
- The Multiple File custom field includes several options, one of which is the Enable Annotation option.
- Select this option and then click Save.
- Subsequently, when you enter edit mode in the upload file field, any uploaded documents will display a small Annotate icon next to them.
Using PDF Annotation
- Click on the small Annotate icon adjacent to the PDF document you wish to annotate.
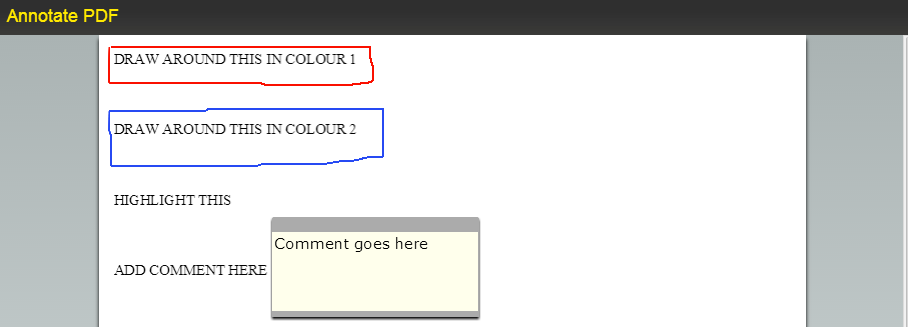
- This action will launch the Annotate PDF screen, which presents a variety of annotation options along the bottom.
- Users can utilize these options to add annotations as follows:
-
- Highlight: enables users to highlight any text within the document
- Comment: permits users to add comments to selected sections of the document
- Strikeout: allows users to apply a strike-through to selected text or sections within the document
- Draw: enables users to draw around selected text or sections in the document, utilizing one of four available color options
- Delete: allows users to remove previously added annotations.
- Show Annotations: enables users to display or conceal the annotation
-
- Once the user has added their annotations, they may simply close the document to save them. Upon reopening the document via the small Annotate icon, the annotations will be visible alongside the document.
Display Additional File Attributes for PDF Documents
- This feature allows you to display extra information (called Meta Data) extracted from PDF files that are stored in Single File or Multiple Files field.
- Only PDF files will display this information.
- The additional attributes that can be extracted and displayed are:
| Meta Data Field Name | Field Code |
| Author | author |
| Creator | creator |
| Producer | producer |
| Keywords | keywords |
| Subject | subject |
| Title | title |
| Number of Pages | numofpages |
| Creation Date | creationdate |
| Modified Date | modifieddate |
| Is Encrypted | encrypted |
Is Encrypted: Returns the word Encrypted if the document has the "Content Copying" or "Content Copying or Extraction" security restriction is in place. PDFs that are encrypted cannot be merged with a Web Page View (see Attach a PDF to a Web Page View)
There are two different ways of displaying additional file attributes for PDF documents, depending on whether the PDF document(s) are stored in a Single File field or Multiple Files field.
Multiple File Fields
- To include the above attributes in the list view of documents stored in a Multiple Files field use the Extra Columns section when you create the Multiple Files field:
- In the Extra Columns field enter the desired column headings (separated by commas), followed by two colons, followed by the field codes from above (again separated by commas)
- Note: be sure there are no spaces between the field codes, just a comma.
- These attributes will only be displayed for PDF documents. They will be left blank for all non-PDF documents.
Pull an upload date and time from an upload fields
For Multiple Files Storage field you can use the below syntax:
@FIELD_NAME.template[#~uploaddate~#]@
Notes
- These additional fields are embedded properties of the file. Accordingly the Modified Date and Creation Date will be displayed in the format in which they are stored in the file, and will not necessarily reflect the format you have selected for Date and Time display in your Personal Settings.
Media Library
The Media Library feature facilitates the enhancement of file upload fields into comprehensive media libraries. This functionality automatically compresses uploaded content and provides a new interface for inline viewing of the uploaded content within your browser. The option to enable the media library interface is available during the configuration of an Upload - Multiple Files Storage custom field. It is important to note that the media library configuration and functionality are exclusively supported in Arcadia mode.
Configuring the Media Library Settings
The File Options section of the Upload - Multiple Files Storage custom field encompasses the following settings that are specific to the Media Library functionality: Media Library Options
- Enable Media Library - activates the media library interface. This option is only available when in Arcadia mode.
- Enable Media Download - this option is only visible when Enable Media Library is checked. It allows for the downloading of any uploaded media files.
- Enable Mobile Link - this option is only visible when Enable Media Library is checked. It provides access to a mobile link.
- Enable Closed Caption - this option is only visible when Enable Media Library is checked. It allows access to Closed Captions (CC) and provides the capability to customize the label on the CC button.
- Enable Media Annotation - this option is only visible when Enable Media Library is checked. It permits users to make annotations on the media item and customize the label on the Annotation button.
- Use Thumbnail Image in Print View - this option is only visible when Enable Media Library is checked. If not selected, the print view will display the entire image. If selected, the print view will show the image at half width with metadata fields on the right-hand side. NOTE: This will require the latest Web Page View "SmartFields Sample Template".
- Watermark - this option is only visible when Enable Media Library is checked. The entered text will appear as a watermark when any uploaded media is viewed.
Using the Media Library
The Upload - Multiple Files Storage field configured as a Media Library will continue to display the same Multiple and Single File upload buttons, allowing uploads to proceed in the same manner. The following section focuses on aspects specific to the Media Library functionality.
Uploading Media Files
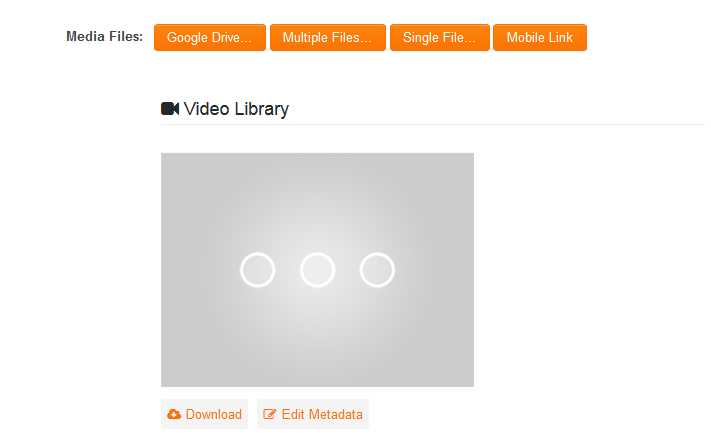
Upon uploading a media file, processing may take a few minutes in the background. This processing is necessary for copying files to a media server and converting them into various formats compatible with different devices. The preview thumbnail will display as three dots until processing is complete.
Supported Media Formats
The following file extensions are supported:
Audio: .mp3, .flac, .wma, .wav, .ra, .rm, .mid, .midi, .ogg
Video: .mp4, .mov, .flv, .ogv, .webm, .wmv, .mkv, .avi, .rm, .asf, .rmvb, .mpg, .mpeg, .mp2, .m4v
Image: .jpeg, .jpg, .gif, .png, .bmp
Media File Overview Options
Once media files are uploaded and processed, an overview of the uploaded image, including a preview thumbnail and associated data, will be displayed beneath the field.
Users have two options for displaying the overview of the uploaded files:
- List View: media files organized vertically, with media file metadata information and buttons appearing to the right of the video preview thumbnail.
- Grid View: media files organized horizontally, with media file information and buttons appearing beneath the video preview thumbnail.
Media Streaming
- Audio and video streaming services are available at an additional cost. Please contact your account manager for further information.
- The media server for all clients is currently hosted in the USA. An additional server for Europe is being prepared and will be available in the near future.
- The table below outlines the expected time range after which an uploaded media file should be accessible. The files utilized in these examples were in the MP4 format.
| Length | Resolution | Size | Suggested Times |
|---|---|---|---|
| 5 mins | 1920 x 1080 | 154MB | 10-15 mins |
| 2560 x 1440 | 301MB | 20-25 mins | |
| 3840 x 2160 | 593MB | 35-40 mins | |
| 10 mins | 1920 x 1080 | 312MB | 15-20 mins |
| 2560 x 1440 | 604MB | 30-35 mins | |
| 3840 x 2160 | 1.2GB | 50-55 mins | |
| 15 mins | 1920 x 1080 | 472MB | 20-25 mins |
| 2560 x 1440 | 916MB | 40-45 mins | |
| 3840 x 2160 | 1.8GB | 1 hour 25 – 1 hour 30 mins |
View and Annotate Media Files
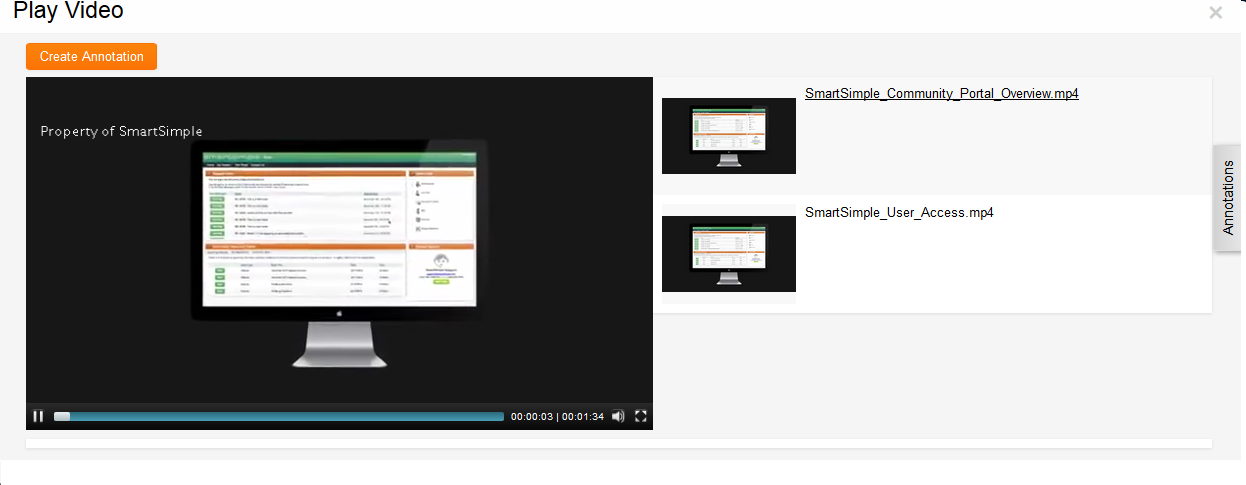
To view the media file, right-click on the preview thumbnail. The media file will open in its own lightbox.
Users can enter notes at specific points in the media file utilizing the Annotations feature.
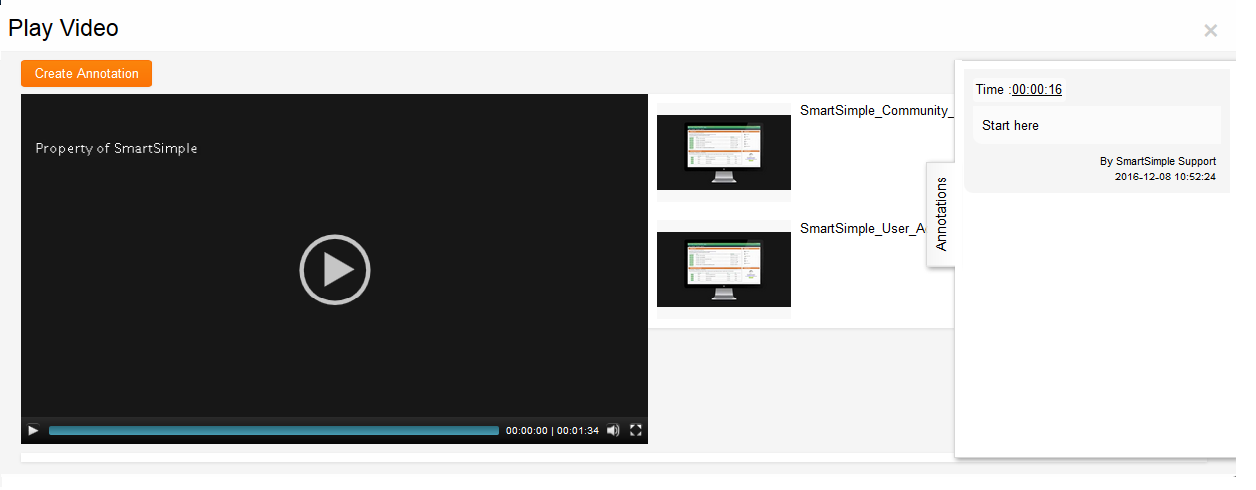
- Click on the video timeline to indicate where the annotation should appear for the media file.
- Click on the Create Annotation button to reveal a Comments field for entering the annotation.
- Enter the note and click Save to store the note, or click Cancel to return to the lightbox without saving any notes.
- The annotation can be viewed using the Annotation tab on the right, with a link in the Time field directing to the relevant point in the video timeline.
Edit Metadata, Including Closed Captions
Metadata is a collection of data that describes and provides information about the media file. It can be accessed via the preview thumbnail and by clicking on the Edit Metadata button. The Edit Metadata button also enables the user to do the following:
- Enable Public Access: if populated, this will expose a URL. The URL will allow viewing access to the media file without requiring a system login. Additionally, there will be a View Statistics button to provide information on users accessing the file via the URL. NOTE: Currently, you must check the Enable Public Access option, click Save, and then re-open the Edit Metadata screen to access the URL.
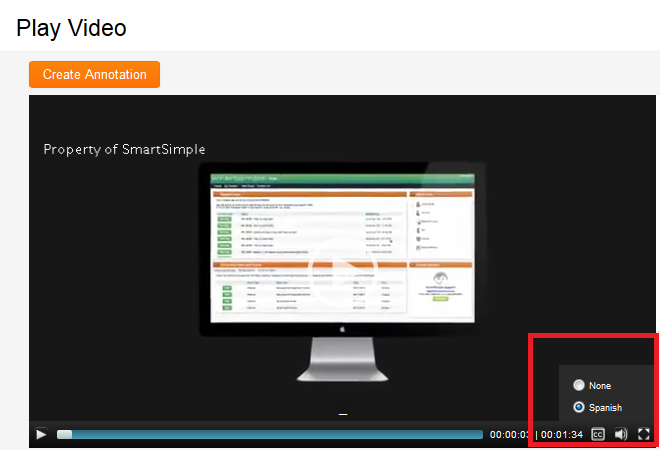
- Closed Captions: this feature allows users to select and upload a file containing subtitles for a specific language. A commonly used file format for closed captions is SRT.
When users view the video, they can click on the CC option, select the desired language, and will be able to see the corresponding subtitles on the media file.
Download File
If the Enable Media Download option is checked for the field, a Download button will be displayed next to the preview thumbnail, allowing users to download the media file directly to their device.

