Overview
SmartSimple offers the capability to designate allocations and execute payments against specific budgets, enabling administrators to establish intricate budget allocation and attribution models for their users.
Administrators can create multiple Level 3 disbursement records in bulk and associate them with Level 2 budget items, all while conducting various validations.
Configuration
- Firstly, the Amortization Schedule Mapping feature must be accessed to perform the initial Activity mapping:
System Administration (gear icon) >> Tracking Applications >> [Edit] *UTAname >> Activity (tab) >> Amortization Schedule Mapping
Within the Activity Mapping section, choose an [Activity Type] to be associated with Payment/Allocations - while mapping all other field data options as required.
- Next we will want to access the mapped Level-2 Activity Type where we will find within the menu our two Allocation Mapping configuration tools:
System Administration (gear icon) >> Tracking Applications >> [Edit] *UTAname >> Activity (tab) >> Types >> [Edit] *TypeName >> Payment Field Mapping (menu)
System Administration (gear icon) >> Tracking Applications >> [Edit] *UTAname >> Activity (tab) >> Types >> [Edit] *TypeName >> Payment Allocation Mapping (menu)
Payment Allocation Mapping for Disbursements
The Payment Allocation Mapping tab will be displayed at the top of the page. Map the provider UTA to the budget manager to specify which UTA is monitoring the disbursed funds.
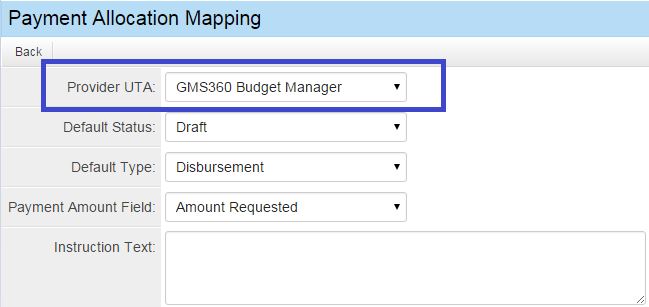
For Provider UTA: set this to the Budget Manager UTA.
For Default Status: set to Draft.
For Default Type: select Disbursement L3.
For Payment Amount Field: set to Amount field.
For Subject: enter content, including Variables, to appear in the payment header in the quick payments screen.
For Instruction Text: enter content to appear in the quick payments screen.
For Budget Calculation: select Committed Amount Reduction. Note: Selecting this option applies the following formula to the Available Amount: Obligated Allocation - Paid.
Click Save.
Payment Allocation Mapping for Allocations
The Payment Allocation Mapping tab will appear in the header of the Level 2 type settings for Budget Allocation. Map the provider UTA to the budget manager to specify which UTA is monitoring the allocated funds.

For Provider UTA: set this to the Budget Manager UTA.
For Default Status: set to Draft Allocation.
For Default Type: select Allocation L3.
For Payment Amount Field: set to Allocation Amount field.
For Subject: enter content, including Variables, to appear in the payment header in the quick payments screen.
For Instruction Text: enter content to appear in the quick payments screen.
For Budget Calculation: select Constant Committed Amount. Note: Selecting this option applies the following formula to the Available Amount: Adjusted-Tentative-Committed.
Click Save.
Mapping between Fiscal Year Budget L1 and Funding Category L2 for Disbursements
Specify the fields in the budget manager that the system updates when a disbursement record is created. A key aspect of this feature is that the L2 funding category reflects the funding released for disbursements from that fund, while the L1 budget displays the total funds released across all funding categories.
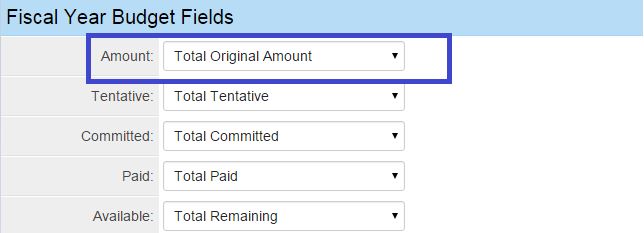
For Amount: set this to the Budget Manager Total Original Amount field.
For Tentative: set this to the Budget Manager Total Tentative Amount field.
For Committed: set this to the Budget Manager Total Committed field.
For Paid: set this to the Budget Manager Total Paid field.
For Available: set this to the Budget Manager Total Balance Remaining field.
Click Save.
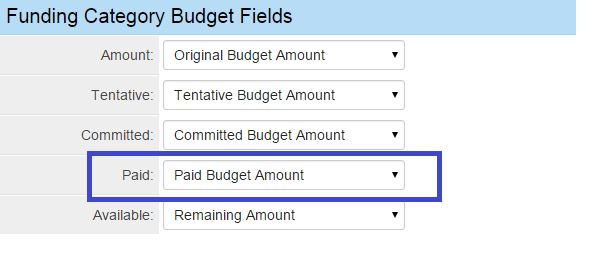
For Amount: set this to the Budget Manager Original Amount field.
For Tentative: set this to the Budget Manager Tentative Amount field.
For Committed: set this to the Budget Manager Committed field.
For Paid: set this to the Budget Manager Paid field.
For Available: set this to the Budget Manager Balance Remaining field.
Click Save.
Mapping between Fiscal Year Budget L1 and Funding Category L2 for Allocations
Specify the fields in the budget manager that the system updates when an allocation record is created. A key aspect of this feature is that the L2 funding category reflects the funding designated for allocation from that fund, while the L1 budget displays the total funds designated across all funding categories.
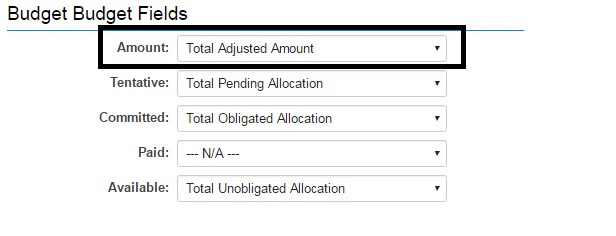
For Amount: set this to the Budget Manager Total Adjusted Amount field.
For Tentative: set this to the Budget Manager Total Pending Allocation field.
For Committed: set this to the Budget Manager Total Obligated Allocation field.
For Available: set this to the Budget Manager Total Unobligated Allocation field.
Click Save.
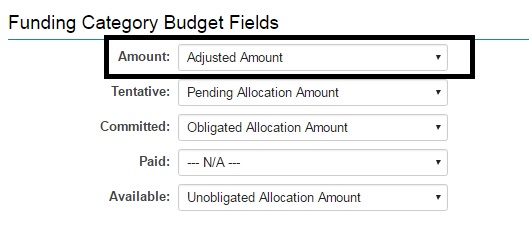
For Amount: set this to the Budget Manager Adjusted Amount field.
For Tentative: set this to the Budget Manager Pending Allocation Amount field.
For Committed: set this to the Budget Manager Obligated Allocation Amount field.
For Available: set this to the Budget Manager Unobligated Allocation Amount field.
Click Save.
Mapping Disbursement Status
It is essential to note that the status of the disbursement record dictates when the fields in the budget manager are updated.
For Tentative: set this to the default disbursement status upon record creation.
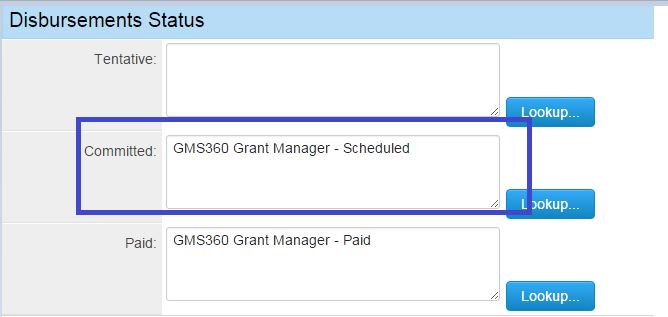
For Committed: set this to the disbursement status for Cheque Pending or Scheduled.
For Paid: set this to the disbursement status when funds have been released, i.e., Paid.
Click Save.
Mapping Allocation Status
It is important to note that the status of the allocation record governs when the fields in the budget manager are updated.
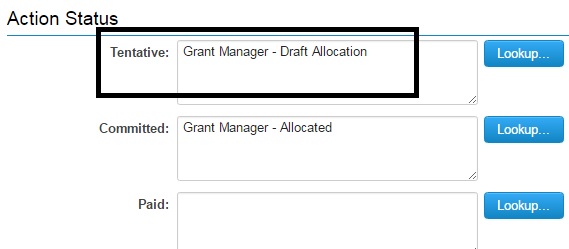
For Tentative: set this to the default allocation status upon record creation.
For Committed: set this to the allocation status for Allocation Completed.
Click Save.