Overview
The Personal Settings within a user's profile govern several essential elements of the user's interaction with the SmartSimple system.
To access your personal settings, please click on the My Profile icon representing your name, located in the top right corner of the screen:
Select the circular icon that includes your centered initial, found in the upper-right corner of the window.
The Personal Settings of a user's profile will influence various aspects of the user's interaction with the SmartSimple system.
Your personal settings encompass the following settings:
- Display
- Regional
- Other
Configuration - Essentials
Profile
Editing Profile
To edit your profile, please click on the Profile link from the menu.
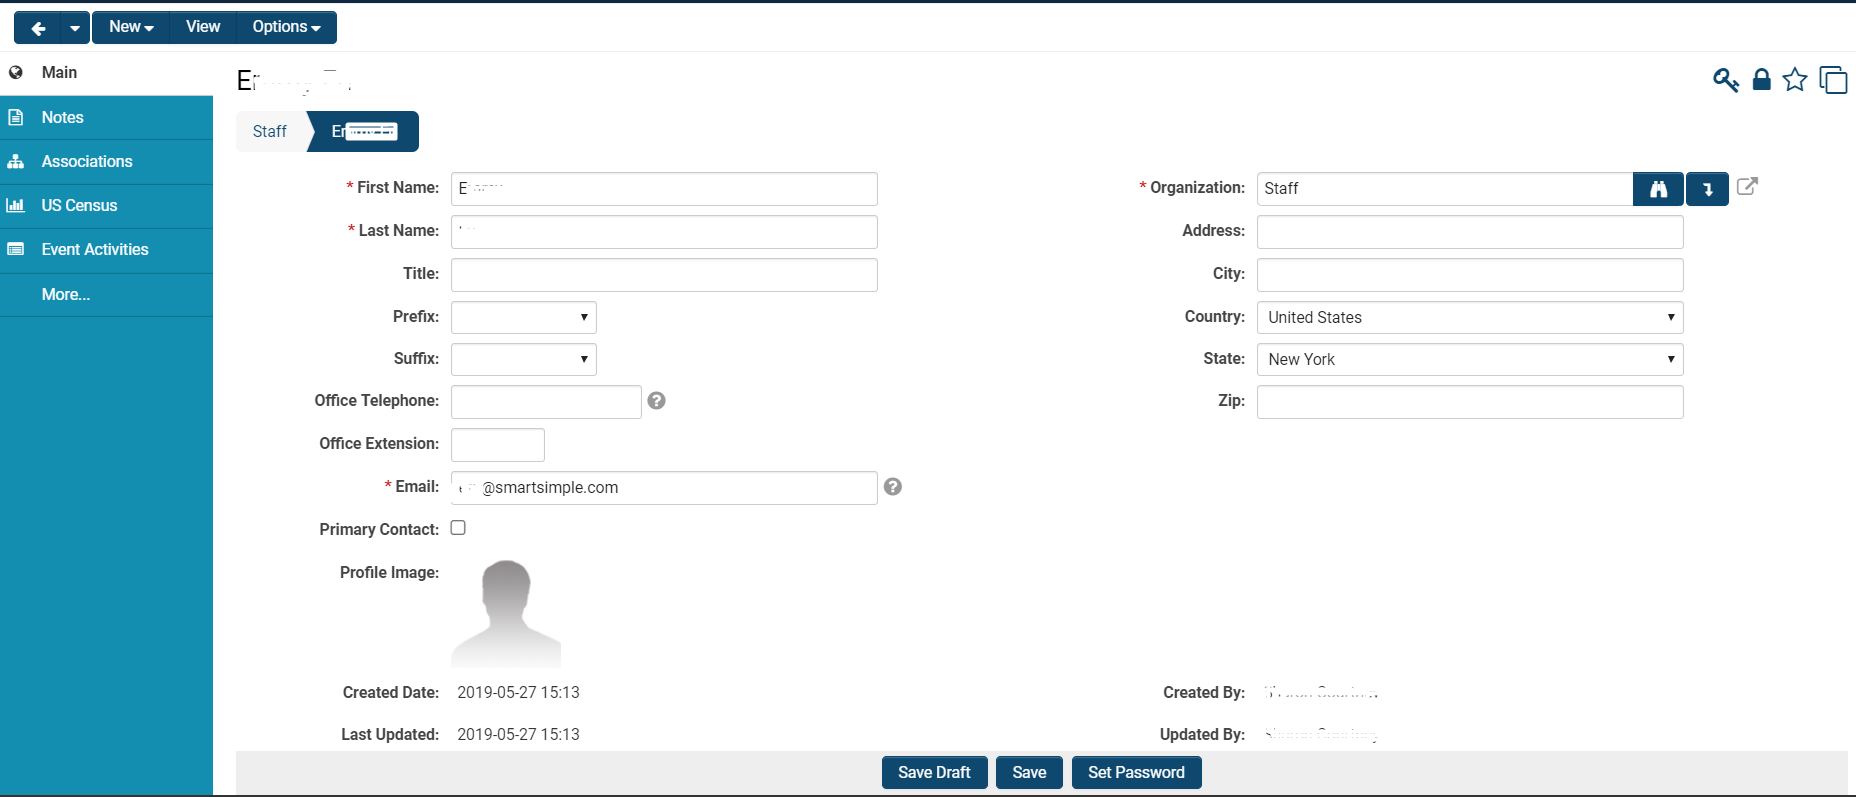
Your details will be displayed. To modify the text in the fields associated with your profile, click the Edit button at the top.
Your screen will refresh into Edit Mode—the fields will now be editable, and the button at the top will change to View to revert to read-only viewing.
You are permitted to set the following values:
| First Name | The first name of the individual |
| Last Name | The last name of the individual |
| Title | The professional title of the individual |
| Prefix | The prefix of the contact |
| Suffix | The suffix of the contact |
| Office Telephone | The office phone number of the individual |
| Office Extension | The direct extension for calling the individual |
| The email address of the individual | |
| Primary Contact | Select this option if this individual is to be displayed as the primary contact for their associated organization |
| Profile Image | Upload a profile image to accompany this individual's profile |
| Organization |
Select the organization with which this individual should be associated. Note: Changing the organization will effectively "move" this individual to a different organization. |
| Address | The street address of the individual, if it differs from that of their organization |
| City | The city of the individual, if it differs from that of their organization |
| Country | The country of the individual, if it differs from that of their organization |
| State/Province | This field will be displayed based on the selected Country. It will indicate the state or province of the individual, if it differs from that of their organization |
| Zip/Postal | This field will vary depending on the selected Country—it will indicate the zip or postal code of the individual, if it differs from that of their organization |
Note: Any field marked with a red asterisk is mandatory and must be completed in order to publish the individual's profile.
Fields that are auto-populated include the following:
- Created Date: The date and time stamp when the individual was initially created in the SmartSimple system
- Last Updated: The date and time stamp of the last update made to this individual's profile
- Created By: The name of the user who created this individual
- Updated By: The name of the user who last updated this individual's profile
At the bottom of the profile in Edit mode, three buttons will be available:
- Save Draft: Clicking this button will allow you to store this information without validation (i.e., of the mandatory standard fields)
- Save: Clicking this button will store and publish this information subject to validation
- Set Password: Clicking this button will enable you to set the password for the user.
Other Features of the Profile
The user profile will also contain additional notes and details:
- Notes are displayed as a tab on the right-hand menu.
- Any associations that the contact has will also be displayed as a tab on the right-hand menu.
- Activity information recorded or participated in, such as meetings, telephone calls, and email messages, is displayed below the personal details.
- A number of additional tabs will be displayed depending on the configuration you establish.
Modifying the User’s Company or Address
To change a user's primary Organization, access the user's profile in Edit Mode, select an alternative company, and associate the user with that entity.
Note: If a user is added to a company after the company address has been established, the user's address will automatically be set to match the company’s details.
You may replicate the organization address as the user address at any time by utilizing the downward arrow icon located to the right of the Organization field.
After you have clicked either the Save or Save Draft button following the addition of an organization to a user, a View Organization button will appear adjacent to the Organization field, enabling you to access the organization’s profile.
For further information regarding user profiles, please refer to our Profile page.
Password
By selecting the Password function from your profile menu, a modal window will appear, as illustrated below:
All passwords are randomly generated and communicated via email when the System Administrator initially authorizes a user to access a SmartSimple instance. No user or administrator has the ability to view another user’s password within the system.
To change your password from the Personal Settings tab, simply enter your current password, create and confirm a new password, and click the Submit button.
A policy note will be displayed at the bottom of the modal window, outlining the required complexity for your password prior to submission into the system.
Please remember: Passwords are case-sensitive!
If you are a System Administrator, you can determine the complexity and security measures related to passwords by following these steps:
1. Click the nine-square menu icon located at the top right of your page.
2. Under the heading Configuration, select Global Settings.
3. Under the Security tab, select Password and Activation Policies.
Personal Settings Options
By selecting the Personal Settings option from your profile menu, a modal window will open, allowing you to customize and select the display settings for your use of the SmartSimple system.
The Display tab on this page allows you to modify the system's display views. You can perform the following functions:
- Enable incoming Instant Messages to open automatically
- Open records within other records in a modal window without disrupting your main page
- Enable Translation Audit Mode
- Determine the number of list view records per page
- Automatically complete the number of displayed records
- Set a default/automatic email From Address for any correspondence sent from your system
The Regional tab allows you to modify specific features of the system settings based on regional constraints.
You may adjust the following options:
- Language
- Input Date Format
- Display Short Date Format
- Display Long Date Format
- Display Time Format
- Time Zone
- Home Currency
- Numeric Decimal Separator
- Numeric Thousands Separator
It is advisable to ensure that the regional time zone settings are specific, appropriate, and accurate, particularly if your organization operates in contexts that involve deadlines.
The Other tab allows you to establish Default Settings for new users and organizations. You can designate a company or role into which all users will be organized, and/or select the parent company and category for new organizations. This structure pertains to the organizational hierarchy that underpins every SmartSimple instance. You may utilize XML import to set a common Profile template, such as for CVs.
Roles and Access
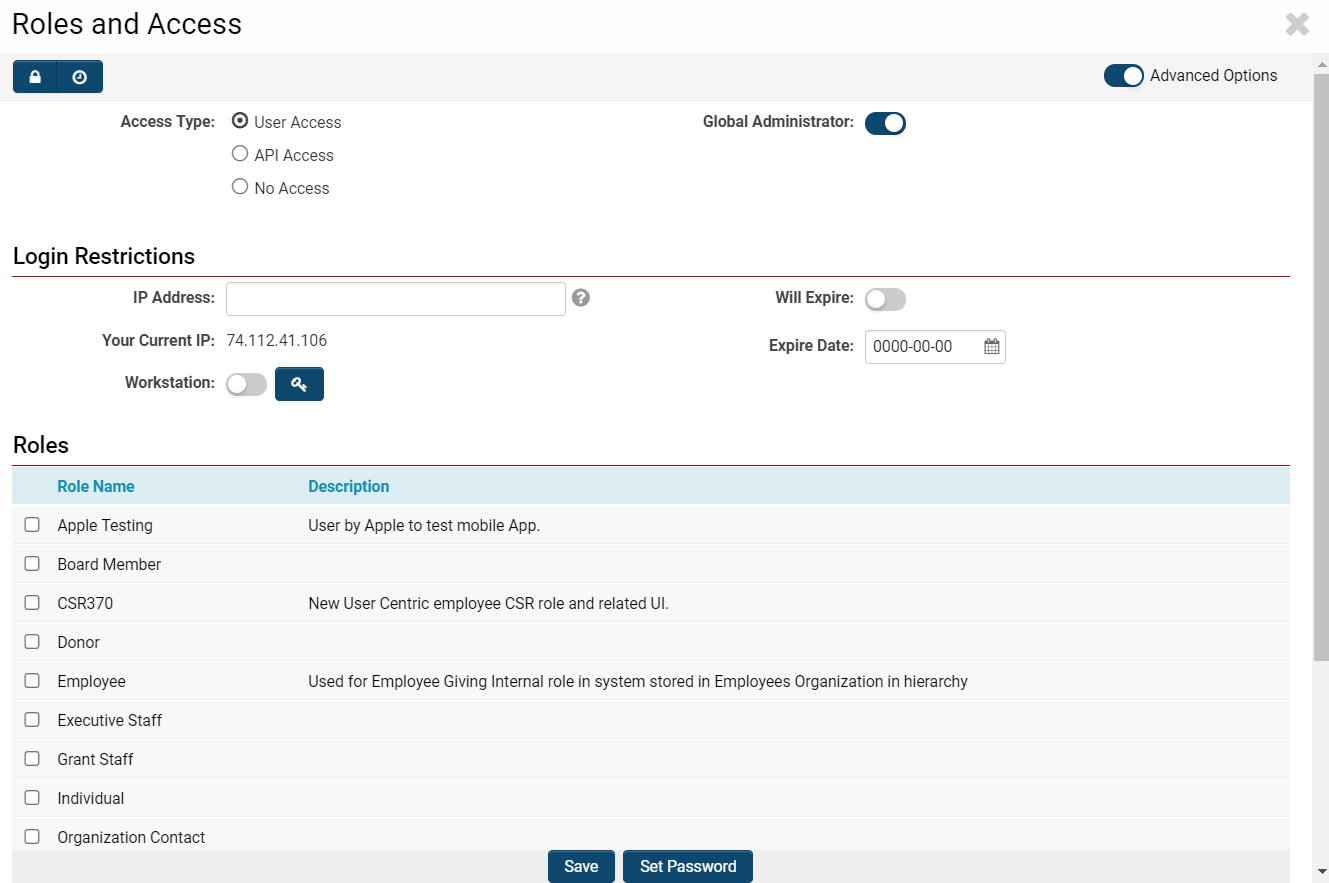
By selecting the Roles and Access option from your profile menu, a modal window will appear, enabling you to modify your role and access privileges within the system.
In this section, you can specify an access type, enable System Administrator privileges, set Login restrictions, and add, remove, or modify roles. You are also able to set a password from the Roles and Access screen.
For additional information, please refer to the section on Activating a User. For a more comprehensive understanding of our role-based security, please consult Roles and Security Settings.
Filters
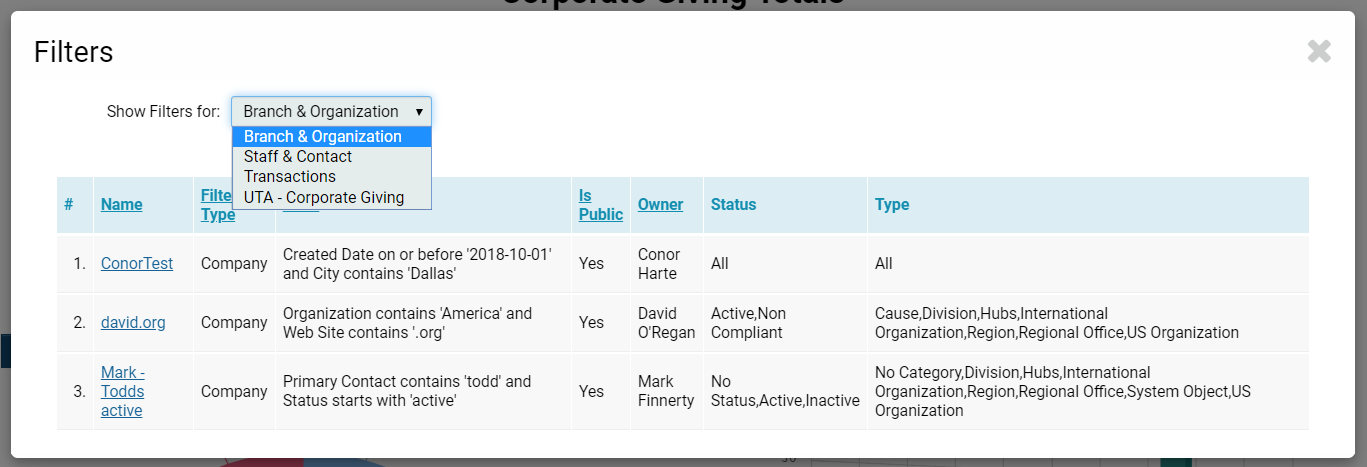
By selecting the Filters option from your profile menu, a modal window will appear displaying all system Filters utilized for List View displays as well as for Search functionality.
You can toggle the list view to display all associated filters for the following:
- Branch and Organization
- Staff and Contact
- Transactions
Clicking on the Name of each filter will open another modal window, allowing you to edit the filter. This window will display the filter's name, its public or private status, and the criteria included in the filter.
Actions from Profile Menu
Beneath the Settings section of the profile menu, you will also find Actions that you can perform:
Notifications
You may check your notifications at any time, with the option to filter results by specific time periods by selecting dates on a calendar.
This will open a modal window displaying which users, currently online within your instance, can be requested to share their screen for collaborative purposes.
Set as Homepage
Selecting this option will designate the current page you are viewing as the default page displayed upon logging into the system. This setting is customizable and unique to each user, facilitating a tailored experience for role-based users to access relevant information on their homepage.
Logout
Clicking this option will log you out of your SmartSimple session.


