Overview
List views constitute a component of the SmartSimple interface that aggregates similar records into a vertically scrolling list. The List View enables users to specify which standard fields and custom fields are visible when reviewing a list of records. These list views are configurable, allowing users to define and customize various aspects such as the order in which records are displayed, the color formatting of specific records, the number of records displayed, and additional parameters.
List views are applicable to every object level within the SmartSimple system, including users, organizations, and various types of applications. Within each list view, users can create and combine filters to tailor the results of their list views.
Features of List Views:
- Up to 30 columns of records
- Dynamic Filters — create and combine filters, refine by type or status, manage date/time options, etc.
- Download Files option — download all records from a list view, including attachments
- SmartCard Indicator — group collections of objects into distinct SmartCards that can be easily shared with other users
- Group Email — send a group email; for instance, mass email a list of applicants from approved applications from a prior year
- Formatting Options — drag and drop sequence of records, format color and text boldness, group fields to display in a single cell, etc.
- Multiple View Options — transform list views into dashboards, interactive charts, graphs, etc.
- Export to Excel — conveniently export list views to Excel for record-keeping purposes
- Export to MS Word — easily export list views to Word for documentation purposes
- Portal Shortcuts — utilize list view aggregations for display on your Portal as a shortcut
- Batch Updates — enable a Batch Updates button to modify all records in a list view simultaneously
- Manifest as Tab — places the List View/Filter combination as a Tab for easy access within the parent Universal Tracking Application
For first-time users, it is strongly recommended to test List View modifications on the Backup Server prior to implementation.
Configuration—Essentials
Typically, external users do not have the capability to edit list views; however, they may select from various list views to modify their display. Only users assigned the role of System Administrator possess the authority to edit list views.
Note: A Default List View should always remain within the system as a generic list of fundamental details, with no filter applied to facilitate unrestricted searching.
Example of List Views
For instance, selecting Organizations from the main menu will reveal a list view of organization records within your SmartSimple system:

In the above example, the following fields have been selected for display:
- Organization Name, Address, City, State, Phone Number, Primary Contact, Website, and Status (inactive/active)
Each field in this list can be sorted in various ways (default, ascending, descending) by adjusting the value of the Sort By dropdown box adjacent to each field.

The list can also be filtered utilizing the Basic Search panel located to the right of the list view or the Advanced Search panel, which, when selected, will open as a modal window allowing for customized search parameters.

Note: List views will default to the last set of search criteria utilized. For example, if a search is conducted within People for contacts with the last name "Smith," upon the next login and viewing of the contacts list, SmartSimple will retain the previous search and present the last set of search criteria in the same sort order.
A user may modify their current list view by selecting the List View Options icon located at the top right.
This action will open a modal window enabling the user to select or deselect specific fields to be displayed in their current list view. The advantage of this feature is that each list view can exhibit a distinct combination of fields, encompassing both standard and custom fields.

Additional options for modifying list views can be accessed through the top buttons available on a list view.

The example above illustrates the following buttons from left to right:
| List View Button | Function |
| New |
The new button, indicated by a + icon, allows for the creation of a new record within that list view. Example: In a list view of organizations within the SmartSimple system, users will be able to create a new organization. |
| Reload | Clicking the reload button will refresh the page. |
| List View Options |
Current - This option allows users to select and deselect which columns are visible in the list view. Global -
|
| Batch Update |
The Batch Update option enables users to update selected fields of records in a list view simultaneously.
|
| Export | The Export function, represented by a right arrow icon, allows for the export of records from the list view to Excel, SmartFolders, or another Internet-enabled folder. For further information, please refer to the Exporting List Views section. |
| List View Options |
The List View options function is denoted by a list icon and the label Default or a customized name. Clicking this icon will reveal a dropdown containing the available List Views, which can be toggled for different presentations of the records.
|
System Views and Personal Views
There exist two categories of list views:
| System Views |
|
| Personal Views |
|
To switch between different List Views, including between System and Personal List Views, simply select the list chart icon located above your list view. A dropdown menu will appear, presenting both the available System and Personal List Views for each user. Each List View is labeled by the user who originally created it.
To modify these List Views, simply select the wrench icon on the left. The details of the selected list view will be displayed.

Organizations and Users List Views
Presented below are examples of the Organizations and Users List Views.

Above: A comprehensive list of all users within the SmartSimple system.

Above: A comprehensive list of all organizations within the SmartSimple system.
List views for both users and organizations can be accessed via the 9-square menu icon located at the top right of your page.

Under the heading Organizations, select People for a list view of users, and Organizations for a list view of organizations.
To configure the list views of users and organizations, please follow these steps:
1. Click the 9-square menu icon located at the top right of your page.
2. Under the heading Configuration, select Global Settings.
3. Under the heading of either Organizations or Users, scroll down to List View Settings.
List Views in a Universal Tracking Application
Within the Universal Tracking Application, the Settings page allows for the definition of the list view for Level 1, Level 2, and Level 3 records, as well as the Accounts and/or Contacts section on the Level 1 records, provided that the Contacts/Accounts Standard Fields have been enabled.
- Note: The List View defined for Level 2 will apply to both the list view on the Level 2 tab and to the list of associated Level 2 records at the bottom of a Level 1 record, if displayed. This will similarly apply to the Level 3 list view that is shown at the bottom of a Level 2 record.
To configure a list view of an application, open the application and select the cog icon located at the top of the page to access the Configuration Settings.

In Configuration Settings, the List Views will be available under the appropriate tab corresponding to the Level of the entity. The Level 1 Entity will be accessible on the first tab following the General tab, and so forth. The nomenclature will vary based on the labels associated with that application.

Configuring List Views
Selecting a specific List View will reveal the details for that List View. The menu for configuring list views is displayed at the top of the page with various tabs:

Each tab facilitates different editing functions. Each tab and its corresponding functions will be elaborated upon in the following sections.
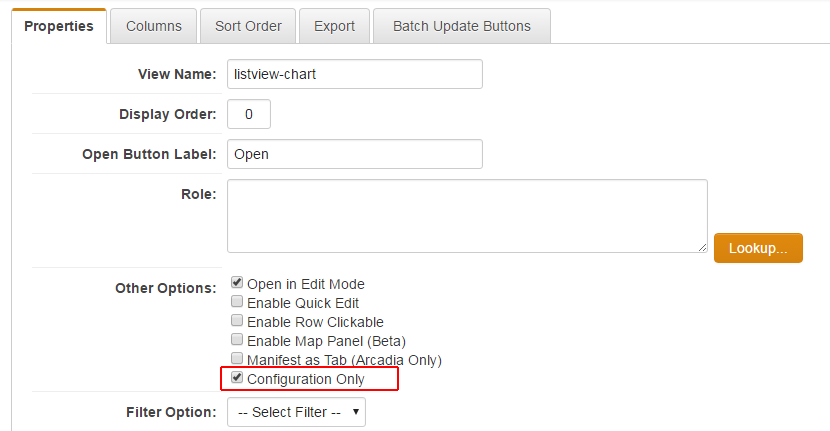
Properties

Functions of Properties:
| Feature | Description |
| View Name |
The name of the list view is modifiable. Assign a distinct name to your list view that will be memorable and associated with that specific list view.
|
| Display Order |
Specify a display order. This will determine which list view will be the default for users who possess multiple roles. List views with lower display order numbers will be displayed prior to those with higher display orders. Example: If you wish for your Default List View to appear first on the list of list view options, you may set its display order to 1 (or any other amount lower than all other list view display orders).
|
| Role Permission | Designate which roles are permitted access to this list view. Assigning roles is advantageous if it is known that multiple users will utilize the list view you are creating - for instance, you may select Everyone, or Employees only. If the list view contains information exclusively pertinent to System Administrators, for example, then you may designate that role and restrict this view from others. |
| Filter Option | Select the desired Filter to apply to this list view. Filters can be saved and stored through Advanced Search, and are labeled by their creators. They may be utilized as System Filters or Personal Filters. |
| View Style |
List - The conventional list view display, where records are presented horizontally by their associated details and vertically to each other. Grid - Records are displayed in a grid-like format, with each record shown in a square. This style is particularly suitable for records containing uploaded images. Tree - Records are exhibited in a hierarchical format, illustrating the associations among them.
|
| Card View Style (Mobile/Grid) |
Note: This feature should only be utilized if the Grid View Style has been enabled. Choose to display uploaded images on each record as Full, Large, or Small and/or Above, Left, or Right of text. Tip: Ensure that a sufficient number of images are uploaded for the records to ensure that the Card View Style appears reasonable; otherwise, records lacking images will be displayed as blank squares. |
| Manifest as Tab |
Distinct list views will be presented as separate tabs that can be toggled back and forth, rather than requiring the user to select the specific List View from a dropdown menu. Note: This option is not always recommended due to its excessive use of screen real estate. |
| Hide Filter Search Text | This option will prevent the display of the Filter Search Text in a list view; for instance, if a System Administrator establishes a specific Filter on a list view but prefers that users remain unaware of that filter, this option may be selected. |
| Default Buttons | This feature is beneficial for lists requiring numerous batch updates. The available buttons are located under the Feature Options heading. |
| Feature Options: |
Open in Edit Mode: When records are accessed, they will default to Edit Mode instead of View Mode.
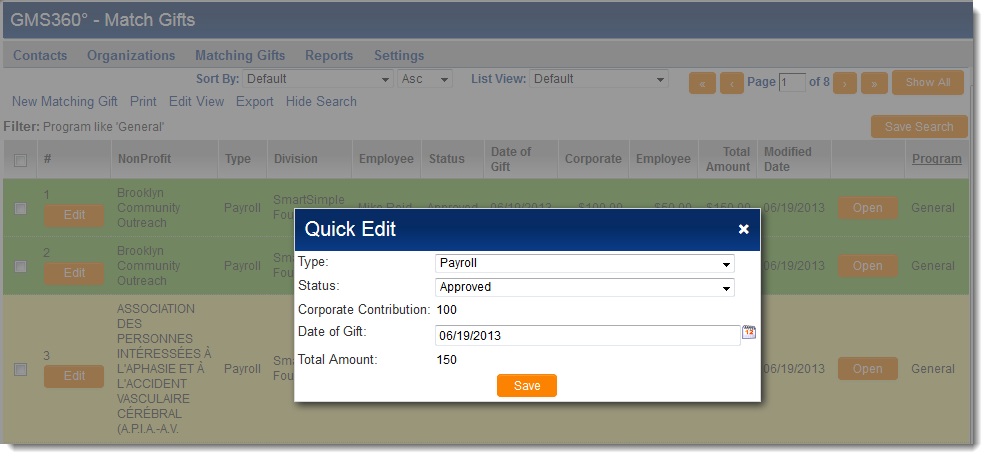
Enable Quick Edit: The List View will be configured with the Quick Edit feature enabled, allowing fields of records to be edited directly from their List View.
Split screen icon: (To exit split screen and revert to single screen mode, simply select the same icon which will now display a single square.) Enable Row Clickable: Each row will function as a clickable button to easily open the referenced record. Enable File Download: Displays an option to download files from single file or multiple file fields on the selected records.
Enable Map Panel: Integrates each record in a list with the associated client's address to create a geographical visualization of client locations. This feature converts address details into latitude and longitude coordinates and integrates with Google Maps. Marked as Configuration Only: This option excludes the list view from the dropdown for Universal Tracking Applications. It is useful when constructing multiple list views for an external portal; the list views are accessible solely through the cog wheel at the top of the list views dropdown. |
| Translated Data Language | Select the preferred language in which the records' data should be displayed. |

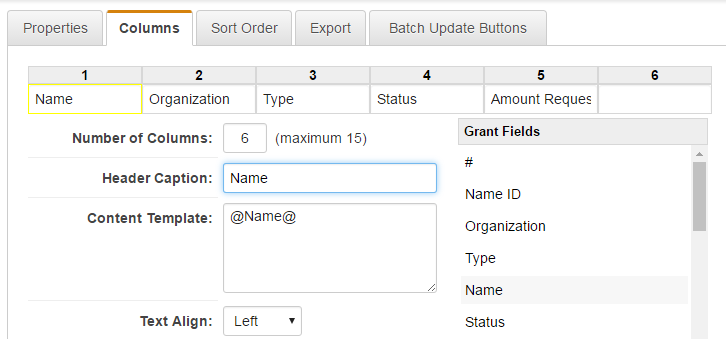
Columns

The Columns tab enables users to visually configure the available columns in a List View. Here, users can define the standard and custom fields that they wish to display. The maximum number of columns allowed in a list view is 30; however, it is advisable to display no more than 10 columns to enhance user experience, as excessive horizontal scrolling can detract from the presentation of records, particularly on responsive devices, including mobile screens.
- Note: A single column may contain multiple field values, assisting in adhering to the recommended limit of 10 columns.
Users may Drag and Drop columns to reorder them. Additionally, by clicking the X located at the top right of each column, users can remove them from the List View. List views are highly configurable; users can incorporate fields from various categories, such as Applicant Fields, Organization Fields, and others. These fields will be listed under the Fields heading and can be scrolled through. Clicking on a cell will reveal configuration options below. For instance, clicking on the Organization cell will highlight the Organization standard field and open configurable options for user input.

| Column Configuration Option | Description |
| Header Caption | This will serve as the label for the column. |
| Content Template |
This displays the variables for the information contained in each column. It is important to note that multiple standard fields can be included in a single column; the content template will indicate the number of fields included by reflecting each added field's variable.
|
| Text Align | You may choose the alignment of the text in a column to be Left, Right, or Center. |
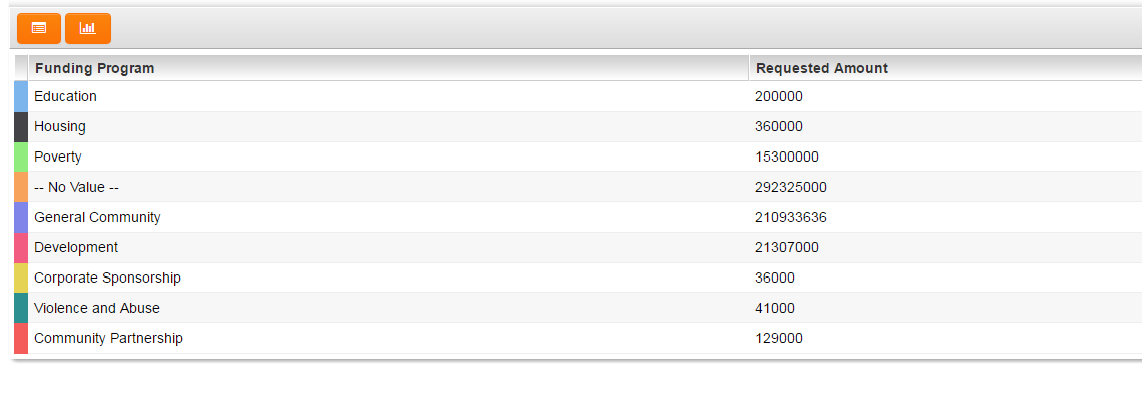
| Font Colour | Select the desired font color for the information in the column. This is particularly useful for emphasizing columns that require user attention, such as the requested amount in a grant or the status of an application. |
| Bold Text | This option will render the information in the column in bold text. |
| Show Total | Enable this option for numerical information in which the column should display a total amount. This option is applicable only for numeric fields and is most commonly used for currency fields. |
| Show Open Button |
This option will activate an open button in that column, allowing the user to access the corresponding record.
|
Multiple values may be added within each column. Upon selecting a field, a new left arrow icon will appear adjacent to the other standard fields. To add an additional field to a column, simply select that icon.
In this example, the Primary Contact is incorporated into the same column as the Organization name, allowing them to be displayed together in the List View.

On the right, the variable for the Primary Contact will be visible in the Content Template box. To position the Primary Contact information below the Organization name, simply format the Content Template accordingly.

To remove a column containing multiple values, click the X button located at the top right of the column box. To eliminate a single field from a column with multiple values, select the left arrow icon adjacent to that field within the Fields list.
Upon completing the configuration of your List View, you may select the Copy button located at the bottom of the page to duplicate the List View as a System or Personal View. It is advisable to initiate this process by creating a copy, particularly when working from the Default List View, to ensure that changes are not lost and the original view remains unchanged.
- Please note that designating your list view as a System List View will permit other users within your SmartSimple environment to access this list view. Conversely, if you designate it as a Personal List View , only you will have access, although you may opt to make it public for others to view; however, further functionalities cannot be performed even with a public Personal List View.

Sort Order
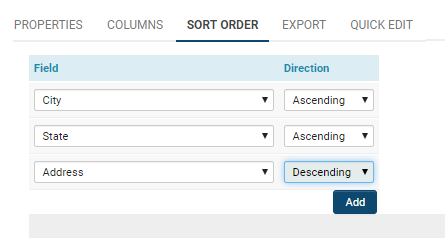
1. Click the Add button to include rows in the Sort Order.
2. Select a field by which the list view should be sorted by default.
3. Specify the Direction for the sorting process:

- Ascending will arrange the selection from A to Z alphabetically or 0 to 9 numerically.
- Descending will arrange the selection from Z to A alphabetically or 9 to 0 numerically.
Note: The Sort Order options only establish the default sort order for the list view. The list view can always be resorted using the Sort By feature within the list view.
Export
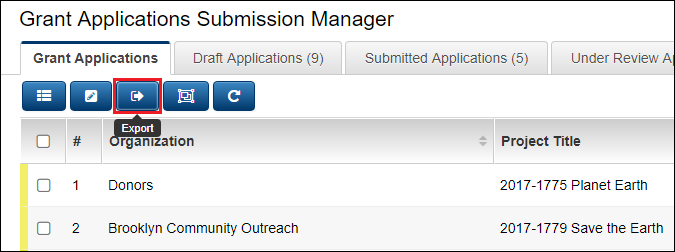
The Export tab presents all functions and options available to users for exporting their list views. Users can export a list view utilizing the Export button located at the top right of their list view.

Activating the Export button will enable users to export to Excel, the default program for exporting data.
If you wish to export to a specific Internet folder, such as a Configuration or SmartFolder, you may select that option from the drop-down menu. Users can search for existing folders within their SmartSimple system by selecting the Binoculars icon.

- Update Status After Export: Each exported record will be updated to reflect the specified status.
- Trigger Workflow After Export: Each exported record will initiate the specified workflow.

In the subsequent sections of the Export page, users can customize settings for exporting to Excel.
Tip: The default settings within the system are typically adequate.
Note: Exporting to Excel will not preserve any personalized formatting applied in the Columns tab, such as color formatting, line breaks where multiple fields are included in a single cell, etc. However, once the data has been exported to Excel, users are free to pivot and customize the formatting of the records within Excel.
- MS Word Settings: Enter a semicolon-delimited list of MS Word Merge field names (fieldname1;fieldname2;fieldname3)
Custom Export Settings:
| Custom Export Setting | Description |
| Header | Define the text and column settings that will appear above the main body of the exported list view |
| Record Template | Define the columns from within the list view that are to be exported |
| Footer Template | Define the text that will appear below the main body of the exported list view |
| Default Filename | Define the name of the exported file |
| Export Values Only | This option will remove any formatting (e.g., commas, currency, decimal places) associated with the selected field |
Quick Edit
The quick edit tab allows for the enabling of specific fields for Quick Edit, permitting users to edit fields directly on a record within the list view.

Configuration - Advanced
Combining Filters and List Views
Filters are created through Advanced Search functionality. Detailed operators may be utilized to restrict the search results of a list view; for instance, users can refine list views by status or type, or by numeric or alphanumeric conditions, among others. The amalgamation of these search conditions is referred to as a Filter and can be saved in the system for future use—either for personal searches, for integration with list views, or for the benefit of other users who may find value in the results of the specified conditions.
To integrate filters with a specific list view, simply enter the Configuration Mode of that list view. Refer to Accessing the List View Configuration Page if guidance is needed on how to access the configuration mode of a list view.
- Filters must be created through Advanced Search prior to their integration into a list view.
Within the Properties tab of the list view configuration page, click on the text box labeled Filter Option, which will enable you to select from all available system list views.
After selecting your filter, click Save. (You may also Copy this Filter + List View combination as a system or personal list view, if desired.)
Upon accessing a record set with this list view, you will observe that the filter is pre-populated in the Advanced Search box, and those fields will not be editable further.
Once a List View has been paired with a Filter, the ability to display this pairing as a Tab within it's parent UTA becomes available from within the List View [Edit] screen:
Global Settings - System Filters
By navigating to the System Filters section within the system under the System Administrator role, you can identify precisely where filters are applied on list views. Additionally, you can modify filters associated with specific list views simultaneously by selecting the List View Name and utilizing the Edit Filter field.
This section of the system is highly valuable as it informs a SysAdmin whether a list view is externally accessible and the implications for users when modifying or deleting the list view. Furthermore, it is advisable to ascertain the location of filters within the system, the users who have access to them, and whether they are utilized on a portal before proceeding to delete filters.
- Deleted filters or list views cannot be restored; they must be entirely reconstructed.
To access the System Filters section, please follow these steps:
1. Click the nine-square menu icon located at the top right of your page.
2. Under the heading Configuration, select Global Settings.
3. Under the first tab, System, and the subheading System Configuration, select Search Filters.

4. Above the list of filters, there is a lookup box titled Show Filters For. By clicking into this box, you can toggle to view which system list views you wish to know the filters for. You may choose from specific UTA list views (which will then be further subdivided by Levels), overall user list views, organization list views, or transaction list views.

5. Clicking the Name of a filter will open a modal window that allows you to Edit Filter.

The window will display the filter name, the associated filter that can be edited, and the corresponding list views.
- Clicking on the Edit Filter button will redirect you to the list view page and the advanced search box containing the filter components.
- Clicking on any of the Associated List Views will take you to the specific list view in Configuration Mode.
Batch Update Buttons
In list views associated with Universal Tracking Applications (specifically, those that are not related to Organizations or Contacts List Views, as we have previously been addressing), the Batch Update Buttons feature can be activated. Upon entering configuration mode for a List View, a fifth tab will appear in the menu, enabling the creation of Batch Update Buttons. Selecting this menu will present a list of available Batch Update buttons. To initiate the creation of a new button, click the + icon.

The criteria for defining each button are detailed below:
| Display Order | This criterion establishes the order in which the Batch Update button will appear in the dropdown list of available Batch Update buttons. A lower numerical value (e.g., 1) will ensure that this particular Batch Update button is displayed first in the list. |
| Button Type |
Batch Update - This option will facilitate the mass update of all selected records simultaneously. Copy - This option will generate a duplicate of the information from the selected records. |
| Button Name | Assign a name to your button. For example, a button that modifies the status of grant applications from submitted to approved may be aptly named Approved. |
| Button Label | Provide a label for your button; this is typically the same as the name. |
| Icon | An icon is instrumental in drawing attention to the button and conveying its purpose to users. For instance: A dollar sign icon for an Approved button related to grant applications. |
| Description | It is advisable to include a brief description to ensure that other System Administrators and users comprehend the functionality of the button. |
| View Roles | This criterion is particularly significant as it determines who can access this button when viewing the specified List View. Clicking into the text box for View Roles will allow for the selection of which roles will have visibility of the Batch Update button. |
| Option |
Select from various types of actions that your button will execute. A common application is for the Option function to be contingent upon Status - for example, in a List View of grant applications, this Batch Update button will modify the status of all selected records simultaneously.
|
| Value | The value corresponding to the option selected for your Batch Update button. For instance, if your Option function was Status, then your Value should be selected from a list of available statuses in your system, such as Approved, Declined, Submitted, and others. |
In other list views (such as those for Organizations and Contacts, as opposed to Universal Tracking Applications), an icon will be visible at the top right of the list view that enables Batch Updates.

If utilizing Status for your Batch Update button, upon saving the button, an option to write a confirmation message will become available. While this is not mandatory, it is often beneficial for users, as they can view the progress and confirmation of the batch update at the top of the screen, but may not be fully aware of the implications: providing a note on the function of the button will assist them in deciding whether to utilize the Batch Update button. Batch Update buttons operate based on Role-Based Security.
Notes:
- Batch update functionality can also be employed to execute template formulae, but it will override all logic restrictions and trigger workflows.
- Batch update buttons are accessible on UTAs at all levels.
- If there are automated processes that may be triggered by a batch update, the recommended approach is to open any affected record while in the System Administrator role and select Options >> Workflow History to review the process of triggers.
- If there is any uncertainty, it is advisable to run the Batch Update Button on your Backup Server and Testing Instance. Although not mandatory, it is best practice for Batch Update buttons to provide one valid progression - for example, a list view with a predefined filter of all applications in pending approval status, where the final step is to approve them simultaneously, ensuring that all notifications are dispatched at the same time.
Enabling Batch Update Permissions
Typically, batch update permissions are granted to users in a System Administrator role. However, there may be other roles that should also have access to the batch update function, such as the Program Manager role specific to a UTA for programs.
To enable batch update permissions for UTA List Views, you must navigate to the specific UTA.
1. Click the 9-square menu icon located at the top right of your screen.
2. Under Applications, select the specific UTA you are seeking, or locate it under Configuration >> Tracking Applications.
3. Select the cog icon at the top if you are on the specific UTA's page, or select the pencil icon next to the specific UTA if you are viewing the Tracking Applications list.

Both methods will display the details of that UTA. 4. Under the tab Security, select Feature and Function Permissions.

5. The option to enable batch update for specific roles should appear as the first line. Click into the text box to search for which roles in the system you would like to grant Batch Update functionality. It is advisable to limit this function to System Administrators only.

6. Click Save. To enable Batch Update Permissions for Organizations and Contacts List Views: 1. Click the 9-square menu icon located at the top right of your screen.
2. Under the heading Configuration, select Global Settings. 3. Under the tab Security, select System Feature Permissions.

4. The Enable Batch Update option should be prominently displayed first.
Click into the text box to search for which roles in the system you would like to grant Batch Update functionality. It is recommended to limit this function to System Administrators. 6. Click Save.
Group Email
The Group Email function is available for List Views and must be enabled separately.
The group email function is advantageous as it enables the transmission of batches of information to a designated group using a pre-branded template—complete with attachments—in a single action, thus eliminating the need to re-enter information for each individual recipient.
This functionality can be utilized for individual records by selecting the roles within a record that you wish to communicate with, and it can be accessed from nearly any screen within a record that contains a list of contacts.
You may select the specific records, contacts, or organizations under the group email option, as well as the template you wish to employ. Additionally, there is an option to include attachments as necessary.
Once all elements are configured, you may preview the email prior to clicking Send.
Please note that the default "from" email address will be that of the administrator currently logged in as the sender; however, this can be easily modified under Global Settings >> Security >> Email Settings.

Group Email for Organizations and Users List Views
1. Click the 9-square menu icon located at the top right of your page.
2. Under Configuration, select Global Settings.
3. Under Security, select Email Settings.
Email Settings include a variety of functions and options.
| Security |
Enable Role Restrictions - Specify which roles are permitted to send emails to other roles, and restrict the filtering types used when searching for recipients. Disable From Address - Managers are permitted to set the From address field to a value other than their own email address. Recipients Under Association Company - Permit associated users to receive emails. Enable on Behalf Of - Send emails from csr360@smartsimplebk.com on behalf of the specified From Address. Enable Reply-To - Send emails with the Reply-To set to the specified From Address. Enable Default From Address - This email address will be designated as the default From Address when composing an email. |
| Email Broadcast Manager Roles | Select which roles are authorized to possess manager permissions for emails. These permissions encompass the ability to disable or modify the From Address for emails and additional functionalities. |
| Restrict Email Access | Select which roles are prohibited from accessing email functionality within your SmartSimple system. |
| Restrict Instant Message Access | Select which roles are denied instant message access within your SmartSimple system. |
| Failed Email Alert | Compose the default failed email alert template, including the From and To Addresses, the subject line, body content, and frequency of alerts. |
Group Email for UTA List Views
Group Email for UTA List Views must be enabled from the specific UTA itself.
1. Select the UTA for which you wish to enable Group Email from the 9-square menu icon.
3. Once the UTA records are displayed, select the cog icon located at the top of the UTA page to enter Configuration Mode.
4. Once you are in Configuration Mode, select the tab labeled Security.
Note: If you wish to establish Email Role restrictions, activate the Enable Email Role Restriction feature. This configuration ensures that within the current UTA records, users are restricted to emailing only those individuals permitted by their role. This setting is in conjunction with Roles and Security Settings.

5. To Enable Group Email for that UTA, select Feature and Function Permissions.
6. Navigate to the second tab (which will be labeled differently depending on the Level 1 Entity for that UTA), scroll down until you locate Enable Group Email.

- The question mark icon next to the title will provide guidance on utilizing Logic, should you opt to configure Group Email through that method.
- The Role text box will enable you to select which roles will have Group Email capabilities for that UTA.
7. Click Save.
For Level 2 Entities (and Level 3 or higher), this feature can be enabled using the same procedure. Simply proceed to the next tab, which will be labeled differently based on your UTA.
Sending a Group Email
Once you have enabled Group Email permissions either on a specific UTA or for particular roles within Organizations and Users List Views, the group email icon should now be visible when you access that list view.
If no records are specifically selected, the system will assume that this function should apply to all records.
Clicking on this icon will open a modal window that allows you to select which user roles should be designated as recipients.

After selecting the user roles intended to receive the email, click Next.
The Template and Modify Message window will appear.

In this window, you can modify the template, From Address, CC Email Address, Subject, and Attachment fields. Additionally, you may adjust more advanced options for the group email, including whether to save the email as an Event, the addition of unique recipients, and the formatting of the email body as either HTML or plain text. A preview will be displayed below.
For further information, please refer to the Group Email page and the Email Category pages.
Configuring Interactive List View Charts
SmartSimple enables users to create dynamic and impactful charts directly from the existing list view without the necessity of utilizing the Report Builder. This functionality allows for the visualization of data in both table and chart formats, as well as the capability to drill down into the data for a more detailed perspective.
List View Charts instantly compile your data without the requirement for re-inputting information.
For instance, if you are a Grants Manager, you may opt to visualize grants aggregated by status in a chart format. From there, you can delve into the charts to examine grants of a specific status further categorized by type, and subsequently switch to a table view to access a specific grant directly.
Features of List View Charts:
- Instantly downloadable in .png, .jpeg, .pdf, or .svg formats
- Seven descriptive and colorful chart types available
- Ability to chart by status, type, or another value of your choice
- Seamless toggling between chart and table views
- Direct access to the object from a table view
- Eliminates the need for traditional reporting processes
- Ideal for detailed views of data
- Convenient for impromptu presentations or meetings
How to Configure Interactive List View Charts
If your list view does not currently exist, please create a list view containing the data you wish to visualize. Depending on the type of data you intend to represent (e.g., contact information, grants information, etc.), you can access the configuration mode of list views from various locations within the system. Refer to Accessing the List View Configuration Page for a comprehensive guide on accessing different list views for configuration.
The list view of a UTA Level 1 Entity is displayed below.
Note: If your list view is intended solely for charting purposes, please select Configuration Only at the bottom of the Properties page. This feature conceals the list view from the View list, while still allowing you to select it for viewing when configuring a portal.
After configuring your list view, please click the Save button to ensure that it is stored within the system.
1. Next, click the nine-square menu icon located at the top right of your page.
2. Under the section titled Configuration, select Roles & Security.
3. Choose User Roles.
4. Click the Edit button (pencil icon) next to the desired role for which you wish to display your chart.

Note: You can determine if a user role has their portal activated by the presence of a black dot aligned with the portal column. Note: The first row, Common, allows for modifications to the menu and portal items for all users rather than proceeding through this process based on role-specific functionality. The common portal is effectively utilized for basic menu items that do not require advanced security permissions or role-based visibility.
The Portal configuration will be displayed as a tab on the left-side menu. If this tab does not appear automatically, please ensure that your Advanced Options (located at the top right of the page) is activated, and click Save to refresh the side menu.

5. On the role's portal page, select the + icon under the section titled Main Menu. This action will create a new component for the main page visible to this role.

6. Complete the caption and description for the main menu item you wish to add. When selecting Content Type, ensure to select the Sections option. All other content type options will not facilitate the creation of an interactive chart.

7. After clicking Save, a new heading labeled Sections will appear below. Click the + icon to create a new section.

8. This action will direct you to a page where you can fill in details regarding the section containing the list view you wish to display as an interactive chart. Provide the name and other pertinent details, ensuring that the Type is designated as Chart. Click Save.

9. The chart settings will be displayed at the bottom of the page.

| Chart Setting | Description |
| Chart List View | Select from the available system list views to display in chart form by clicking into the text box. |
| Chart List View Filters | Select from the available system list view filters to modify the data displayed in chart form by clicking into the text box. |
| Chart Title |
Enter the chart title, adhering to a naming convention that succinctly describes the visualization (e.g., Grants Funded by Amount). The title will be displayed on the rendered chart above the data visualization. |
| Chart Type |
Select the desired chart type. The current options include:
|
| X-Axis | Select the list view column to be represented as the x-axis of the chart. The available columns are the Standard Fields associated with that list view. |
| Y-Axis |
Select the list view column to be represented as the y-axis of the chart. The available columns are the Standard Fields associated with that list view. Note: If the Aggregation Type is Sum or Average, the y-axis must be a numerical value. |
| X-Axis and Y-Axis Label | Provide appropriate labels for both the x-axis and y-axis, which will be rendered on the chart adjacent to their respective axes. |
| Aggregation |
Select the aggregation type from the available options:
|
| Enable View Options |
Activating Enable View Options allows the user to explicitly choose which views they wish to see the data in (list, table, chart, etc.). Enabling this option will also present another option, Show Search Panel on List View. Activating the Search Panel will permit the user to utilize Basic Search and Advanced Search on the list view accessed from the chart. |
10. Once you have completed the configuration of your interactive list view chart, click Save. Preview the portal to confirm that the chart is displayed correctly.
Utilizing the Interactive List View Chart
Upon accessing the SmartSimple system through a user account linked to a specific role, the initial page displayed is the role-based portal. Alternatively, it may present the Common Portal if the system is configured accordingly, or it may feature elements from both the Common Portal and a role-specific portal.
If configured, the interactive list view charts will be visible on the portal.
The example below illustrates a 3D Pie Chart that utilizes list view information regarding grants by state, as displayed on the portal.

You may access a record by clicking on its corresponding column or slice, depending on the displayed Chart Type. This action will reveal a list of all related records within that column.
To maximize the utility of the interactive list view chart, simply click on the icon buttons located at the top right of the visual.

The left button enables you to View All Data in the standard list view, while the right button allows you to view the data in a Table.
Clicking on the View All Data Button will generate additional buttons in the list view format. Upon selecting a record or multiple records, further buttons will appear, providing functionalities similar to those found in a standard list view, such as batch updates, deletion, emailing, etc. The outer two buttons will consistently allow you to toggle between Table View and Chart View.

On the left side of the interactive chart, there is a three-line icon that, when clicked, provides options for printing and downloading (in .png, .jpeg, .svg image formats, or as a PDF document).

Types of Interactive List View Charts
The various display types for the information presented in the Interactive List View Chart are visually represented below:
- Chart: Presented as a chart (Chart Type - Bar)

- List View: Presented as a basic list view.
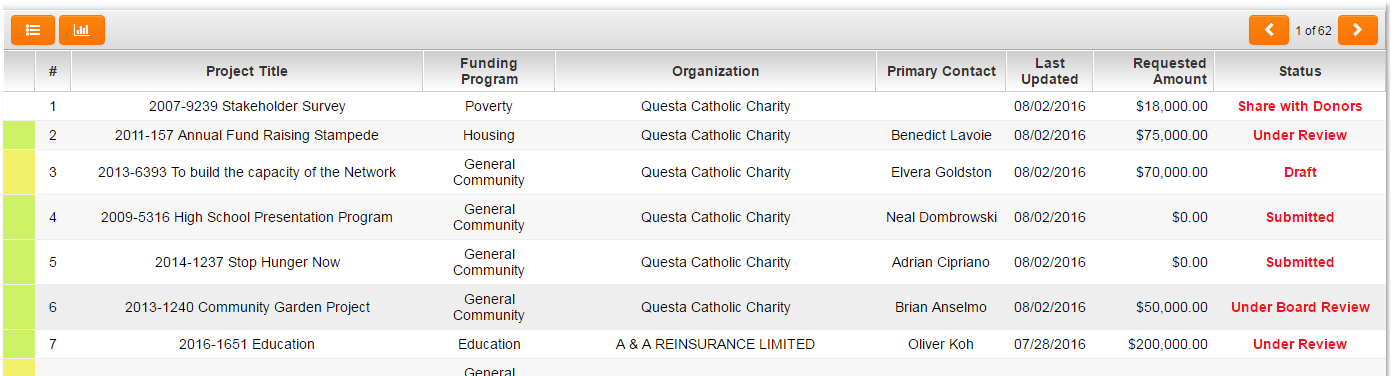
Table: Presented as tabular data.
Useful Tips for List Views
Enhancing the Speed of List View Searches
Several effective strategies for minimizing load times on a list view during searches include:
- Rather than searching “All Columns”, specify a particular column (field) by utilizing the column selector dropdown.
- Limit the number of columns displayed in the list view. Fewer columns enhance readability and comprehension (it is advisable to maintain 7 to 8 columns or fewer for optimal usability).
- Incorporate specific status/type filters (restrict searches to records of a particular status and type).
- Archive older records that may no longer be relevant.
- Refrain from using Display Text and Variable fields in list views. You can directly integrate organization and user information into the list view without employing display fields.
- If you possess a substantial number of records and real-time sorting, counts, or results are unnecessary, you may activate the Enable Quick Load feature found in the list view settings.
- Modify the Personal Setting titled List View Records Per Page. For instance, setting it to 20 records will result in faster loading compared to All records.
Accessing the List View Configuration Page
Most list views can be modified in real-time by clicking the wrench icon adjacent to the name of the list view.

Clicking the wrench will direct you to the configuration page for that record.
Below is a guide detailing alternative methods for accessing the configuration pages for the list views of various entities.
The terminology of your headings may vary depending on your SmartSimple instance. For instance, the tab names of Level 1 entity settings will differ based on the purpose of your UTA. Level 1-3 Entities typically follow a chronological left to right order after the General tab when accessing the Configuration Settings of a UTA.
| To Configure the List View For: | Navigate to: |
| Contacts, System-Wide | Global Settings > User > List Views |
| Organizations, System-Wide | Global Settings > Organizations > List Views |
| Level 1 Entities within a Universal Tracking Application |
1. Access the Configuration Settings of a UTA (gear icon) 2. Select the List Views hyperlink under the Level 1 Settings tab |
| Level 2 Entities within a UTA |
1. Access the Configuration Settings of a UTA (gear icon) 2. Select the List Views hyperlink under the Level 2 Settings tab |
| Level 3 Entities within a UTA |
1. Access the Configuration Settings of a UTA (gear icon) 2. Select the List Views hyperlink under the Level 3 Settings tab |
| Associations | Global Settings > Association Settings > List Views |
| Workflow Requests | Refer to Workflow Requests List View |
| Transactions | Global Settings > Transactions > List Views |
Differentiating Between Reports and List Views
When should one utilize a List View, and when is it more appropriate to generate a report?
A report is warranted if your situation meets at least one of the following criteria:
- You require more than 30 columns
- You require formulas or calculations
- You need more complex aggregations than a simple total (e.g., count distinct, minimum, maximum, sum, group by, total by)
- You necessitate an OData connection or need to link multiple datasets that are not automatically connected (e.g., multiple UTAs)
Note:
- Reports are more sensitive due to the following reasons:
- only 5 criteria are permitted, in contrast to the limitless criteria available in a List View
- require more expertise in SQL and reporting (although this is manageable for users familiar with MS Access or Tableau, as the principles are similar)
- less dynamic in nature.
- Reports are more sensitive due to the following reasons:
Quick Edit
Quick Edit is a functionality that enables users to modify fields within a record directly from the list view. The system administrator determines which fields are displayed in the Quick Edit pop-up via the list view configuration page.
Configuring Quick Edit
To configure Quick Edit for a specific list view, please follow the steps outlined below:
1. Navigate to the List View Configuration Page.
2. Select the desired list view from the left-hand list (please note that Quick Edit is exclusively available for System Views, not Personal Views).
3. Activate the "Enable Quick Edit" option under "Other Options" and click "Save":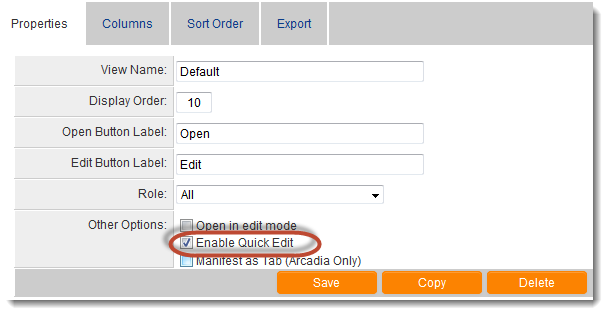
A new tab labeled "Quick Edit" will now appear between the "Sort Order" and "Export" tabs.
4. Optional: If you wish to modify the label of the Quick Edit button, you may enter a new value in the "Edit Button Label" field, as illustrated here: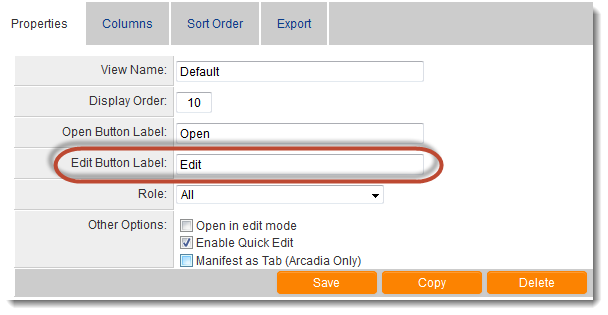
5. Click on the Quick Edit tab and, in the "Enable Fields for Quick Edit" section, select the fields that you would like to display in the Quick Edit pop-up: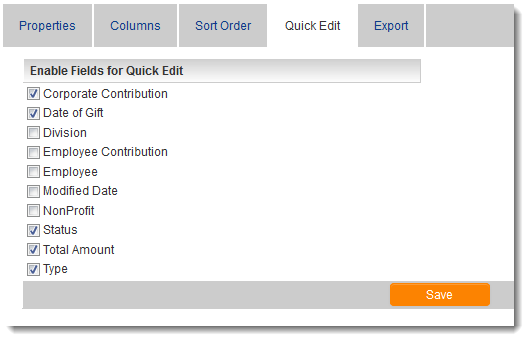
6. Click on the "Columns" tab.
7. Choose the column in which you would like to display the Quick Edit button.
8. Click within that column and select the "Show Quick Edit Button" option. The "@QUICKEDITBUTTON@" variable will then appear in the "Content Template" of that column. The Edit button will now be visible in the configured list view.
Quick Edit has been successfully configured. Clicking the Edit button will display the Quick Edit pop-up for that record, allowing for direct field modifications from the list view.
Validation
The data validation specified for each individual custom field is executed when modifications are made to field values through the Quick Edit interface.
Your system may have been set up to include custom validation managed by a browser script associated with a UTA record. In such instances, utilizing Quick Edit will bypass that validation.
Quick Edit and Record Lock
Please note that the Quick Edit feature will also circumvent any Record Lock configurations that have been implemented. Users may access the Quick Edit pop-up on a record simultaneously with other users, regardless of whether Record Lock has been activated.
Quick Edit and Field Visibility
Edit conditions can be established for individual custom fields using Field Permissions, the Field Permission Matrix, or by selecting "Read Only" within a field's Field Formatting Options. All of these conditions apply to the fields designated for Quick Edit. If a field is non-editable when displayed in edit mode on a record, it will likewise be non-editable via Quick Edit.
However, any visibility conditions configured on a custom field using Field Permissions, the Field Permission Matrix, or Visibility Conditions will not be considered when utilizing Quick Edit. Therefore, it is essential to consider whether a field should be visible to all users when configuring System Views and the Quick Edit feature.
You may edit individual custom fields and select the "Disable Quick Edit" option to prevent the field from being enabled for Quick Edit.
If no fields within the list view are editable by the user and the "Quick Edit" button is clicked, an error message will be displayed.
NOTE: Dynamic Control and Rich Text field types do not support Quick Edit functionality.
Fields associated with Dynamic Field visibility control will not be available for quick editing.
Exporting Currency Values to Excel from List Views
The export functionality for list views now verifies whether the Number Format of the referenced custom field is designated as Currency, subsequently removing the currency formatting.
This functionality is not applicable to Read Only - System Variable fields.
It is applicable when the field is a Store Value - System Variable that includes a variable such as
<!--hideifnotfound-->@xml.Hybrid Budget.Revenue.Grant.Rev-Amount.nodevalue@
and the Number formatting is configured as "Currency."
However, this will not function if the currency is defined within the variable, such as
<!--hideifnotfound-->@xml.Hybrid Budget.Expenses.Capital.Currency(Ex-Amount.nodevalue)@
Exporting List View Results to Microsoft Excel
A significant feature of SmartSimple list views is the capability to export list view results seamlessly to Microsoft Excel. Once your list view has been established, please follow the steps below to enable exporting to Excel:
- Navigate to the list view configuration page.
- Select the list view for which you wish to enable exporting.
- Click on the "Export" tab.
- Choose the
 option.
 - Click the "Save" button.
- The Export button will now be activated for your list view.
- You may also specify the desired location for the results of the list view export within the resulting Excel spreadsheet.
- Furthermore, you have the option to upload an Excel spreadsheet to be utilized as a template for list view result exports.
- SmartSimple employs specific protocols for exporting values formatted as currency to Excel.
Note:
- Buttons displayed on the list view, such as Quick Edit buttons and Web Page Views, will not be included in the export. Consequently, a blank column will appear in the Excel file for columns containing only buttons.
- In the Basic Search panel, when conducting a search on a custom field, an additional column is added to the list view to display the values for that custom field. This additional column will not be exported to the Excel spreadsheet; a separate list view export can be configured for that purpose.
CSV Data Security
When exporting data into a CSV format, files may become susceptible to malicious CSV injection attacks. As a precautionary measure, an additional space will be prefixed to any values commencing with at signs ( @ ), plus signs ( + ), minus signs ( - ), piping symbols ( | ), or equals signs ( = ). Therefore, when exporting a file from Platform3 into a CSV format and subsequently importing that file into another system, please ensure to remove the additional space preceding any values.