Overview
The Global Administrator is a user who oversees the entire configuration and environmental settings with the SmartSimple application, and is empowered to perform the following functions:
- Manage system security.
- Manage email integration.
- Manage JSON API functions.
- Create additional users at any level, including other Global User Administrators.
- Establish new sub-organizations.
- Subscribe organizations to SmartSimple application programs.
- Upload organizational and contact information for both internal and external organizations.
- Define custom fields for any SmartSimple object.
- Create roles and collaborative workflows.
- Enable & Disable user login access.
Notes
- As a security measure, when a new Global Administrator is created, all existing Global Administrators within that instance of SmartSimple will receive an email notification regarding the new administrator.
- If your user type is Global Administrator, you will have access to all items on the menu icon (the 'Display Menu Icon' option in role configuration). All selected/deselected items in 'Menu Items' will be disregarded, as you will have visibility of all items on the left-hand panel.
Enabling or Disabling Global Administrator Privileges
For a user to possess Global Administrator privileges, they must be assigned the togglable Role from within their User Profile's Edit Roles and Access
1. Access the profile of the user to whom you wish to assign the Global Administrator role.
2. Click on the Actions button located in the top left row of buttons; this will reveal a dropdown menu.
3. Select Edit Roles and Access.
4. On the right side of the first line, there will be a toggle on/off function labeled Global Administrator.
- By activating this option, you are granting this user Global Administrator privileges.
- By deactivating this option, you will be removing them from the Global Administrator role.
5. Click Save to confirm that the role has been added or removed.
System Administrators - Security Permissions
In addition to enabling the Global Administrator role via the toggle option in the specific user profile, it is essential to ensure that the alternative System Administrator role, the general administration Role for users within your system, possesses the appropriate security permissions. After creating a System Administrator Role, to access the Organization and User Security Matrixes first navigate as follows:
System Administration (gear icon) >> Security (tab) >> Security Matrix
- For the Organization tab, scroll down the list of user roles until you locate the System Administrator role. Click on it.
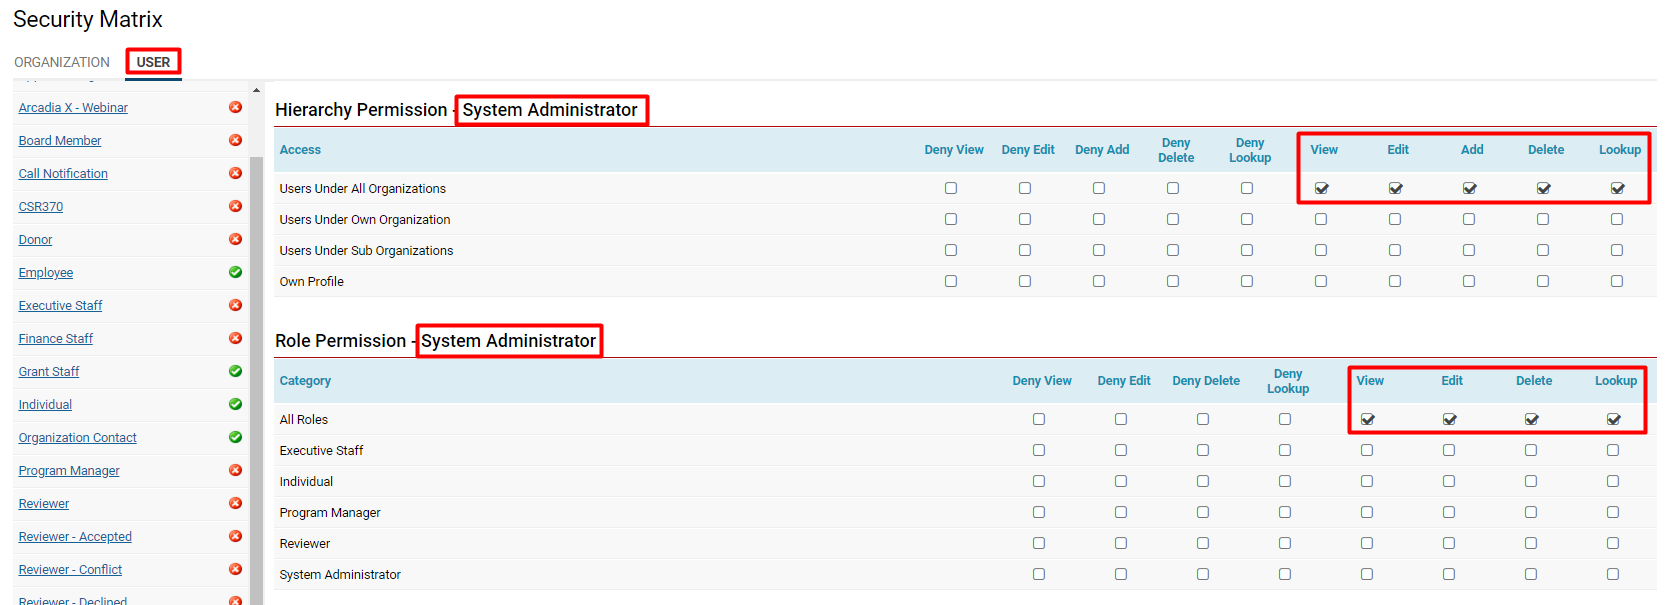
- Review the following options for access and permissions under each row that mentions All: View, Edit, Add, Delete and Lookup.
- Click on the User tab and repeat the step above.
- Click Save upon completion.
- When you have configured the security matrix for a role, a green check mark should appear next to the role name on the left-hand list. This indicates which roles have or have not been granted access to system features; this is also where you can verify if a user role lacks access to certain functionalities that they should possess.
Your security matrix for a System Administrator should therefore resemble the following:
Other Permissions
The System Administrator role should also be granted permissions to access additional functionalities within the system; for instance, it is important to ensure that the role has the capability to set, activate, modify passwords, and edit email addresses for all other users within the system.
By selecting the System Administrator (gear icon) and navigating to Global Settings, you can efficiently assign permissions to the System Administrator role across multiple areas of the system. Key areas include:
Utilize the search bar located in the top right corner to conveniently locate hyperlinks in Global Settings.
- System Visibility Permissions
- System Feature Permissions
Additionally, you can assign permissions to the System Administrator role by navigating to:
System Administration (gear icon) >> Roles and Security >> User Roles
